Japan - Epilogue - Travelling with Film Photography
Temple complex in Kyoto. Praktica LTL, 50mm Meyer-Optik Domiplan Lens, Kodak Portra 400,
First Trip Abroad with Film
One Camera, one lens, one film stock. That’s how I approached my first trip abroad shooting film. A fitting assignment, I think, considering the countries’ own reputation for blending the new with the old. What follows is a few of my learnings for would-be film photography travelers. Of course, I’m an enthusiastic amateur rather than a pro, so take what you like, throw away the rest, and share your own thoughts in the comments at the bottom!
Harbour View in Wakayama, Praktica LTL. 50mm Meyer-Optik Domiplan Lens, Kodak Portra 400
Read the full Japan series:
Tokyo → Kanazawa → Koyasan → Hiroshima
The Camera
I chose my camera for this trip based on availability and price. Availability being immediate, as I found it in dad’s basement, and price being free for the same reason. I’ve subsequently picked up quite a number of other film cameras (Gear Acquisition Syndrome is real, folks) and my go-to film camera for travel has shifted to the venerable Nikon FE with an Olympus XA as back-up. Regardless of what camera you bring, from TLR to Point & Shoot, it’s a good idea to develop some proficiency with it before leaving for your trip. This includes challenging weather and lighting conditions and different film stocks in order to learn what the output looks like in each case.
The Praktica being fully manual, albeit with an effective light meter, it was easy to get things wrong in the panic of trying to capture a decisive moment. I only put a couple of rolls through it before leaving for Japan and that was probably a mistake. Investing more time in advance would likely have meant more “keepers” on the trip itself. Here are some other tips related to choice of camera:
Simpler, in general, is better: Film Cameras are aging, and in some cases that means failing. This is more of a problem for point & shoots which rely on electronics and servo motors that are starting to get beyond their “best before” date. A mechanical shutter and focus system, if well maintained, should last a very long time, and in many cases are repairable. An SLR and a point & shoot in combination could make a mighty pairing.
That said, does it have shooting modes? Later film cameras benefitted from better light meters and electronics that allowed them to shoot in semi auto modes such as Aperture priority. This can help take one more item off your mind to allow you to concentrate on focus and framing. The Praktica is fully manual with stop-down TTL metering, but my Nikon FE shoots aperture priority when in “auto”. I never use that feature, however; as I find it has a tendency to overexpose when doing so.
A bright viewfinder: Traveling can mean shooting in challenging lighting conditions, can you see the light meter in your viewfinder, or confirm your focus? This was something I took for granted when I started this trip, and luckily the Praktica performed well, although occasionally I’d loose sight of the black exposure needle in lower light situations. The light meter lever moves slowly on the Praktica, so a trick I learned was to quickly point towards something bright and see where the needle was before it jumped. Far from perfect, but it did help on some occasions.
Pick the package: Do you want to carry a bag of lenses and stuff? Or, are you comfortable that you can shoot with one lens and make the most of it? (potentially saving a fair bit of weight in the process) I’ve done it both ways, there’s no right or wrong answer here. Sometimes the tyranny of choice gets in the way, others you might find yourself thinking “if only I had a wide angle…”. Err on the side of simplicity for your first time out. If you are shopping for a bag to carry your equipment, by the way, this one by Peak Design is my favorite.
Are the batteries still available: Do some quick research on the type of battery the camera you’re considering purchasing uses. There are some where the original battery no longer exists, although people have found workarounds in some of these cases. Check the battery compartment for corrosion as well!
Hiroshima Cyclist, Praktica LTL. 50mm Meyer-Optik Domiplan Lens, Kodak Portra 400
What to pack
Here’s a quick list of what I’m packing with film photography in mind on a trip:
Basic Cleaning kit: A puffer, brush and some dedicated wipes are really all you need. I often have one of those cleaning “pens” in my bag as a matter of course.
Spare Batteries: I have literally used the same batteries that came in most of my film cameras for years now. In general, they just don’t drain much power. That said, and especially if you bought yours with a battery of unknown provenance, grab a couple of spares. They add no appreciable weight, and you may not find them if you need them where you’re headed.
Film: How much, what brand, what iso, color or black & white are all factors to consider.
If I’m going somewhere bright and sunny (or at least, I hope it is when I get there) I’m typically comfortable going with ISO 400 or even lower to something like an Ektar 100. Keep in mind if you still have half a roll of 100 in the camera when you’re heading out for a night on the town, you’re likely leaving that camera at your accommodation. It’s tempting to go low ISO for landscapes, however; when you’re aiming for minimal grain and beautiful color rendering.
I’m more accustomed to shooting color than b&w, so that’s my first choice. That said I have done b&w only trips, and it can make for an engaging project that might just challenge how your look at the world and light in particular. There is some glorious b&w film out there to try out, including my current favorite, Ferrania’s gorgeous P30.
Film brands are a matter of taste. For some reason I’ve gravitated to Kodak for color but given I’m partly colorblind, your mileage may vary! I do note it’s quite consistent from roll to roll, as is Fujifilm. With some niche brands I’ve found occasional issues with the emulsion that seem like bubbles or waves in the edges of the image.
Spare Camera: Not required, but it’s a way of overcoming some of the issues noted above. For example, the venerable Olympus XA which I once wrote an article on for Emulsive (here) is tiny and pocketable with a stunning lens. I don’t mind bringing that along with a different film stock in it, such as a black and white or low ISO option. Or, perhaps pack a digital point & shoot? There’s no sticking to dogma on this blog, so I certainly won’t judge you for mixing mediums, many pros do just that!
Tripod: I’m yet to travel with one but even just writing this article I’m realizing what a good idea it is, if you can make the space. A lightweight tripod could be extremely helpful when you have lower ISO film in your camera and sub-optimal lighting.
If I had to pick one lens: All of my Japan photos were taken on a cheap and cheerful 50mm Meyer-Optik Domiplan f2.8 lens. The 50mm focal length is generally regarded as quite versatile, but with this particular lens sharpness definitely suffers the more open the aperture. The photos remain quite pleasing despite that weakness (wabi-sabi, I think, is the Japanese term I’m looking for here), with an almost dreamlike quality to them and enjoyable bokeh. So, would I use that one again? Not exclusively. I’ve gotten wider with age (ha!) and would probably pick a 35mm if I were to only take one. I have done trips with a 20mm Nikkor f3.5 on my Nikon FE and that can get addictive as well. What should you take? Provided you’ve had a bit of practice with it/them there really isn’t a wrong answer.
Dreamy Vision of Gardens in Kanazawa, Praktica LTL. 50mm Meyer-Optik Domiplan Lens, Kodak Portra 400,
The Airport
Don’t stress. We’ve all heard about the dangers of airport x-ray scanners to film. In reality, with anything under 800 ISO I haven’t seen any issue, despite even two or three passes through x-ray machines. That said, if you can avoid it, why not try?
Be Polite: Easy, right? The security clearance staff have no doubt heard the argument before about damaging your film. Most would roll their eyes but if I was humble in my request, and there wasn’t a crazy huge security line, they’d often hand-check my bag of film. It’s important to have it ready before they ask, and organized in a clear plastic bag. Japan, China, Spain, Slovakia, Croatia, even London Heathrow hand checked my film when I asked nicely. The only time I was flatly refused was Vienna airport. You win some you lose some.
The Burner Roll: I don’t recall where I learned this technique, but essentially you choose a sacrificial roll of high ISO film (Ilford Delta 3200 for example) and ensure it’s prominent in your film bag. High ISO film will not tolerate xray machines and in some airports there’s even signage saying so. Displaying this to the security team may get you an extra ounce of sympathy to get a hand-check of your entire film collection.
Airport Security asking me to take a photo to prove the camera works…I never did mail them the photo. Praktica LTL. 50mm Meyer-Optik Domiplan Lens, Kodak Portra 400
The Routine
In the morning, I’d look to see how many shots I had left on a roll and typically plan to take an extra roll or two with me depending on how long we were going to be out. Speaking of the roll, while most rolls of 35mm film are designed to give 36 shots, I’ve often found I can get 2, 3,+ more if I’m careful about how I load my film. Once it’s engaged I’d give the film advance one full click then shut the rear, then one full click more and start my shooting. Occasionally you’ll end up with a “first of the roll” image with a partial light burn on the side, but this can actually make for an interesting effect (or happy accident). Ensure you feel some resistance in your film advance. I’ve been lucky to only once shoot an entire roll only to find out it didn’t properly catch and I got exactly zero images out of it.
With film photography, there’s no checking if the photo turned out, just shoot and go. Obviously, there’s risk in this, but I feel it also unencumbers me, allowing me to be more present in the moment and leaving capacity to maintain my attention on the world around me to look for the next opportunity that catches my eye. Many digital cameras allow you to switch preview off (or like the X-Pro 3, hide the screen), so this isn’t exclusive to film but it certainly eliminates the temptation. The pitfall of this is the lack of immediate quality control. There’s no reminder or feedback for potentially forgetting to check some key settings before taking your photographs. For example, whether your ISO is set correctly for the film you’re using. When shooting a single filmstock it’s a non-issue, but swapping between different films it’s easy to forget to change the ISO accordingly.
Depending on the length of your trip and your workflow when you get home, it can be quite some time before you review the pictures you took and by then you can forget a lot! Immediately sort and label your images when you receive/create your scans. I also generally try to take notes in a little notebook to remind me where I was, or which film and camera I was using. I’m beginning to sound like an analog snob…
Kyoto Streets, Praktica LTL. 50mm Meyer-Optik Domiplan Lens, Kodak Portra 400
Getting the most out of your photos
If you develop your own film, I take my hat off to you. I have neither the time nor enough skill to be confident in doing so, yet. I’m fortunate to have a lab in Vancouver that I trust for developing, printing and scanning my shots (Rocket Repro), and there are also great mail-in services still available in North America and no-doubt other continents. I don’t print every shot on every roll, rather I review the scanned copies and then decide what I’d like to do with them. I’ve printed a number of sizes and formats from simple 4x6, to a roughly 37x72 landscape that hangs in the dining room. I also enjoy creating photobooks (thus far using google photo) and do flip through them often. Film photos look glorious printed though, so I do strongly encourage doing so. It’s what they were always meant for.
In any of these cases you should prepare to do some minor editing depending on the result of your scans. A high quality scan still isn’t going to be as malleable as working with a RAW file, but you’d be surprised what you can recover in highlights and shadows. It’s generally easy to recover a slightly over or under exposed image. It feels pretty great though when a roll comes together with a great scan and almost/no editing at all is required. This is a neat facet of shooting with film in the modern era, your “presets” are already dictated by the filmstock you’ve chosen!
A lesson I learned from my friend Farzaan at fcracer.com in his post here, is not to shy away from cropping photos. While most images I share in the same format as the image comes out, there are definitely cases where a well thought out crop can demonstrably improve an image, or perhaps, align it more so with the photographers’ vision. The effective digital resolution of a 35mm film image is quite high so you can safely crop a fair bit. I’ve read it can be anything from 21MP to 80+MP, depending on the film and scanner used, but there seems to be a lot of debate on the topic and needless to say, film photography is not for pixel peeping. Some labs will offer a higher resolution scan for large printing purposes, but the cost to do so increases significantly from a standard scan. Keep your negatives, and if you find a keeper you’d like to enlarge and print, have the lab re-scan the specific image at high resolution to maximize your subsequent print quality.
Temple Complex in Kyoto, Praktica LTL. 50mm Meyer-Optik Domiplan Lens, Kodak Portra 400
The People
There’s a delightful tactile experience to using a manual film camera. It’s not unlike the appreciation for mechanical watches over digital. Anachronistic, sure, but special and still remarkably capable. You can tell by the nods of appreciation from certain passers by when seeing what’s hanging around your neck that film photography still carries a special places in many hearts. That connection, particularly when you meet another film photographer “in the wild” can make for great conversations and experiences, so don’t shy away from making those connections when you can!
Taking photographs of people, be they locals or other tourists can add more dimensions of context to your travel photos. No difference conceptually here between film and digital, but be mindful that some film stocks are better suited to candid portraiture than others. As always, check local laws and customs on photographing strangers in public and smile when taking the photo.
Harajuku, Praktica LTL. 50mm Meyer-Optik Domiplan Lens, Kodak Portra 400
The Cost
In a recent video, street photographer Samuel Lintaro Hopf mentions that Kodak is increasing the price of it’s film by up to 40%, apparently in response to it’s skyrocketing popularity and low supply. This highlights just a part of the increasingly challenging economics of shooting with film for amateurs. It’s pretty easy to calculate the cost per image, factoring in the cost of a roll of film plus the cost to develop & scan. Even film camera prices are inflated, though I find local online peer to peer marketplaces generally are the best places to find a deal followed by local shops with used and consignment items that in some cases are even tested.
I choose not to do the math, only because I prefer not to associate each click of the shutter release with a dollar amount. But ultimately, it would be foolish to ignore it entirely. For candid family snaps, picnics, and life around the house I’ll rarely take a film camera out; choosing instead the versatility of Fujifilm’s excellent Xpro-2, or even my cellphone in a pinch, though the latter is my least favorite way to capture an image. Like any hobby, you must decide what it’s worth to you, and budget accordingly to enjoy it. Many photographers I follow still work with both film and digital depending on the project they’re working on, or indeed what they feel will get them motivated creatively that day.
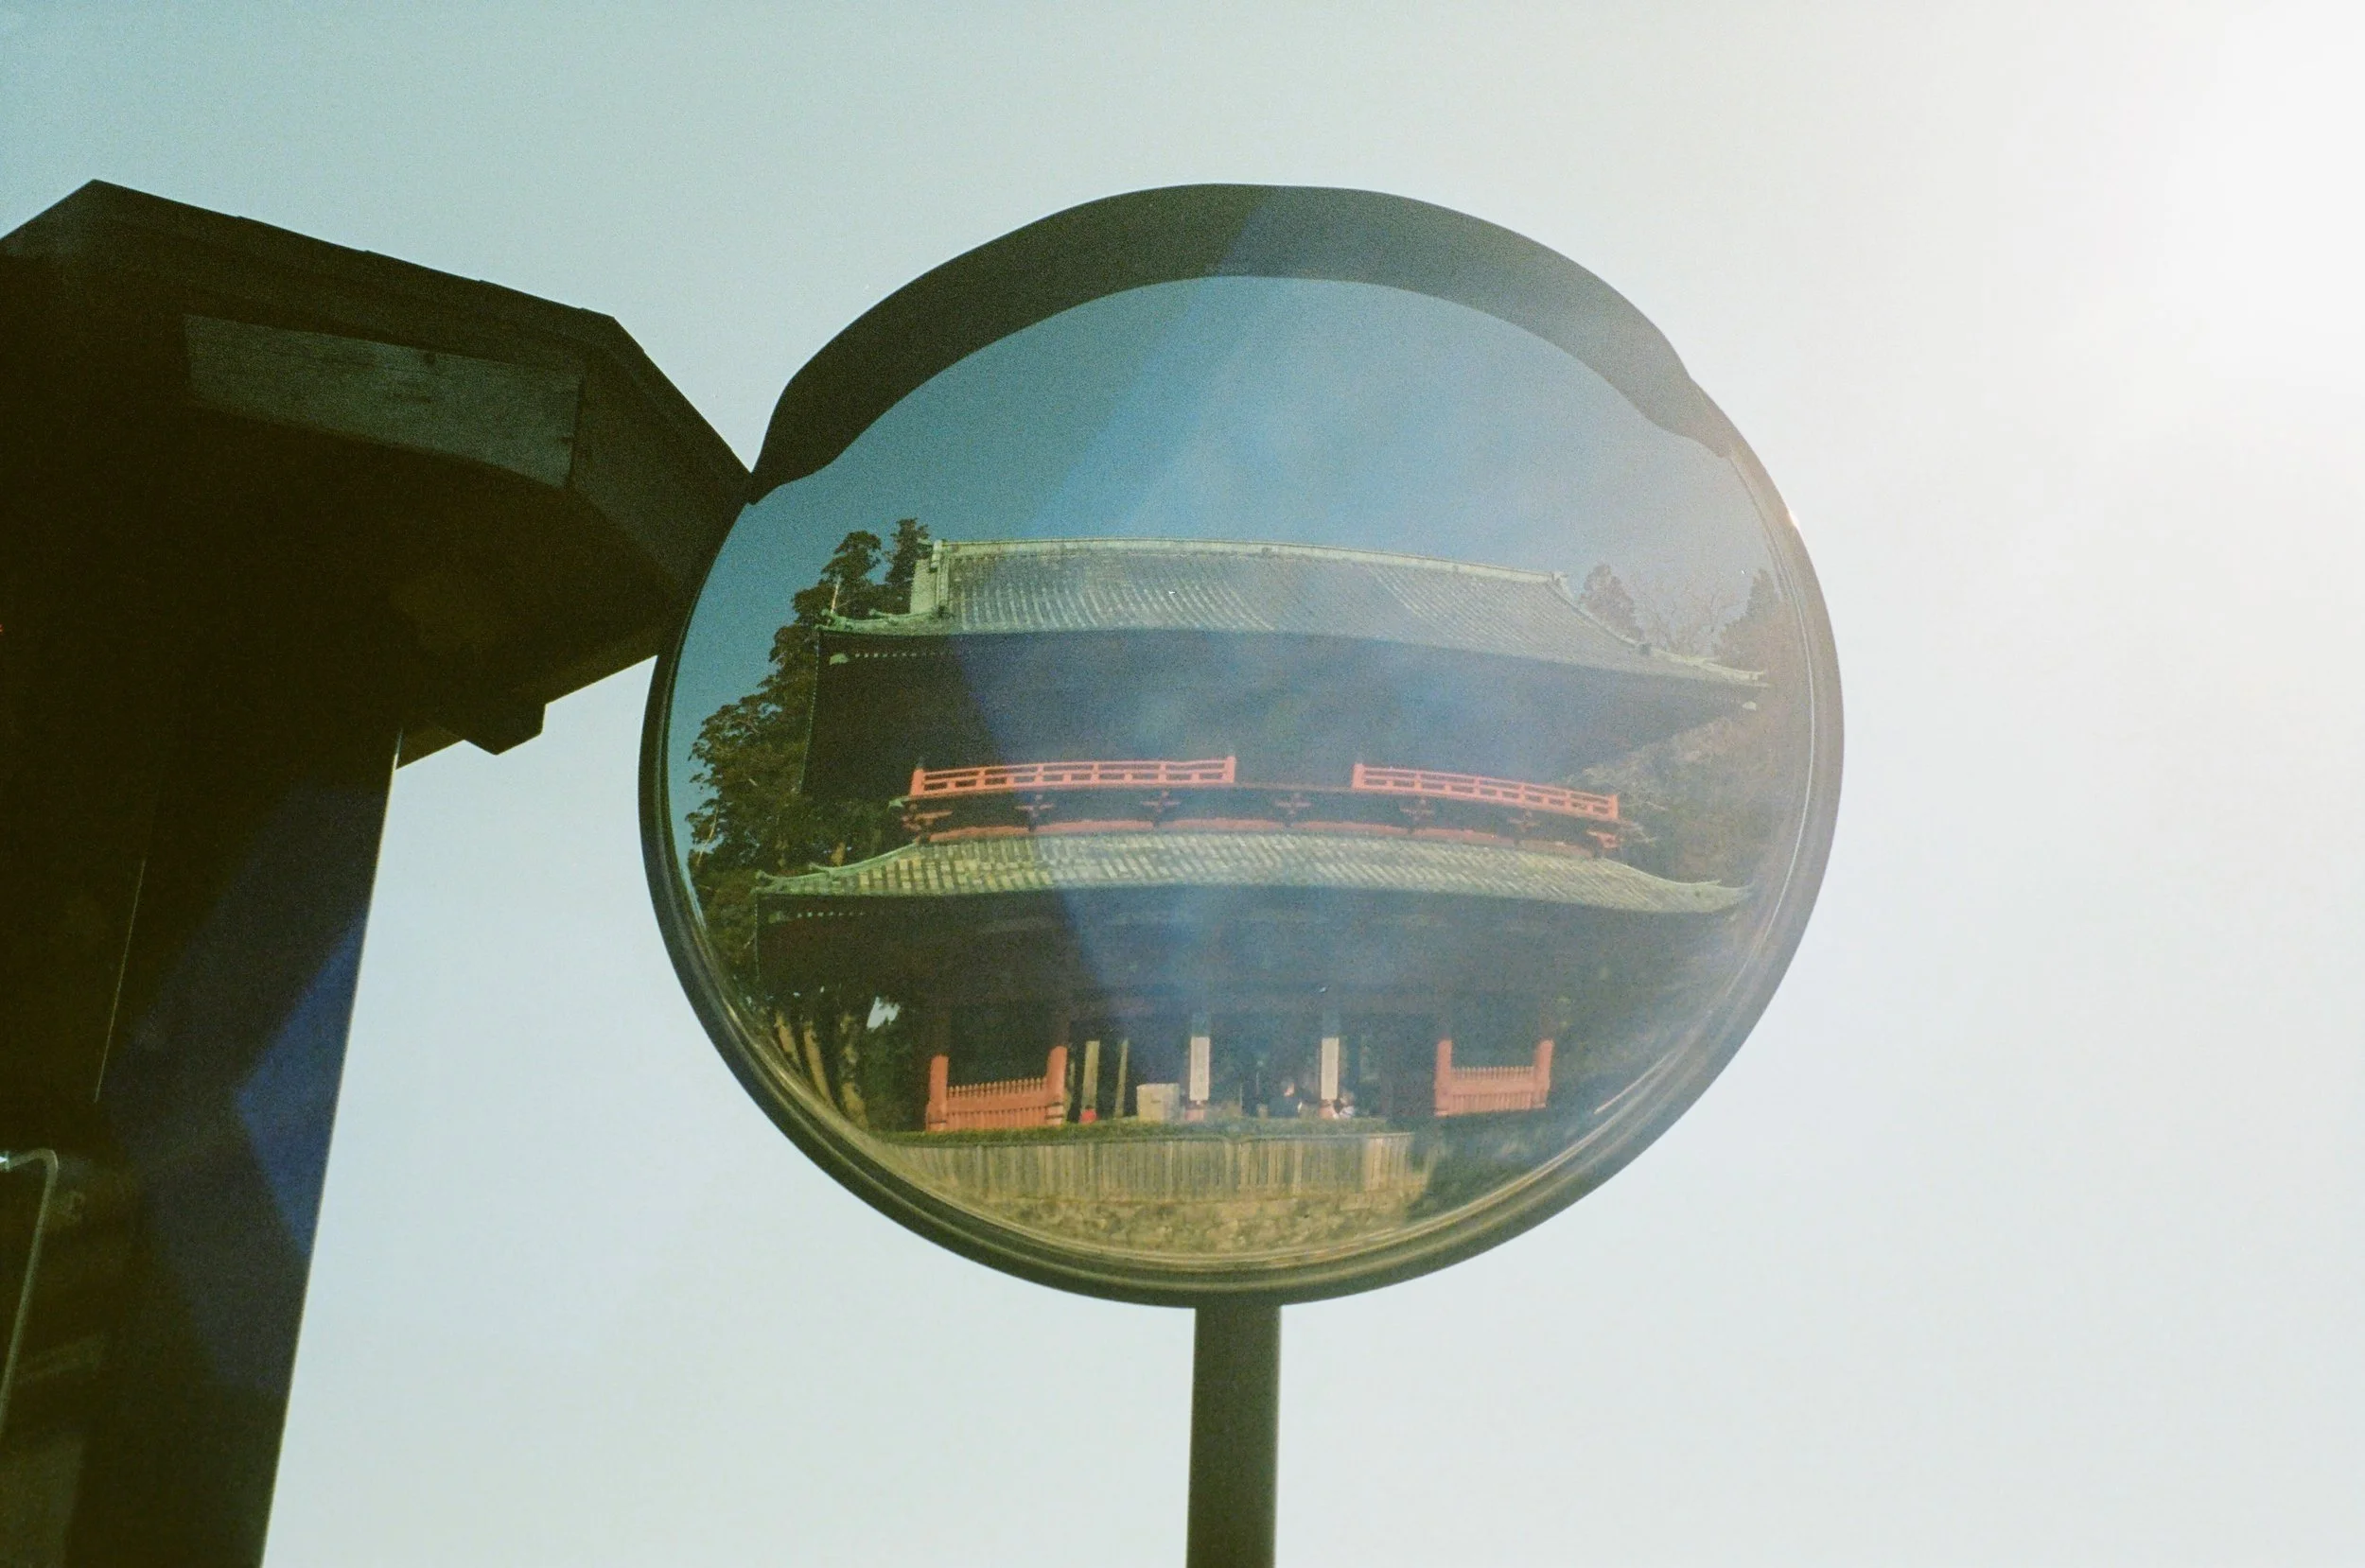
Daimon Gate reflected in a traffic mirror, Koyasan, 50mm Meyer-Optik Domiplan Lens, Kodak Portra 400
I’ll be Back
I hope you’ve enjoyed this short series on Japan, as well as my experience on this first trip abroad with film photography. As always, I welcome your comments and ideas, and most of all hope I’ve provided some inspiration to visit these places and share the images you capture there. At the time of writing I’m planning another trip back to explore more of this beautiful country. What camera will I take on my next travels there? Film and/or digital? Well, I may not be able to help myself this time as I’ll certainly be taking more than one, but a hint would be that Daido Moriyama had some influence on my decision, and it’s going to be fun.