
Blog
From cobblestoned Portuguese alleys navigated one-handed with a stroller to reef dives in Fiji, this is where the trips live. Told through words and whatever camera happened to be with me.
I shoot film and digital and travel with family in tow. These posts are part travel journal, part photography log, and part love letter to the places that made an impression. I hope they make you want to go see them for yourself.
Latest Articles


Mallorca - Soller
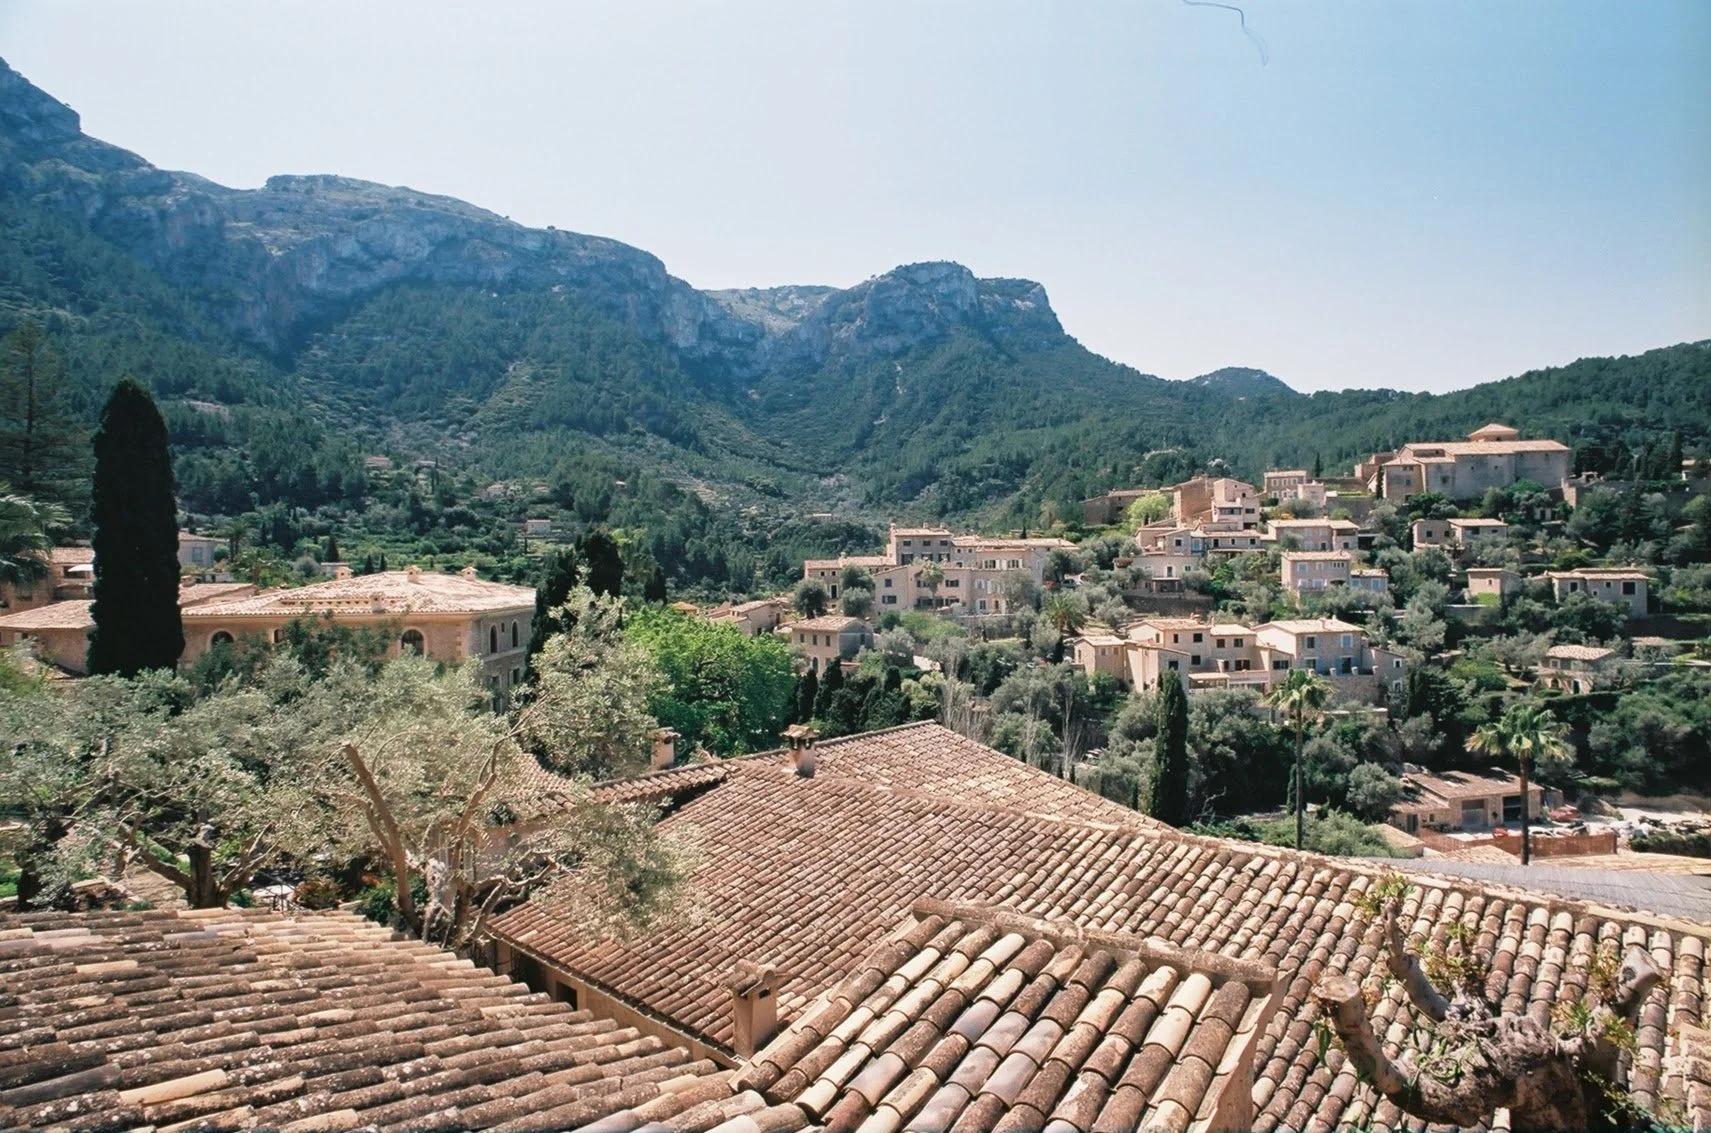
Soller was buzzing with activity when we were there. While there were plenty of tourists, it’s clear that there is a large local community here and the buzz of them going about their day creates a great vibe in the town center. While bigger than Deia, Soller is by no means large, and exploring it on foot is the best way to go for the most part, especially with the aforementioned narrow lanes.
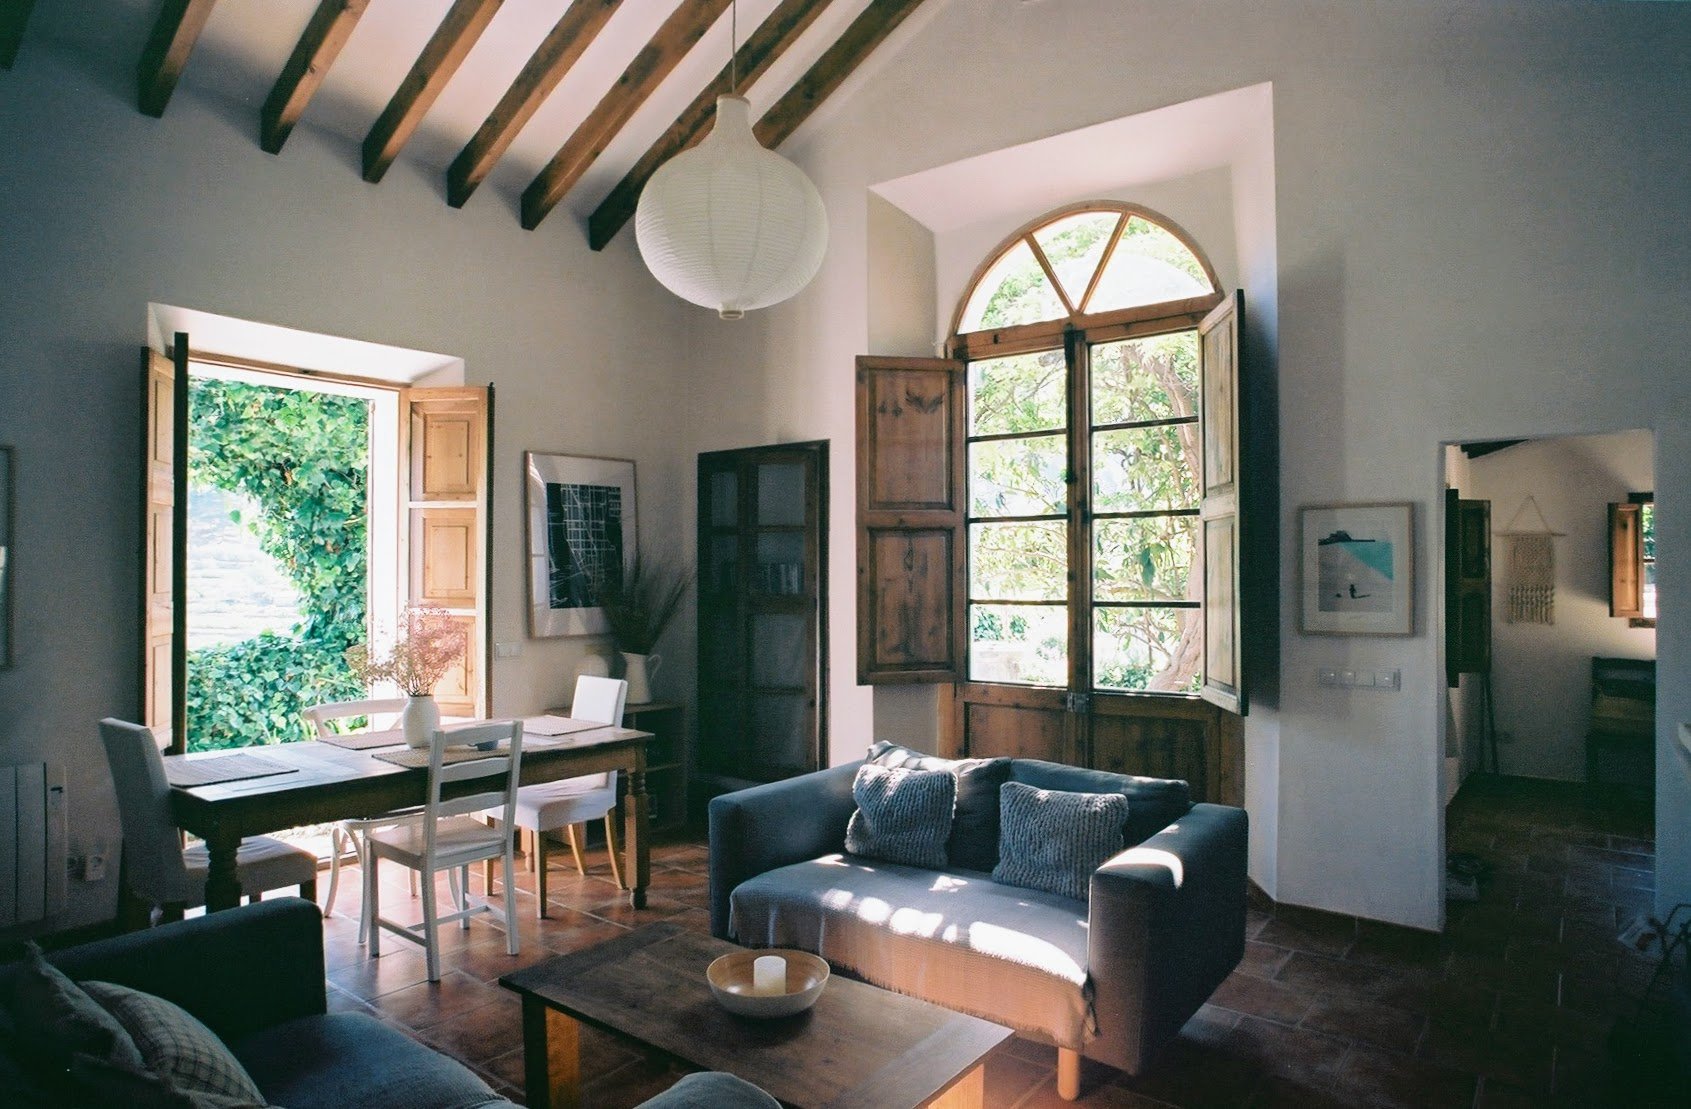
View from the living room, Soller, Mallorca, Nikon FE, 20mm Nikkor Lens, Kodak Portra 400
Read Part I: Mallorca - First Taste of Spain →
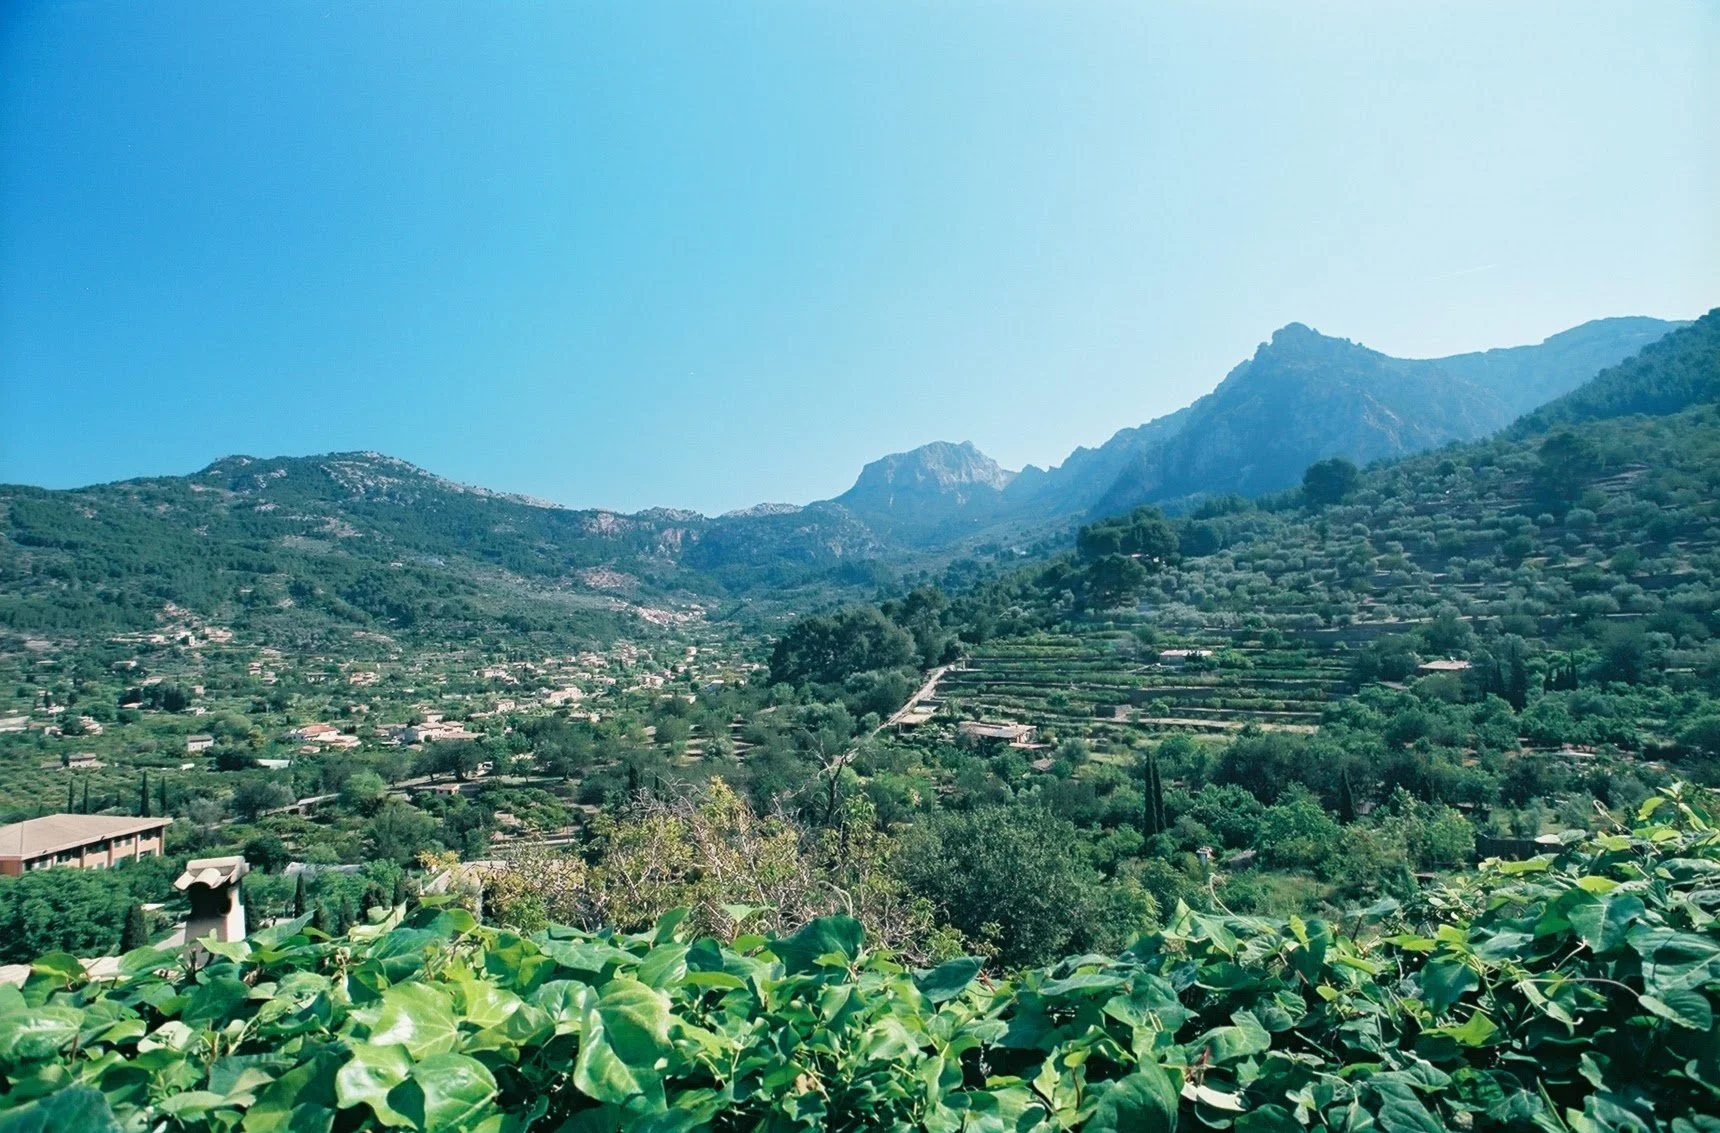
After a beautiful stay in Deia, we drove just 15km or so to our next destination, a small villa we booked in the hills above Soller. The drive, like most on the periphery of the island, is winding and beautiful, with scenic vistas at every turn. It’s also quite narrow, with no passing lanes and many cyclists, so always bank on it taking about double the time you expect. Soller occupies a broad valley and stretches right down to the sea at the westernmost end (Port de Soller). As I dutifully followed google maps towards our stay we quickly encountered a bit of a snag. The route took us through the heart of the city, and as it did, the road got narrower and narrower until our right and left side tires were squealing along the curbs! It got worse before it got better as we came up to a 90 degree right hand bend. Through a feat of geometric genius, we managed to navigate the gauntlet and thankfully the road widened on the other side. Lesson learned, if it’s getting skinny, get out and scout on foot first!
Not entirely sure I was supposed to drive this way, Soller, Mallorca, Nikon FE, 20mm Nikkor Lens, Kodak Portra 400
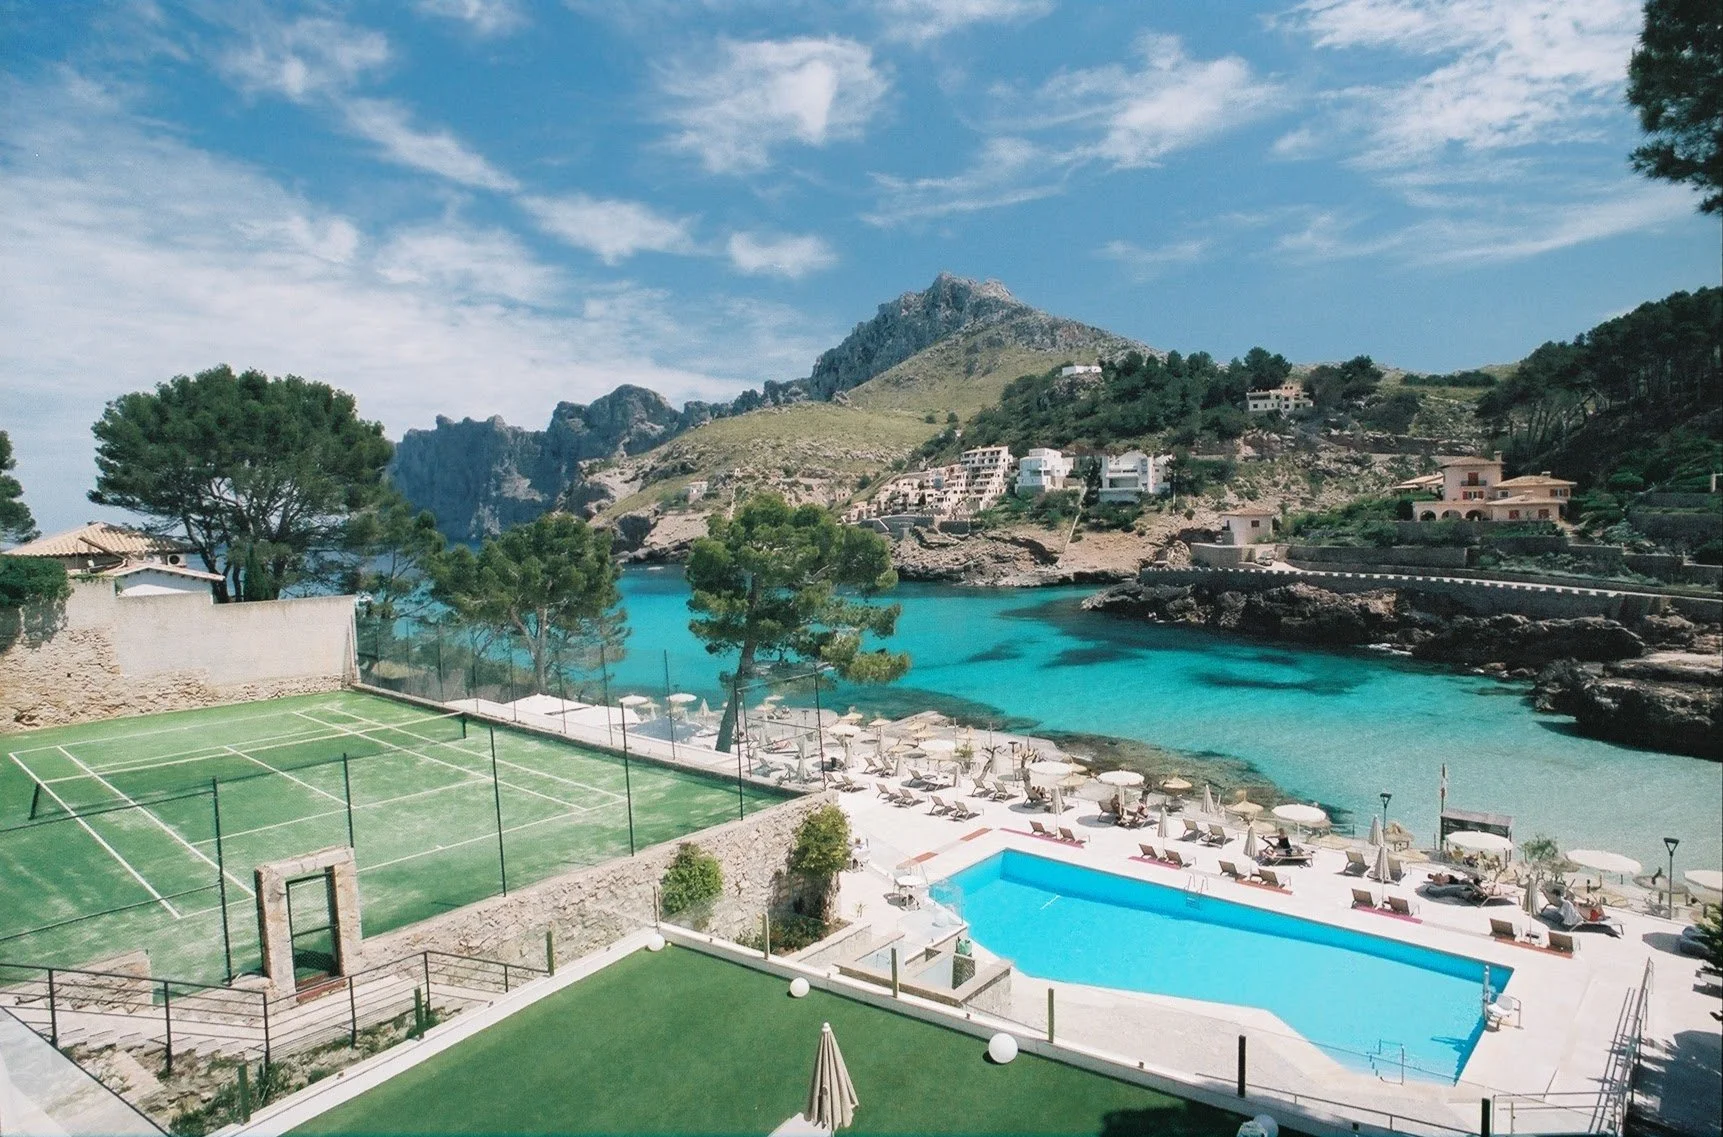
Casa Azva
I really wanted to experience at least one private stay on this trip, and this would be it. We booked Casa Azva on AirBnb after a protracted, indecisive search online on various booking sites. Mallorca is absolutely full of villa stays, and in the shoulder season many are incredibly good value, so it can be tough to choose. In our case we wanted someplace quiet with a view, and scored 10/10 on both points. The challenge here is that your vehicle parking is at the bottom of the property, so you need to be comfortable with a 5 minute walk up the occasionally steep hill to your accommodation.
The villa itself was quaint and cozy, with two bedrooms, a full kitchen and a wood burning fireplace that we made good use of in the cool evenings of the mountainside. The villa is located on the outskirts of Soller near the village of Biniaraix, it’s about a 20min walk into town but we usually drove given the unpredictable nature of travelling with a little one. There are a few restaurants near the accommodation and many hiking trails in the hills behind for those feeling adventurous!

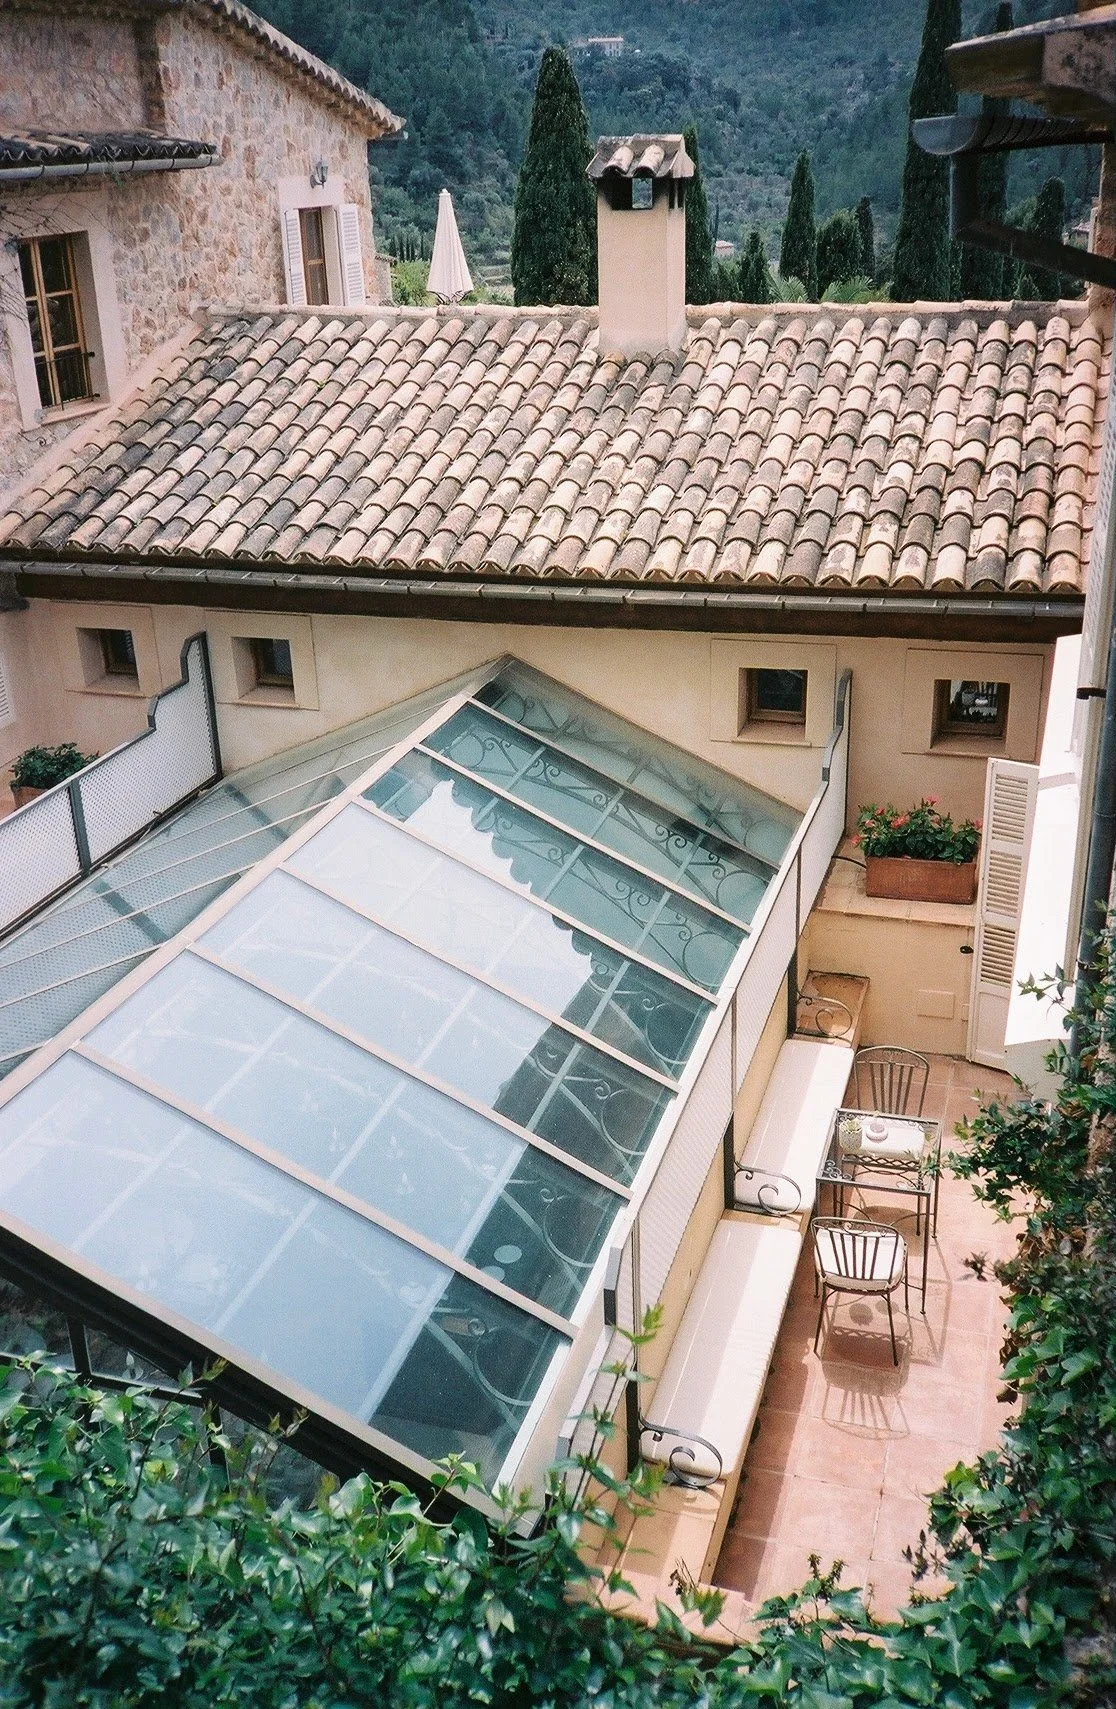
Casa Azva, Soller, Mallorca, Nikon FE, 20mm Nikkor Lens, Kodak Portra 400
Casa Azva, Soller, Mallorca, Nikon FE, 20mm Nikkor Lens, Kodak Portra 400
View from our yard, Casa Azva, Soller, Mallorca, Nikon FE, 20mm Nikkor Lens, Kodak Portra 400
Living room, Casa Azva, Soller, Mallorca, Nikon FE, 20mm Nikkor Lens, Kodak Portra 400
Around Town
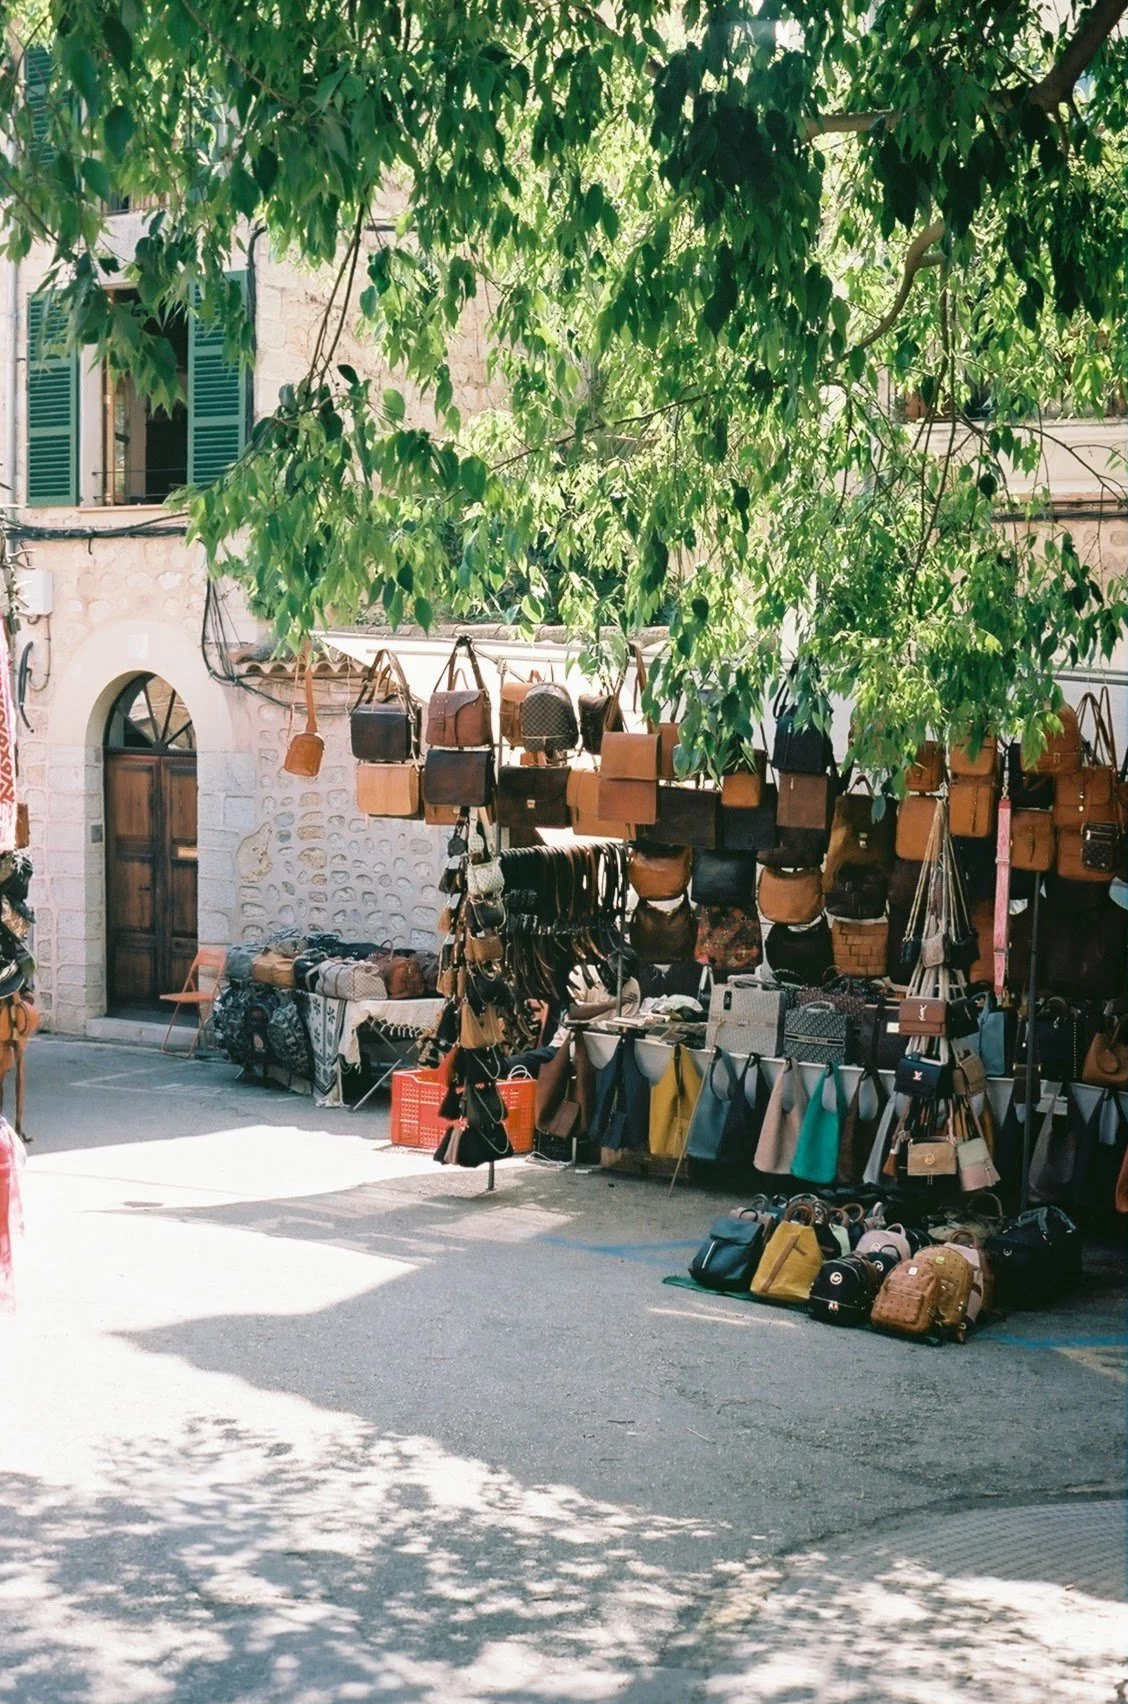
Soller was buzzing with activity when we were there. While there were plenty of tourists, it’s clear that there is a large local community here and the buzz of them going about their day creates a great vibe in the town center. While bigger than Deia, Soller is by no means large, and exploring it on foot is the best way to go for the most part, especially with the aforementioned narrow lanes. Hungry and want to try a great local snack? Ensaimadas, are a local delicacy available fresh or pre-packaged in many if not all of the local bakeries. Essentially a sweet bread with powdered sugar on top, it’s a tasty treat for between meals. Fresh squeezed juices are also available from some shops and these are both tastier and less costly than bottled drinks. To try more local fare, or bring some fresh food back to your villa to cook-up yourselves, try the Mercat-Municipal; a large indoor market with butchers, bakers, fish and fresh local produce.
For us, one of the highlights of Soller was simply sitting outside a cafe sipping espresso and watching the world walk by, but as with all such trips we needed to do some exploring, and Soller has a particularly beautiful way of helping you do just that. The town is bisected by a tramway that carries the Tren De Soller, a vintage light-rail carriage that takes you on a 5km journey from near the the city center at the Plaza de la Constitución to the beautiful harbour village of Port du Soller (with a few stops along the way). While you don’t need to ride the Tren to explore Soller itself, it is the ideal way to visit Port du Soller for it’s beaches and seaside cafes and bars.
The Tren de Soller passes right through the central square in Soller, Mallorca, Nikon FE, 20mm Nikkor Lens, Kodak Portra 400
“For us, one of the highlights of Soller was simply sitting outside a cafe sipping espresso and watching the world walk by.”
Plaza de la Constitución, Soller Mallorca, Nikon FE, 20mm Nikkor Lens, Kodak Portra 400
A few more tables and kiosks outside the Mercat-Municipal, Soller Mallorca, Nikon FE, 20mm Nikkor Lens, Kodak Portra 400

Soller Mallorca, Nikon FE, 20mm Nikkor Lens, Kodak Portra 400
Soller, Mallorca, Nikon FE, 20mm Nikkor Lens, Kodak Portra 400
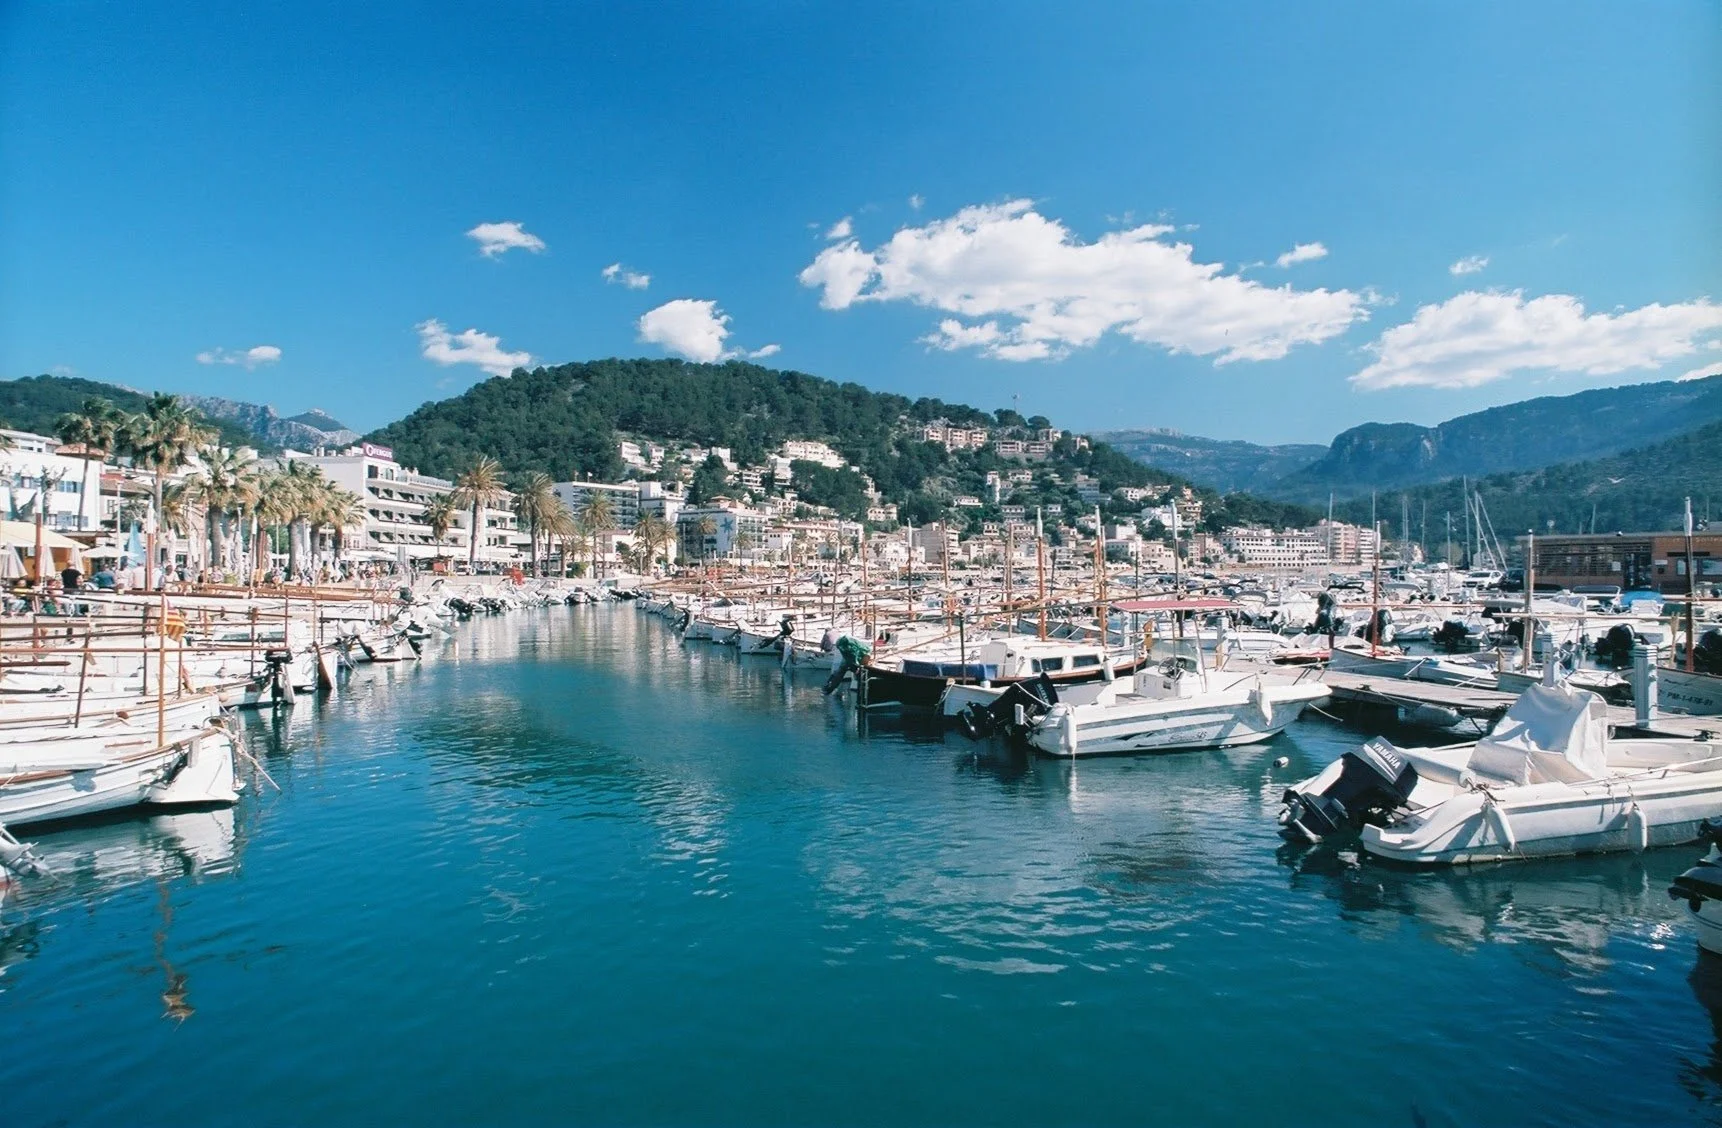
Port Du Soller
Port Du Soller is the beautiful seaside sibling to the more densely laid out Soller. Built around a bay with a narrow opening to the Balearic Sea, this little town may just be the archetypal southern European beachfront village. The Tren line runs along the east bank of the bay, covering about half it’s circumference with a few stops along the way. We found it best to hop off at the very first stop as the rest of the town is very walkable and indeed that’s a great way to enjoy it. We spent a bit of time on the beach, but late April proved a bit cool yet for swimming (I tried). There are many restaurants all facing inward towards the water and a beautiful marina where I’m sure boat rentals and charters are an enticing option, but we weren’t going to try that with our 6 month old in tow.
The Port is a great place to spend a day, and while it’s clearly “touristy” it doesn’t feel obtrusively so and is indeed beautiful enough to invest the time in a visit if you’re on this coast. I suspect during the summer the beach is absolutely packed and the atmosphere overall must be amazing. In late spring it was relatively quiet but in glorious sunshine we didn’t mind a more relaxed day. Absent the beach, there are plenty of cafe’s restaurants and gellaterias to enjoy, as well as a marine museum and various boat-tour operators.
The tren passing by in Port du Soller, Mallorca, Nikon FE, 20mm Nikkor Lens with circular polarizing filter, Kodak Portra 400
The Marina in Port Du Soller, Mallorca, Nikon FE, 20mm Nikkor Lens with circular polarizing filter, Kodak Portra 400
Interlude
On the Soller leg of our Mallorca trip the sun finally came out in full force and so did my trusty Olympus XA loaded with Film Ferrania’s P30. I’d never shot this film stock before, and with an ISO (ASA) of just 80 I was a bit nervous about trying until I had some really bright light. It felt like a bit of a risk entrusting a lesser known film stock on a trip abroad, but wow am I happy I did.
P30 is a newly manufactured film with high silver content which Ferrania claim provides high-contrast with minimal grain in an effort to capture the look of Italian cinema of the mid 20th century. It delivers triumphantly. While that low sensitivity means it’s not very versatile (a tripod might help with that), when it shines it’s utterly gorgeous. Enjoy a couple shots here and you’ll see more as I cover the second half of the trip.

Port Du Soller, Mallorca, Olympus XA, Ferrania P30

The Tren passing through Port Du Soller, Mallorca, Olympus XA, Ferrania P30
Oops, a car race!
I think it was the third day of our visit to Soller that I awoke to the sounds of engines screaming across the valley. At first I figured some motoring enthusiasts were having a go at the delightfully twisty roads before the local police force had gotten out of bed. It was my wife that noted that the consistency of the sounds which reminded her of attending one of my car races back home. I hadn’t read about any tracks in the area, so what could it be?
It was actually quite challenging to find any mention online about an organized motorsport event, so we decided to hop in the car and drive towards the sound until we found something. It turns out there was a hill-climb race going on that weekend, and they had shut several kilometers of the road north out of Soller down to run it for the day. I raced hill climb in Canada about ten years ago (and won “King of the Hill” at Knox Mountain on my final attempt) so was absolutely delighted to see how it’s done here in Mallorca. The cars for the most part were much different from what I typically would see back home, so that in itself was exciting. I unfortunately had a roll of Kodak Ektar 100 in the camera that morning, which is not the right film for high speed action photography, but I tried my best and got most of my best shots as they came back down the hill. (Always a potential downside to committing to film photography on a trip)
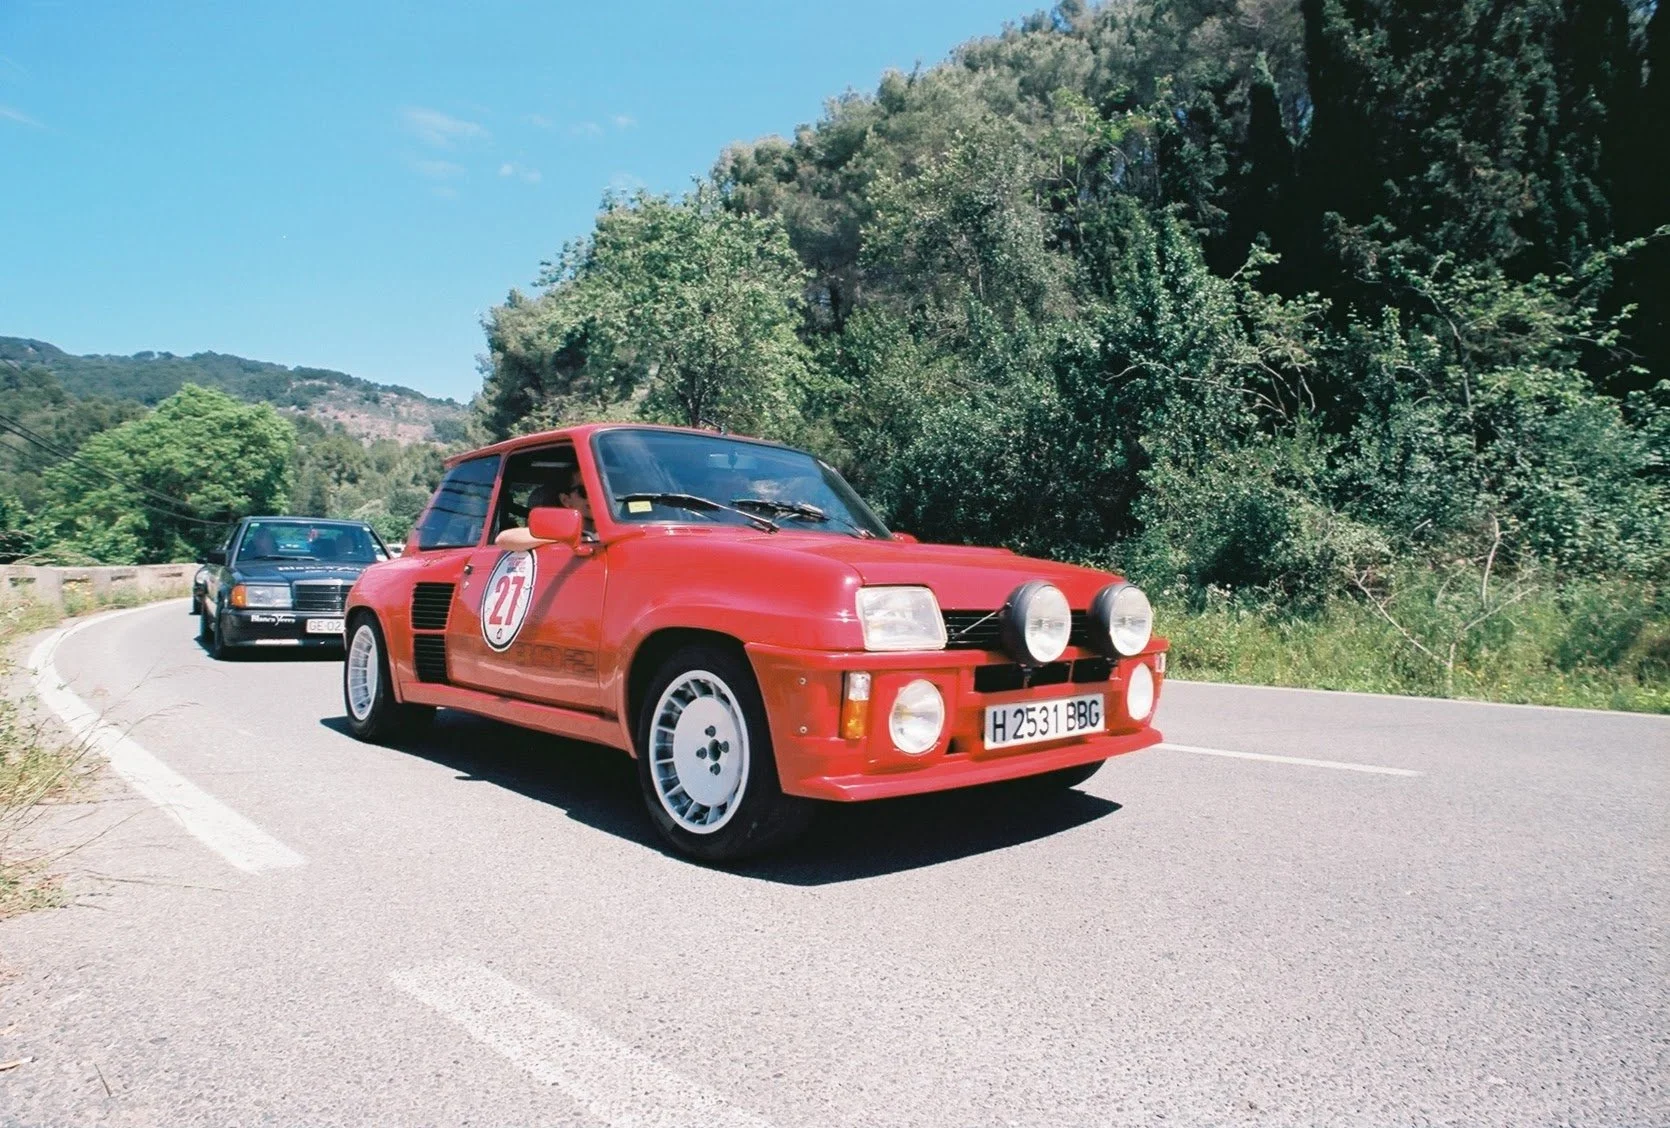
Holy Sh!t, a Renault 5 Turbo, Soller, Mallorca, Nikon FE, 20mm Nikkor Lens, Kodak Ektar 100
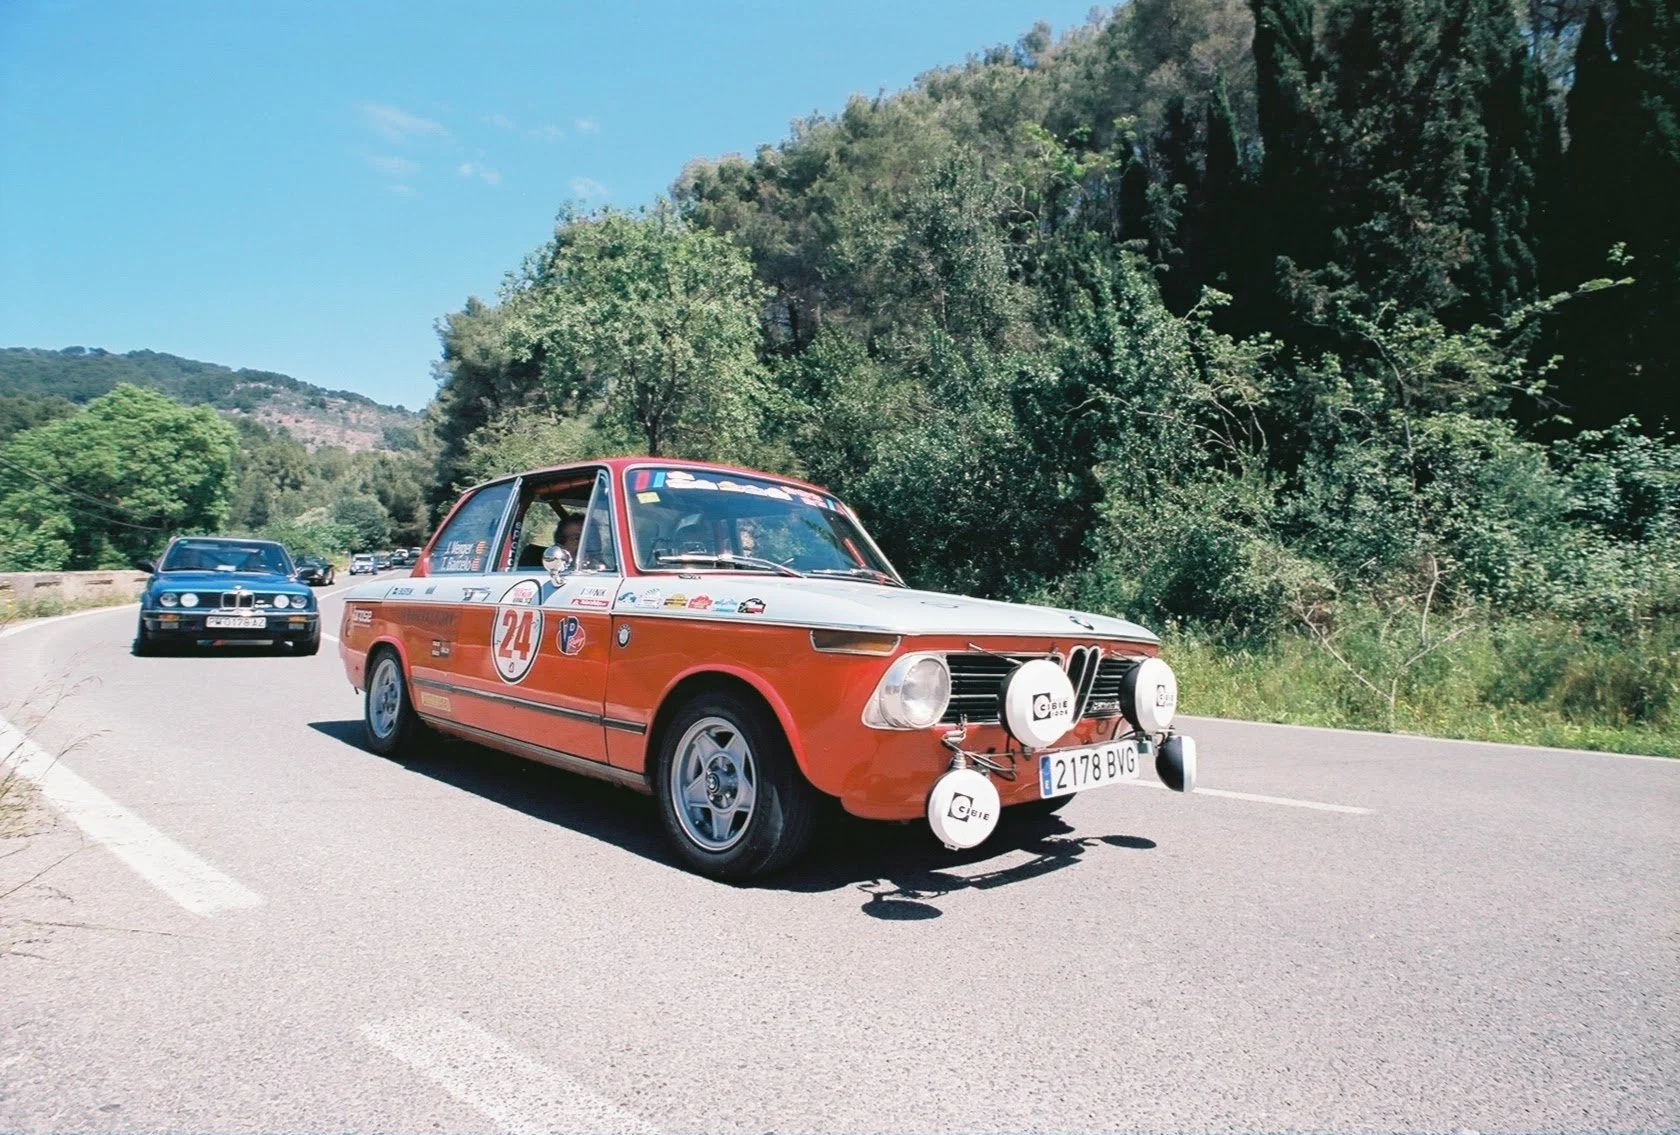
BMW 2002, Soller, Mallorca, Nikon FE, 20mm Nikkor Lens, Kodak Ektar 100
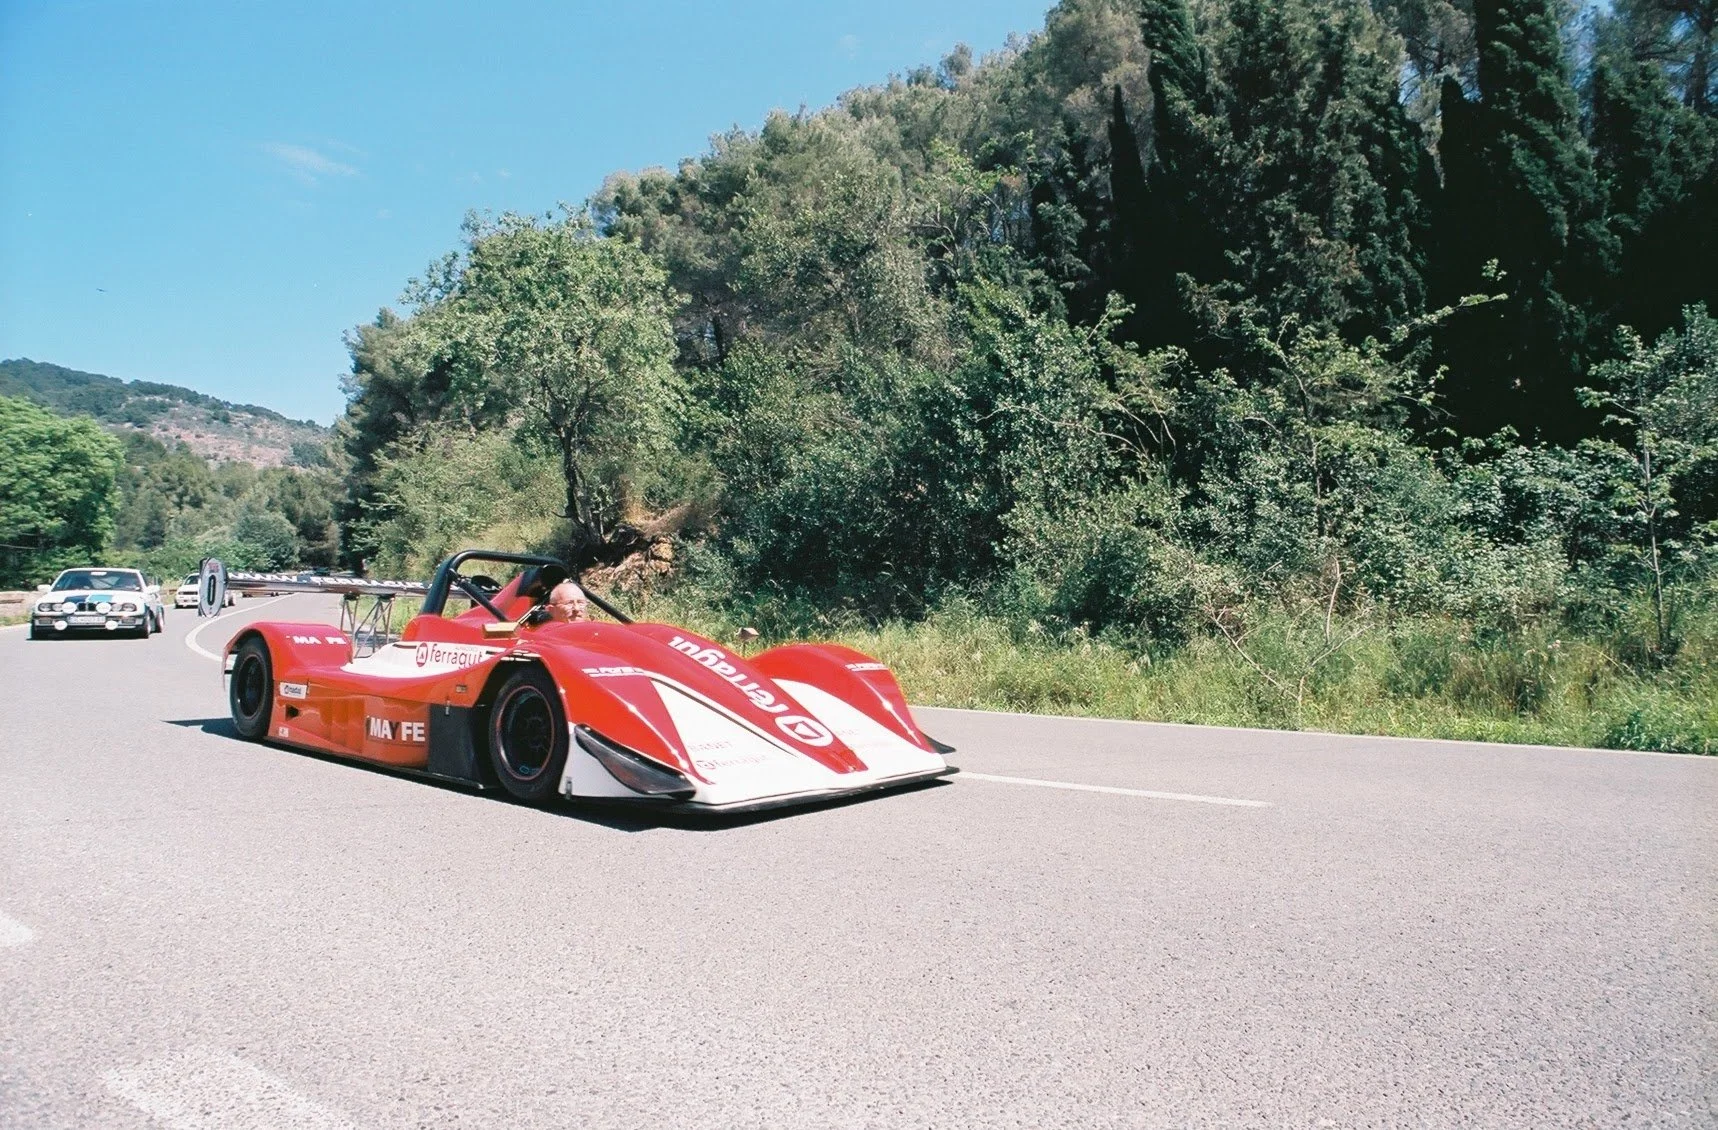
Serious Sports Racer, Soller, Mallorca, Nikon FE, 20mm Nikkor Lens, Kodak Ektar 100
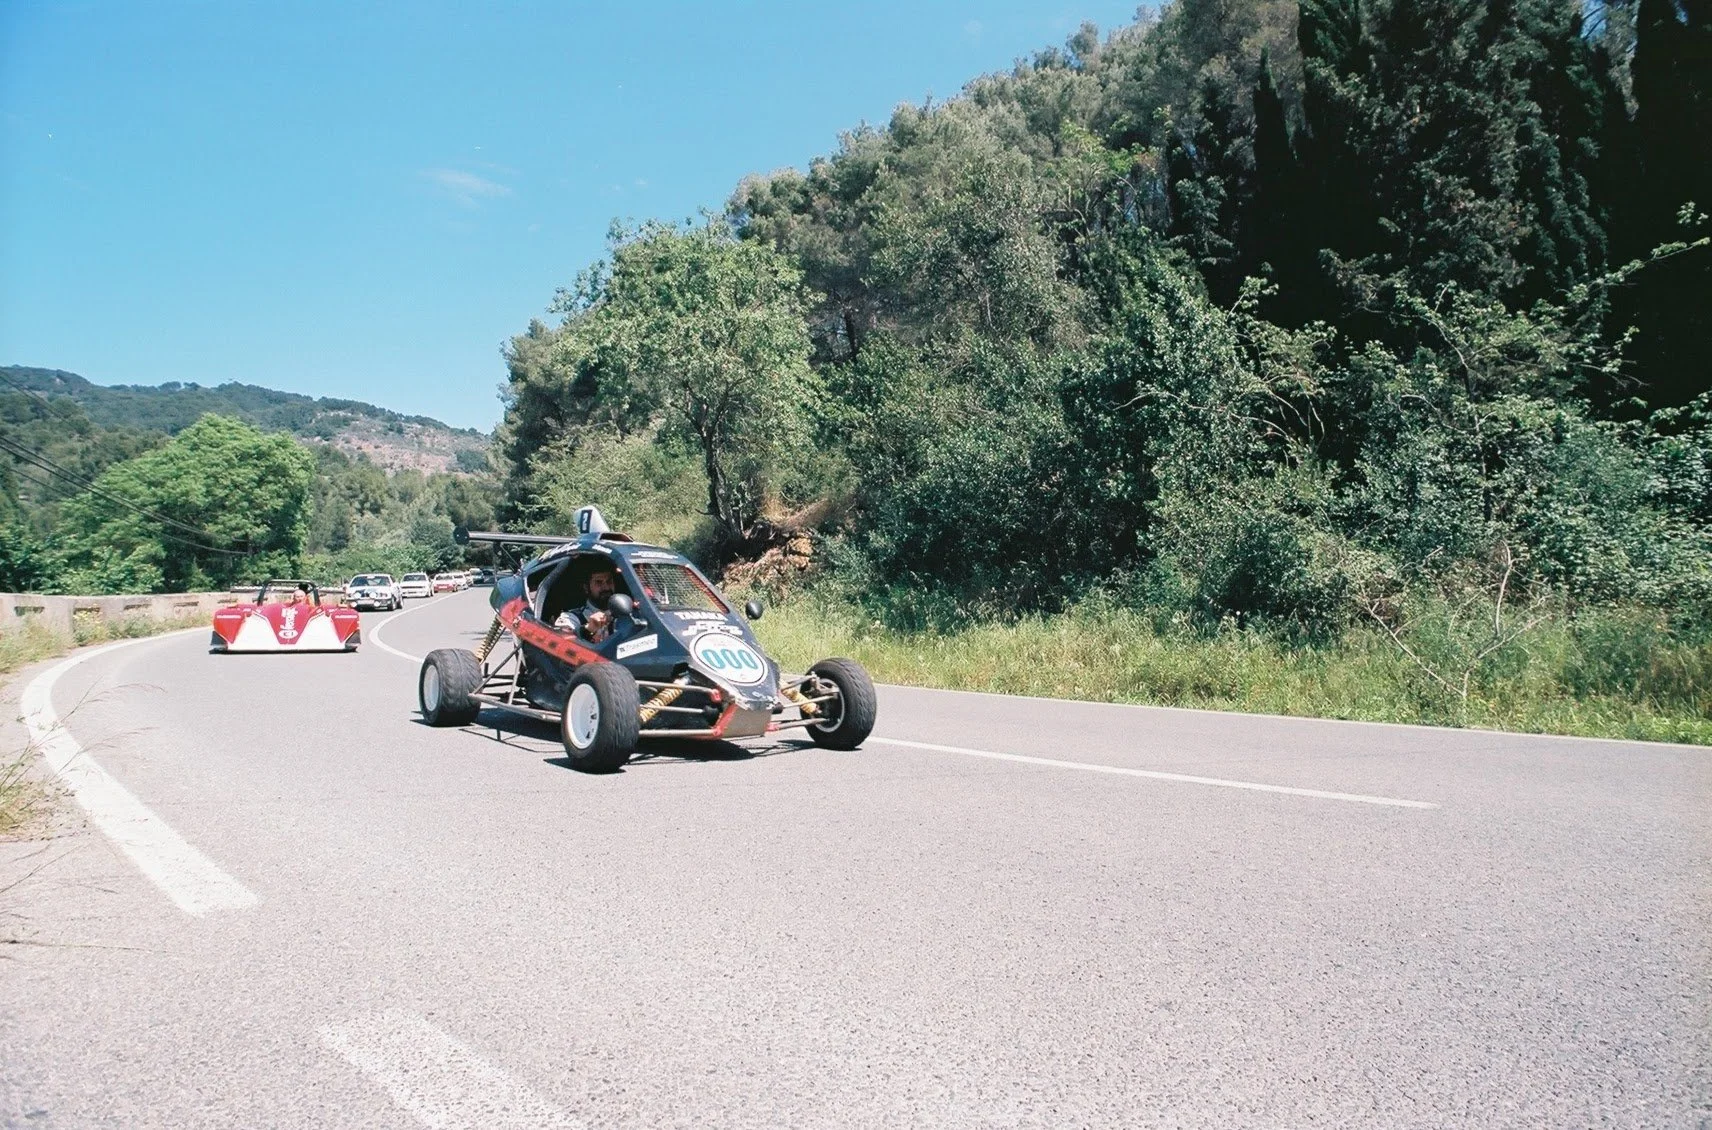
Bike Engined open-wheeler, Soller, Mallorca, Nikon FE, 20mm Nikkor Lens, Kodak Ektar 100
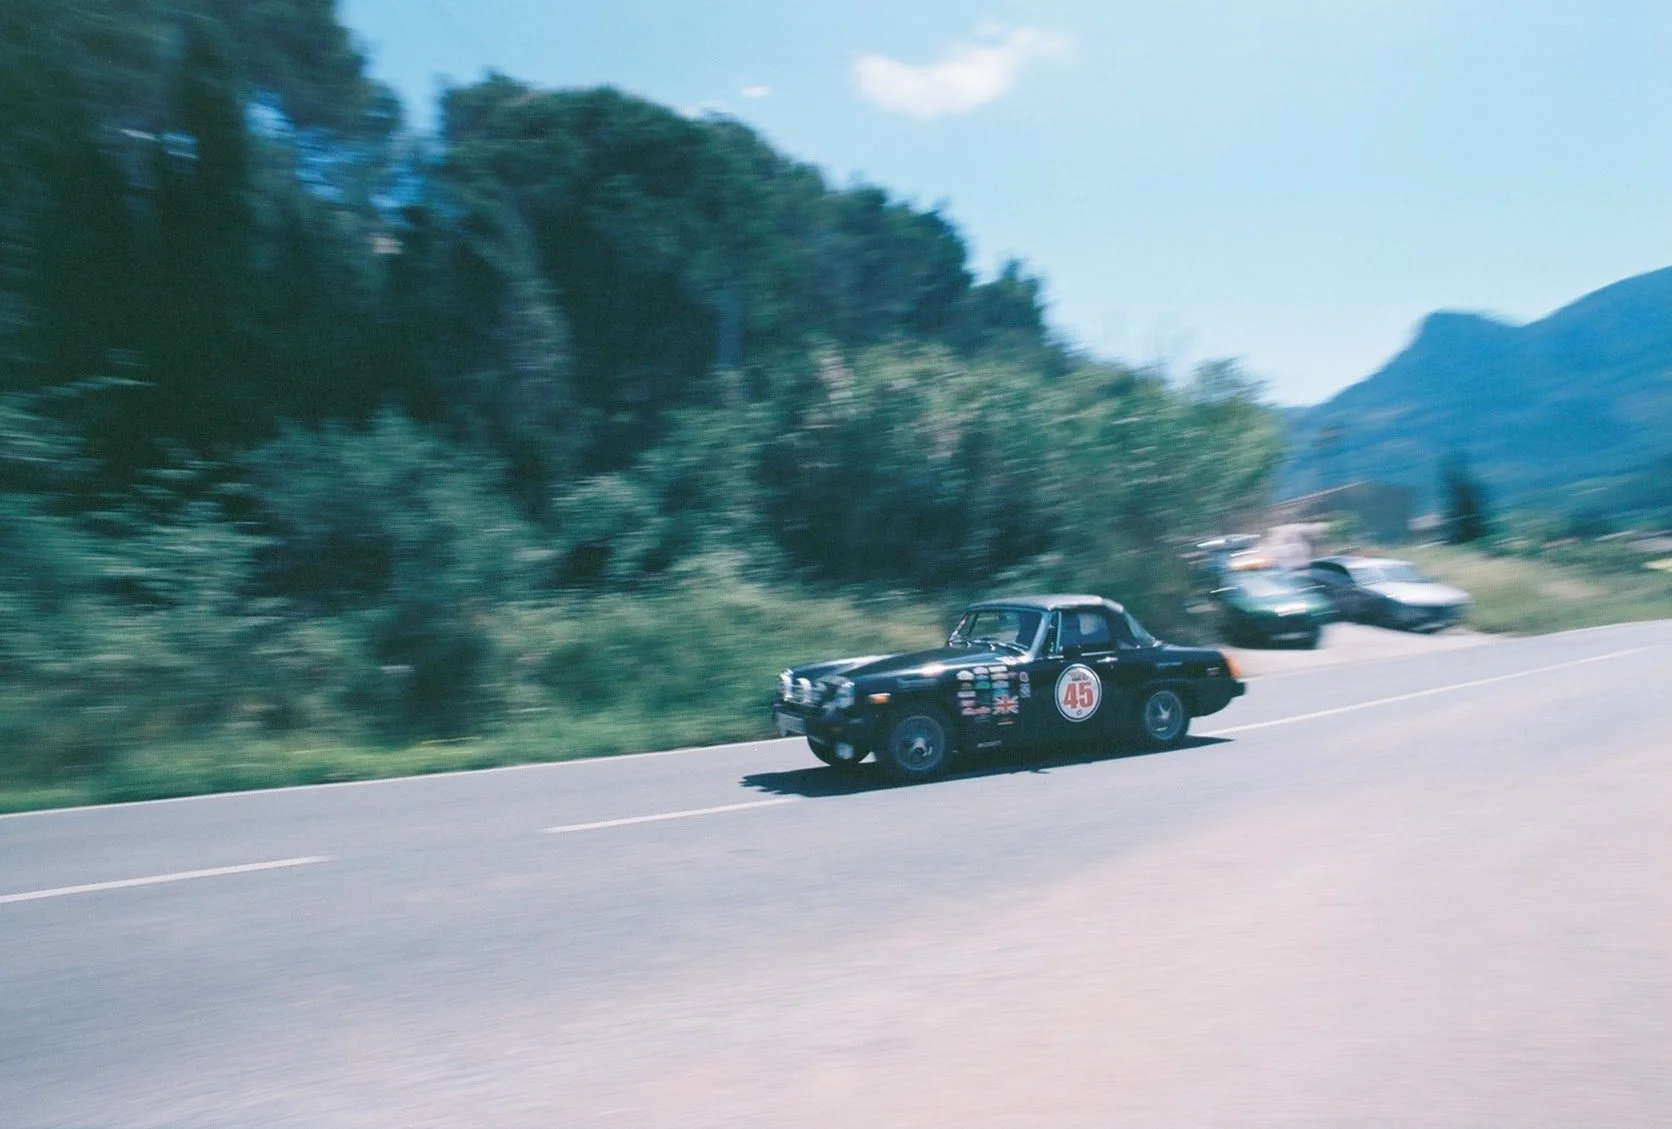
MG haulin’ butt, Soller, Mallorca, Nikon FE, 20mm Nikkor Lens, Kodak Ektar 100

The ubiquitous E30, Soller, Mallorca, Nikon FE, 20mm Nikkor Lens, Kodak Ektar 100

Renault racer, Soller, Mallorca, Nikon FE, 20mm Nikkor Lens, Kodak Ektar 100
We would have the opportunity to drive the hill climb route as we left Soller a day or so later and I can confirm (despite the rather anemic engine in our rental) that this would have been an amazing route to race with sharp corners with an incredible amount of banking that should allow for high G’s and big grins. Perhaps I can arrange an arrive & drive on a future visit!
Our next stay would be a seaside resort in Cala St. Vincenc, but not before a brief stop to visit a friend in the beautiful village or Fornalutx -a gem of a location not to be missed on your way out of Soller!
Mallorca - First Taste of Spain
It was a last minute idea. From intention, to booking, to flight in less than two weeks. It’s not often one makes a significant career change, and this one warranted a few weeks abroad to rest and reset. Mallorca was not an obvious destination for us, coming from Vancouver where Hawaii or Mexico might be the more frequented, and frankly closer, destinations.
The Pool at La Residencia, Deia, Mallorca, Nikon FE, 20mm Nikkor Lens, Kodak Portra 400
It was a last minute idea. From intention, to booking, to flight in less than two weeks. It’s not often one makes a significant career change, and this one warranted a few weeks abroad to rest and reset. Mallorca was not an obvious destination for us, coming from Vancouver where Hawaii or Mexico might be the more frequented, and frankly closer, destinations. But shoulder season meant there were some amazing deals to be had, and if you’re going to spend the same money, why not try somewhere new? With that in mind and our 6 month old in tow, we created a simple plan; 2 weeks, 4 stays, 4 very different approaches to beautiful Mallorca.
Tempting, but no baby seat. Deia, Mallorca, Nikon FE, 20mm Nikkor Lens, Kodak Portra 400
La Residencia
This one was my wife’s pick. Her reasoning? -You’ve worked your butt off for years, let’s treat ourselves and start with a real rest. Of course, our prior 6 months with our young son had been exhausting as well, so a touch of luxury was well earned by all. La Residencia sits in the beautiful valley-village of Deia on the western side of Mallorca. It’s about a 45min car ride from Palma airport depending how many cyclists are on the road -more on this in a later post. The hotel is owned by Belmond, a hospitality company dedicated to creating amazing experiences for it’s guests.
The history of the compound dates back to medieval times and has changed hands and purpose many times. It was most recently owned by Sir Richard Branson, before being acquired by Belmond (LVMH). The hotel blends luxury and exceptional service with ancient charm and architecture quite seamlessly as it’s myriad buildings seem to be chiseled right out of the hillside it occupies. A village within a village. Upon arrival, our bags are cheerfully grabbed by porters as the valet hops in to park the car and we are whisked off to the patio where champagne awaited. It took about two minutes of sitting, sipping, and listening to the live piano before I melted into my chair.
The patio at Cafe Miro, La Residencia, Deia, Mallorca, Nikon FE, 20mm Nikkor Lens, Kodak Portra 400
Reception waiting area, La Residencia, Deia, Mallorca, Nikon FE, 20mm Nikkor Lens, Kodak Portra 400
Our patio, La Residencia, Deia, Mallorca, Nikon FE, 20mm Nikkor Lens, Kodak Portra 400
A few glasses of champagne later we made our way up to our suite near the top of the property above the main pool and breakfast area. We were delighted to find a large room with a four post bed, private patio with a mountain view, a bottle of wine and some fruit and chocolate as well as a crib already setup for our son. Inside the crib, a toddler-sized branded canvass backpack for him with a stuffy inside -nice touch. It can be challenging to find accommodations such as these that permit young children, but here our son was welcomed warmly. There’s even a family center with activities for kids although our little guy was too young to take advantage of it this time around.
Part of the main road that bisects Deia, Mallorca, Nikon FE, 20mm Nikkor Lens, Kodak Portra 400
That first night we hadn’t made reservations so we decided to wander the town and find a place to eat. All three of us were jet-lagged, and I’m sure the little guy hadn’t the slightest idea what was going on. On the recommendation of the hotel we walked to Restaurante Sebastian in the center of the village. As we carried our little stroller up the three steps into the restaurant my first thought was “uh-oh” -I was the only guy without a sport-coat on, and there wasn’t another stroller in sight between the white linen covered tables. We were about to spin around and leave when the owner warmly greeted us and directed us to an open table. It was here we really realized what a family friendly culture we’d stepped in to in Mallorca. As we ordered our meal, the owner swept our son from his high-chair and began to show him around the restaurant stopping at various guest tables, and off to the kitchen to show the chef. The meal was a delight and the distraction for our son meant we could eat it in peace. Amazing.
This happened to us again on the second night when we ate at El Olivo on La Residencia’s property. In this case the waiter excitedly told us how he hopes to have a son like ours one day before whisking him off to parade around the restaurant. This certainly wouldn’t happen back home, but it was most welcomed!
Looking down on Son Fony from our private yard, La Residencia, Deia, Mallorca, Nikon FE, 20mm Nikkor Lens, Kodak Portra 400
La Residencia’s property itself is massive, you could spend an entire morning just wandering the grounds as we did, and you might even stumble upon the resident donkeys!
Couple of locals, Deia, Mallorca, Nikon FE, 20mm Nikkor Lens, Kodak Portra 400
On the second day we were delighted to be invited to enjoy afternoon cocktails on the lawn by Thomas, general manager of the hotel. His passionate articulation of his vision for the future of the property -retaining it’s old-world charm while updating the rooms with more modern amenities- certainly has us looking forward to a return visit one day.
Terraced hillside of La Residencia, Deia, Mallorca, Nikon FE, 20mm Nikkor Lens, Kodak Portra 400
The indoor pool at La Residencia, Deia, Mallorca, Nikon FE, 20mm Nikkor Lens, Kodak Portra 400
Wandering Deia
Deia, and Cala Deia below it, is a gorgeous village nestled in a u-shaped valley with a small mount in the center. It is well known for art and ex-pats, in fact there are hardly any “locals” at all, with workers traveling here from other towns. It is in effect a ‘one-road town’, at least as far as cars are concerned, and like most of the Mallorcan coast, that road is winding with remarkably tight corners in places. I do recommend renting a small car to get here (and indeed most of the places we traveled on this trip), but once in town everything is walking distance. There are a few shops, cafes, and restaurants as you might expect, but it truly is a small village so don’t come expecting a lot more than that. Boutiques and galleries are hidden down many lanes and alleys, so be sure to venture off the main road and get lost a little.
If you make your way down a steep switch-backing road to the west of town you find yourself in Cala Deia, a tiny fishing cove with a rocky beach and locally famous seafood restaurant Patro March. The food was good with an excellent view of the cove. In the summer I imagine Cala Deia is an amazing place for a swim and day in the sun, but in April, it would be tough even in a wetsuit! I tried regardless, but got out pretty quickly.
Deia, Mallorca, Nikon FE, 20mm Nikkor Lens, Kodak Portra 400
Deia, Mallorca, Nikon FE, 20mm Nikkor Lens, Kodak Portra 400
Deia in the hazy morning light, Mallorca, Nikon FE, 20mm Nikkor Lens, Kodak Portra 400
Thankfully it’s a light stroller! Deia, Mallorca, Nikon FE, 20mm Nikkor Lens, Kodak Portra 400
Box of Fruit, Deia, Mallorca, Nikon FE, 20mm Nikkor Lens, Kodak Portra 400
“Boutiques and galleries are hidden down many lanes and alleys, so be sure to venture off the main road and get lost a little.”
The main street through Deia, Mallorca, Nikon FE, 20mm Nikkor Lens, Kodak Portra 400
There’s only one route up the west coast, so every town becomes a tourist stop. Deia, Mallorca, Nikon FE, 20mm Nikkor Lens, Kodak Portra 400
It gets narrower. Deia, Mallorca, Nikon FE, 20mm Nikkor Lens, Kodak Portra 400
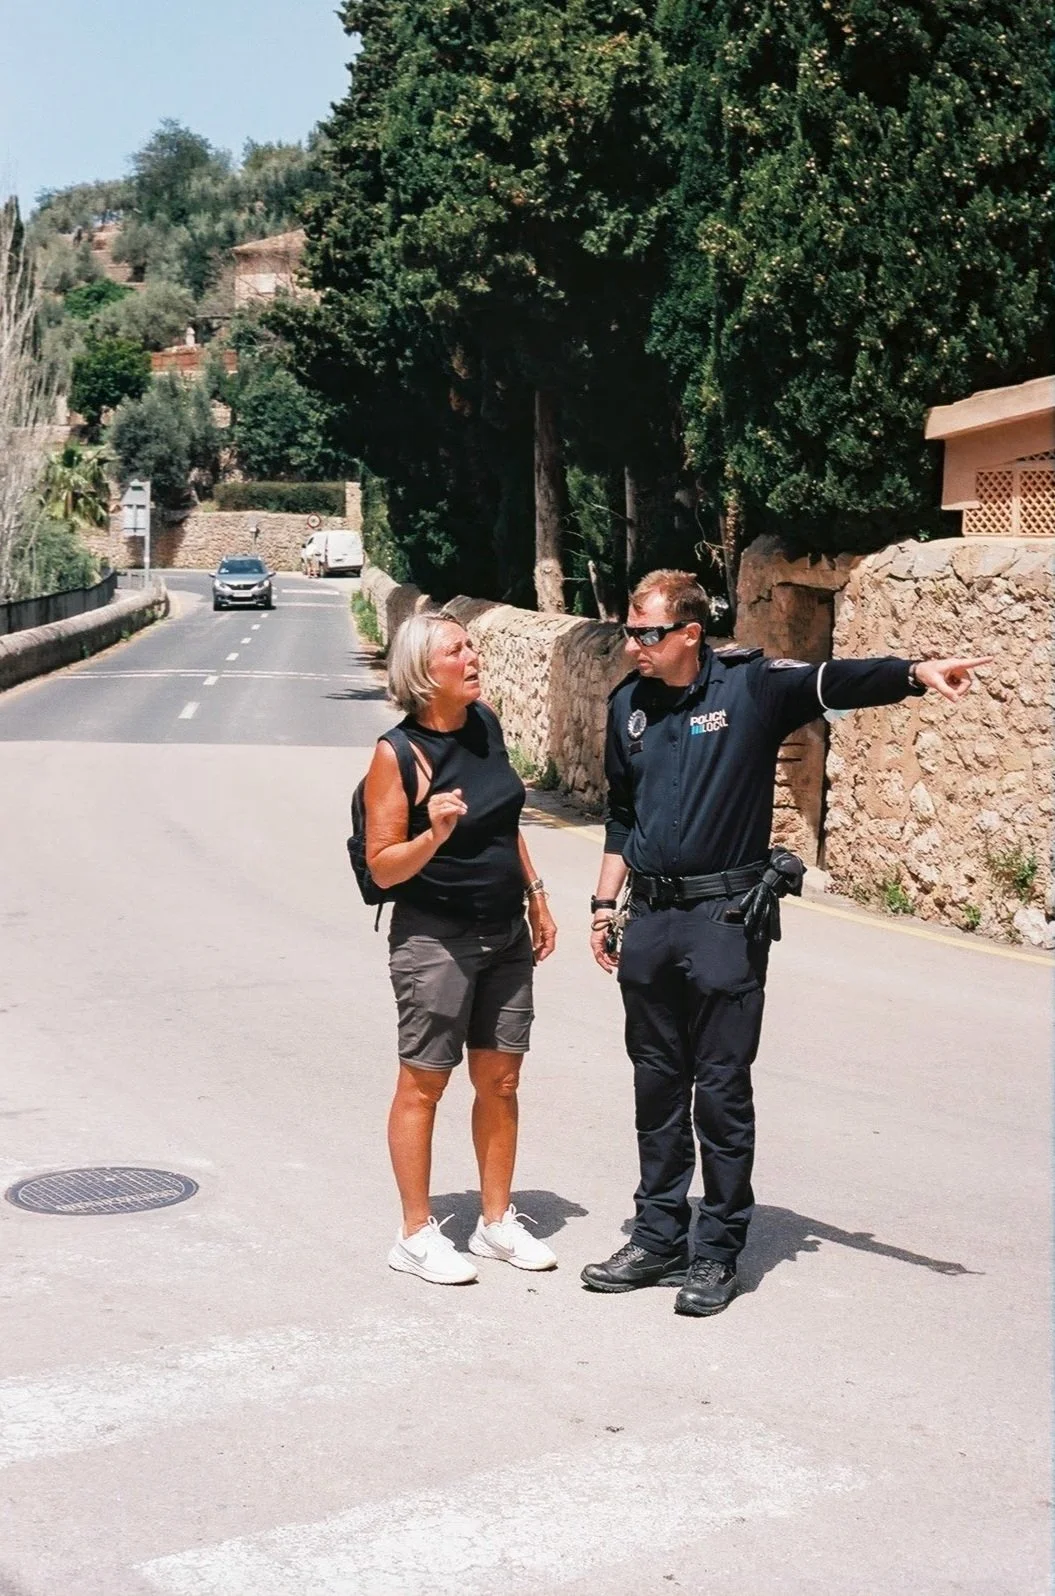
He didn’t seem enthused about giving directions. Deia, Mallorca, Nikon FE, 20mm Nikkor Lens, Kodak Portra 400
Wandering Deia, Mallorca, Nikon FE, 20mm Nikkor Lens, Kodak Portra 400
La Residencia, Deia, Mallorca, Nikon FE, 20mm Nikkor Lens, Kodak Portra 400
Parting Thoughts
You could cover Deia in half a day, but stay at La Residencia for much longer. Four nights suited us best, and while we were sad to go, we knew we had a lot more to see ahead. From here we’d be heading to Soller, just a winding half hour further up the coast from Deia. We set the bar pretty high (again) at the beginning of our trip, how would our next destination on the island compare?
Spend the day sitting here? Don’t mind we I do. La Residencia, Deia, Mallorca, Nikon FE, 20mm Nikkor Lens, Kodak Portra 400
Japan - Epilogue - Travelling with Film Photography
One Camera, one lens, and one film stock. That’s where we started this first photographic sojourn to Japan. A fitting assignment, I think, considering the countries’ own reputation for blending the new with the old. What follows is a few of my learnings for would-be film photography travelers.
Temple complex in Kyoto. Praktica LTL, 50mm Meyer-Optik Domiplan Lens, Kodak Portra 400,
First Trip Abroad with Film
One Camera, one lens, one film stock. That’s how I approached my first trip abroad shooting film. A fitting assignment, I think, considering the countries’ own reputation for blending the new with the old. What follows is a few of my learnings for would-be film photography travelers. Of course, I’m an enthusiastic amateur rather than a pro, so take what you like, throw away the rest, and share your own thoughts in the comments at the bottom!
Harbour View in Wakayama, Praktica LTL. 50mm Meyer-Optik Domiplan Lens, Kodak Portra 400
Read the full Japan series:
Tokyo → Kanazawa → Koyasan → Hiroshima
The Camera
I chose my camera for this trip based on availability and price. Availability being immediate, as I found it in dad’s basement, and price being free for the same reason. I’ve subsequently picked up quite a number of other film cameras (Gear Acquisition Syndrome is real, folks) and my go-to film camera for travel has shifted to the venerable Nikon FE with an Olympus XA as back-up. Regardless of what camera you bring, from TLR to Point & Shoot, it’s a good idea to develop some proficiency with it before leaving for your trip. This includes challenging weather and lighting conditions and different film stocks in order to learn what the output looks like in each case.
The Praktica being fully manual, albeit with an effective light meter, it was easy to get things wrong in the panic of trying to capture a decisive moment. I only put a couple of rolls through it before leaving for Japan and that was probably a mistake. Investing more time in advance would likely have meant more “keepers” on the trip itself. Here are some other tips related to choice of camera:
Simpler, in general, is better: Film Cameras are aging, and in some cases that means failing. This is more of a problem for point & shoots which rely on electronics and servo motors that are starting to get beyond their “best before” date. A mechanical shutter and focus system, if well maintained, should last a very long time, and in many cases are repairable. An SLR and a point & shoot in combination could make a mighty pairing.
That said, does it have shooting modes? Later film cameras benefitted from better light meters and electronics that allowed them to shoot in semi auto modes such as Aperture priority. This can help take one more item off your mind to allow you to concentrate on focus and framing. The Praktica is fully manual with stop-down TTL metering, but my Nikon FE shoots aperture priority when in “auto”. I never use that feature, however; as I find it has a tendency to overexpose when doing so.
A bright viewfinder: Traveling can mean shooting in challenging lighting conditions, can you see the light meter in your viewfinder, or confirm your focus? This was something I took for granted when I started this trip, and luckily the Praktica performed well, although occasionally I’d loose sight of the black exposure needle in lower light situations. The light meter lever moves slowly on the Praktica, so a trick I learned was to quickly point towards something bright and see where the needle was before it jumped. Far from perfect, but it did help on some occasions.
Pick the package: Do you want to carry a bag of lenses and stuff? Or, are you comfortable that you can shoot with one lens and make the most of it? (potentially saving a fair bit of weight in the process) I’ve done it both ways, there’s no right or wrong answer here. Sometimes the tyranny of choice gets in the way, others you might find yourself thinking “if only I had a wide angle…”. Err on the side of simplicity for your first time out. If you are shopping for a bag to carry your equipment, by the way, this one by Peak Design is my favorite.
Are the batteries still available: Do some quick research on the type of battery the camera you’re considering purchasing uses. There are some where the original battery no longer exists, although people have found workarounds in some of these cases. Check the battery compartment for corrosion as well!
Hiroshima Cyclist, Praktica LTL. 50mm Meyer-Optik Domiplan Lens, Kodak Portra 400
What to pack
Here’s a quick list of what I’m packing with film photography in mind on a trip:
Basic Cleaning kit: A puffer, brush and some dedicated wipes are really all you need. I often have one of those cleaning “pens” in my bag as a matter of course.
Spare Batteries: I have literally used the same batteries that came in most of my film cameras for years now. In general, they just don’t drain much power. That said, and especially if you bought yours with a battery of unknown provenance, grab a couple of spares. They add no appreciable weight, and you may not find them if you need them where you’re headed.
Film: How much, what brand, what iso, color or black & white are all factors to consider.
If I’m going somewhere bright and sunny (or at least, I hope it is when I get there) I’m typically comfortable going with ISO 400 or even lower to something like an Ektar 100. Keep in mind if you still have half a roll of 100 in the camera when you’re heading out for a night on the town, you’re likely leaving that camera at your accommodation. It’s tempting to go low ISO for landscapes, however; when you’re aiming for minimal grain and beautiful color rendering.
I’m more accustomed to shooting color than b&w, so that’s my first choice. That said I have done b&w only trips, and it can make for an engaging project that might just challenge how your look at the world and light in particular. There is some glorious b&w film out there to try out, including my current favorite, Ferrania’s gorgeous P30.
Film brands are a matter of taste. For some reason I’ve gravitated to Kodak for color but given I’m partly colorblind, your mileage may vary! I do note it’s quite consistent from roll to roll, as is Fujifilm. With some niche brands I’ve found occasional issues with the emulsion that seem like bubbles or waves in the edges of the image.
Spare Camera: Not required, but it’s a way of overcoming some of the issues noted above. For example, the venerable Olympus XA which I once wrote an article on for Emulsive (here) is tiny and pocketable with a stunning lens. I don’t mind bringing that along with a different film stock in it, such as a black and white or low ISO option. Or, perhaps pack a digital point & shoot? There’s no sticking to dogma on this blog, so I certainly won’t judge you for mixing mediums, many pros do just that!
Tripod: I’m yet to travel with one but even just writing this article I’m realizing what a good idea it is, if you can make the space. A lightweight tripod could be extremely helpful when you have lower ISO film in your camera and sub-optimal lighting.
If I had to pick one lens: All of my Japan photos were taken on a cheap and cheerful 50mm Meyer-Optik Domiplan f2.8 lens. The 50mm focal length is generally regarded as quite versatile, but with this particular lens sharpness definitely suffers the more open the aperture. The photos remain quite pleasing despite that weakness (wabi-sabi, I think, is the Japanese term I’m looking for here), with an almost dreamlike quality to them and enjoyable bokeh. So, would I use that one again? Not exclusively. I’ve gotten wider with age (ha!) and would probably pick a 35mm if I were to only take one. I have done trips with a 20mm Nikkor f3.5 on my Nikon FE and that can get addictive as well. What should you take? Provided you’ve had a bit of practice with it/them there really isn’t a wrong answer.
Dreamy Vision of Gardens in Kanazawa, Praktica LTL. 50mm Meyer-Optik Domiplan Lens, Kodak Portra 400,
The Airport
Don’t stress. We’ve all heard about the dangers of airport x-ray scanners to film. In reality, with anything under 800 ISO I haven’t seen any issue, despite even two or three passes through x-ray machines. That said, if you can avoid it, why not try?
Be Polite: Easy, right? The security clearance staff have no doubt heard the argument before about damaging your film. Most would roll their eyes but if I was humble in my request, and there wasn’t a crazy huge security line, they’d often hand-check my bag of film. It’s important to have it ready before they ask, and organized in a clear plastic bag. Japan, China, Spain, Slovakia, Croatia, even London Heathrow hand checked my film when I asked nicely. The only time I was flatly refused was Vienna airport. You win some you lose some.
The Burner Roll: I don’t recall where I learned this technique, but essentially you choose a sacrificial roll of high ISO film (Ilford Delta 3200 for example) and ensure it’s prominent in your film bag. High ISO film will not tolerate xray machines and in some airports there’s even signage saying so. Displaying this to the security team may get you an extra ounce of sympathy to get a hand-check of your entire film collection.
Airport Security asking me to take a photo to prove the camera works…I never did mail them the photo. Praktica LTL. 50mm Meyer-Optik Domiplan Lens, Kodak Portra 400
The Routine
In the morning, I’d look to see how many shots I had left on a roll and typically plan to take an extra roll or two with me depending on how long we were going to be out. Speaking of the roll, while most rolls of 35mm film are designed to give 36 shots, I’ve often found I can get 2, 3,+ more if I’m careful about how I load my film. Once it’s engaged I’d give the film advance one full click then shut the rear, then one full click more and start my shooting. Occasionally you’ll end up with a “first of the roll” image with a partial light burn on the side, but this can actually make for an interesting effect (or happy accident). Ensure you feel some resistance in your film advance. I’ve been lucky to only once shoot an entire roll only to find out it didn’t properly catch and I got exactly zero images out of it.
With film photography, there’s no checking if the photo turned out, just shoot and go. Obviously, there’s risk in this, but I feel it also unencumbers me, allowing me to be more present in the moment and leaving capacity to maintain my attention on the world around me to look for the next opportunity that catches my eye. Many digital cameras allow you to switch preview off (or like the X-Pro 3, hide the screen), so this isn’t exclusive to film but it certainly eliminates the temptation. The pitfall of this is the lack of immediate quality control. There’s no reminder or feedback for potentially forgetting to check some key settings before taking your photographs. For example, whether your ISO is set correctly for the film you’re using. When shooting a single filmstock it’s a non-issue, but swapping between different films it’s easy to forget to change the ISO accordingly.
Depending on the length of your trip and your workflow when you get home, it can be quite some time before you review the pictures you took and by then you can forget a lot! Immediately sort and label your images when you receive/create your scans. I also generally try to take notes in a little notebook to remind me where I was, or which film and camera I was using. I’m beginning to sound like an analog snob…
Kyoto Streets, Praktica LTL. 50mm Meyer-Optik Domiplan Lens, Kodak Portra 400
Getting the most out of your photos
If you develop your own film, I take my hat off to you. I have neither the time nor enough skill to be confident in doing so, yet. I’m fortunate to have a lab in Vancouver that I trust for developing, printing and scanning my shots (Rocket Repro), and there are also great mail-in services still available in North America and no-doubt other continents. I don’t print every shot on every roll, rather I review the scanned copies and then decide what I’d like to do with them. I’ve printed a number of sizes and formats from simple 4x6, to a roughly 37x72 landscape that hangs in the dining room. I also enjoy creating photobooks (thus far using google photo) and do flip through them often. Film photos look glorious printed though, so I do strongly encourage doing so. It’s what they were always meant for.
In any of these cases you should prepare to do some minor editing depending on the result of your scans. A high quality scan still isn’t going to be as malleable as working with a RAW file, but you’d be surprised what you can recover in highlights and shadows. It’s generally easy to recover a slightly over or under exposed image. It feels pretty great though when a roll comes together with a great scan and almost/no editing at all is required. This is a neat facet of shooting with film in the modern era, your “presets” are already dictated by the filmstock you’ve chosen!
A lesson I learned from my friend Farzaan at fcracer.com in his post here, is not to shy away from cropping photos. While most images I share in the same format as the image comes out, there are definitely cases where a well thought out crop can demonstrably improve an image, or perhaps, align it more so with the photographers’ vision. The effective digital resolution of a 35mm film image is quite high so you can safely crop a fair bit. I’ve read it can be anything from 21MP to 80+MP, depending on the film and scanner used, but there seems to be a lot of debate on the topic and needless to say, film photography is not for pixel peeping. Some labs will offer a higher resolution scan for large printing purposes, but the cost to do so increases significantly from a standard scan. Keep your negatives, and if you find a keeper you’d like to enlarge and print, have the lab re-scan the specific image at high resolution to maximize your subsequent print quality.
Temple Complex in Kyoto, Praktica LTL. 50mm Meyer-Optik Domiplan Lens, Kodak Portra 400
The People
There’s a delightful tactile experience to using a manual film camera. It’s not unlike the appreciation for mechanical watches over digital. Anachronistic, sure, but special and still remarkably capable. You can tell by the nods of appreciation from certain passers by when seeing what’s hanging around your neck that film photography still carries a special places in many hearts. That connection, particularly when you meet another film photographer “in the wild” can make for great conversations and experiences, so don’t shy away from making those connections when you can!
Taking photographs of people, be they locals or other tourists can add more dimensions of context to your travel photos. No difference conceptually here between film and digital, but be mindful that some film stocks are better suited to candid portraiture than others. As always, check local laws and customs on photographing strangers in public and smile when taking the photo.
Harajuku, Praktica LTL. 50mm Meyer-Optik Domiplan Lens, Kodak Portra 400
The Cost
In a recent video, street photographer Samuel Lintaro Hopf mentions that Kodak is increasing the price of it’s film by up to 40%, apparently in response to it’s skyrocketing popularity and low supply. This highlights just a part of the increasingly challenging economics of shooting with film for amateurs. It’s pretty easy to calculate the cost per image, factoring in the cost of a roll of film plus the cost to develop & scan. Even film camera prices are inflated, though I find local online peer to peer marketplaces generally are the best places to find a deal followed by local shops with used and consignment items that in some cases are even tested.
I choose not to do the math, only because I prefer not to associate each click of the shutter release with a dollar amount. But ultimately, it would be foolish to ignore it entirely. For candid family snaps, picnics, and life around the house I’ll rarely take a film camera out; choosing instead the versatility of Fujifilm’s excellent Xpro-2, or even my cellphone in a pinch, though the latter is my least favorite way to capture an image. Like any hobby, you must decide what it’s worth to you, and budget accordingly to enjoy it. Many photographers I follow still work with both film and digital depending on the project they’re working on, or indeed what they feel will get them motivated creatively that day.
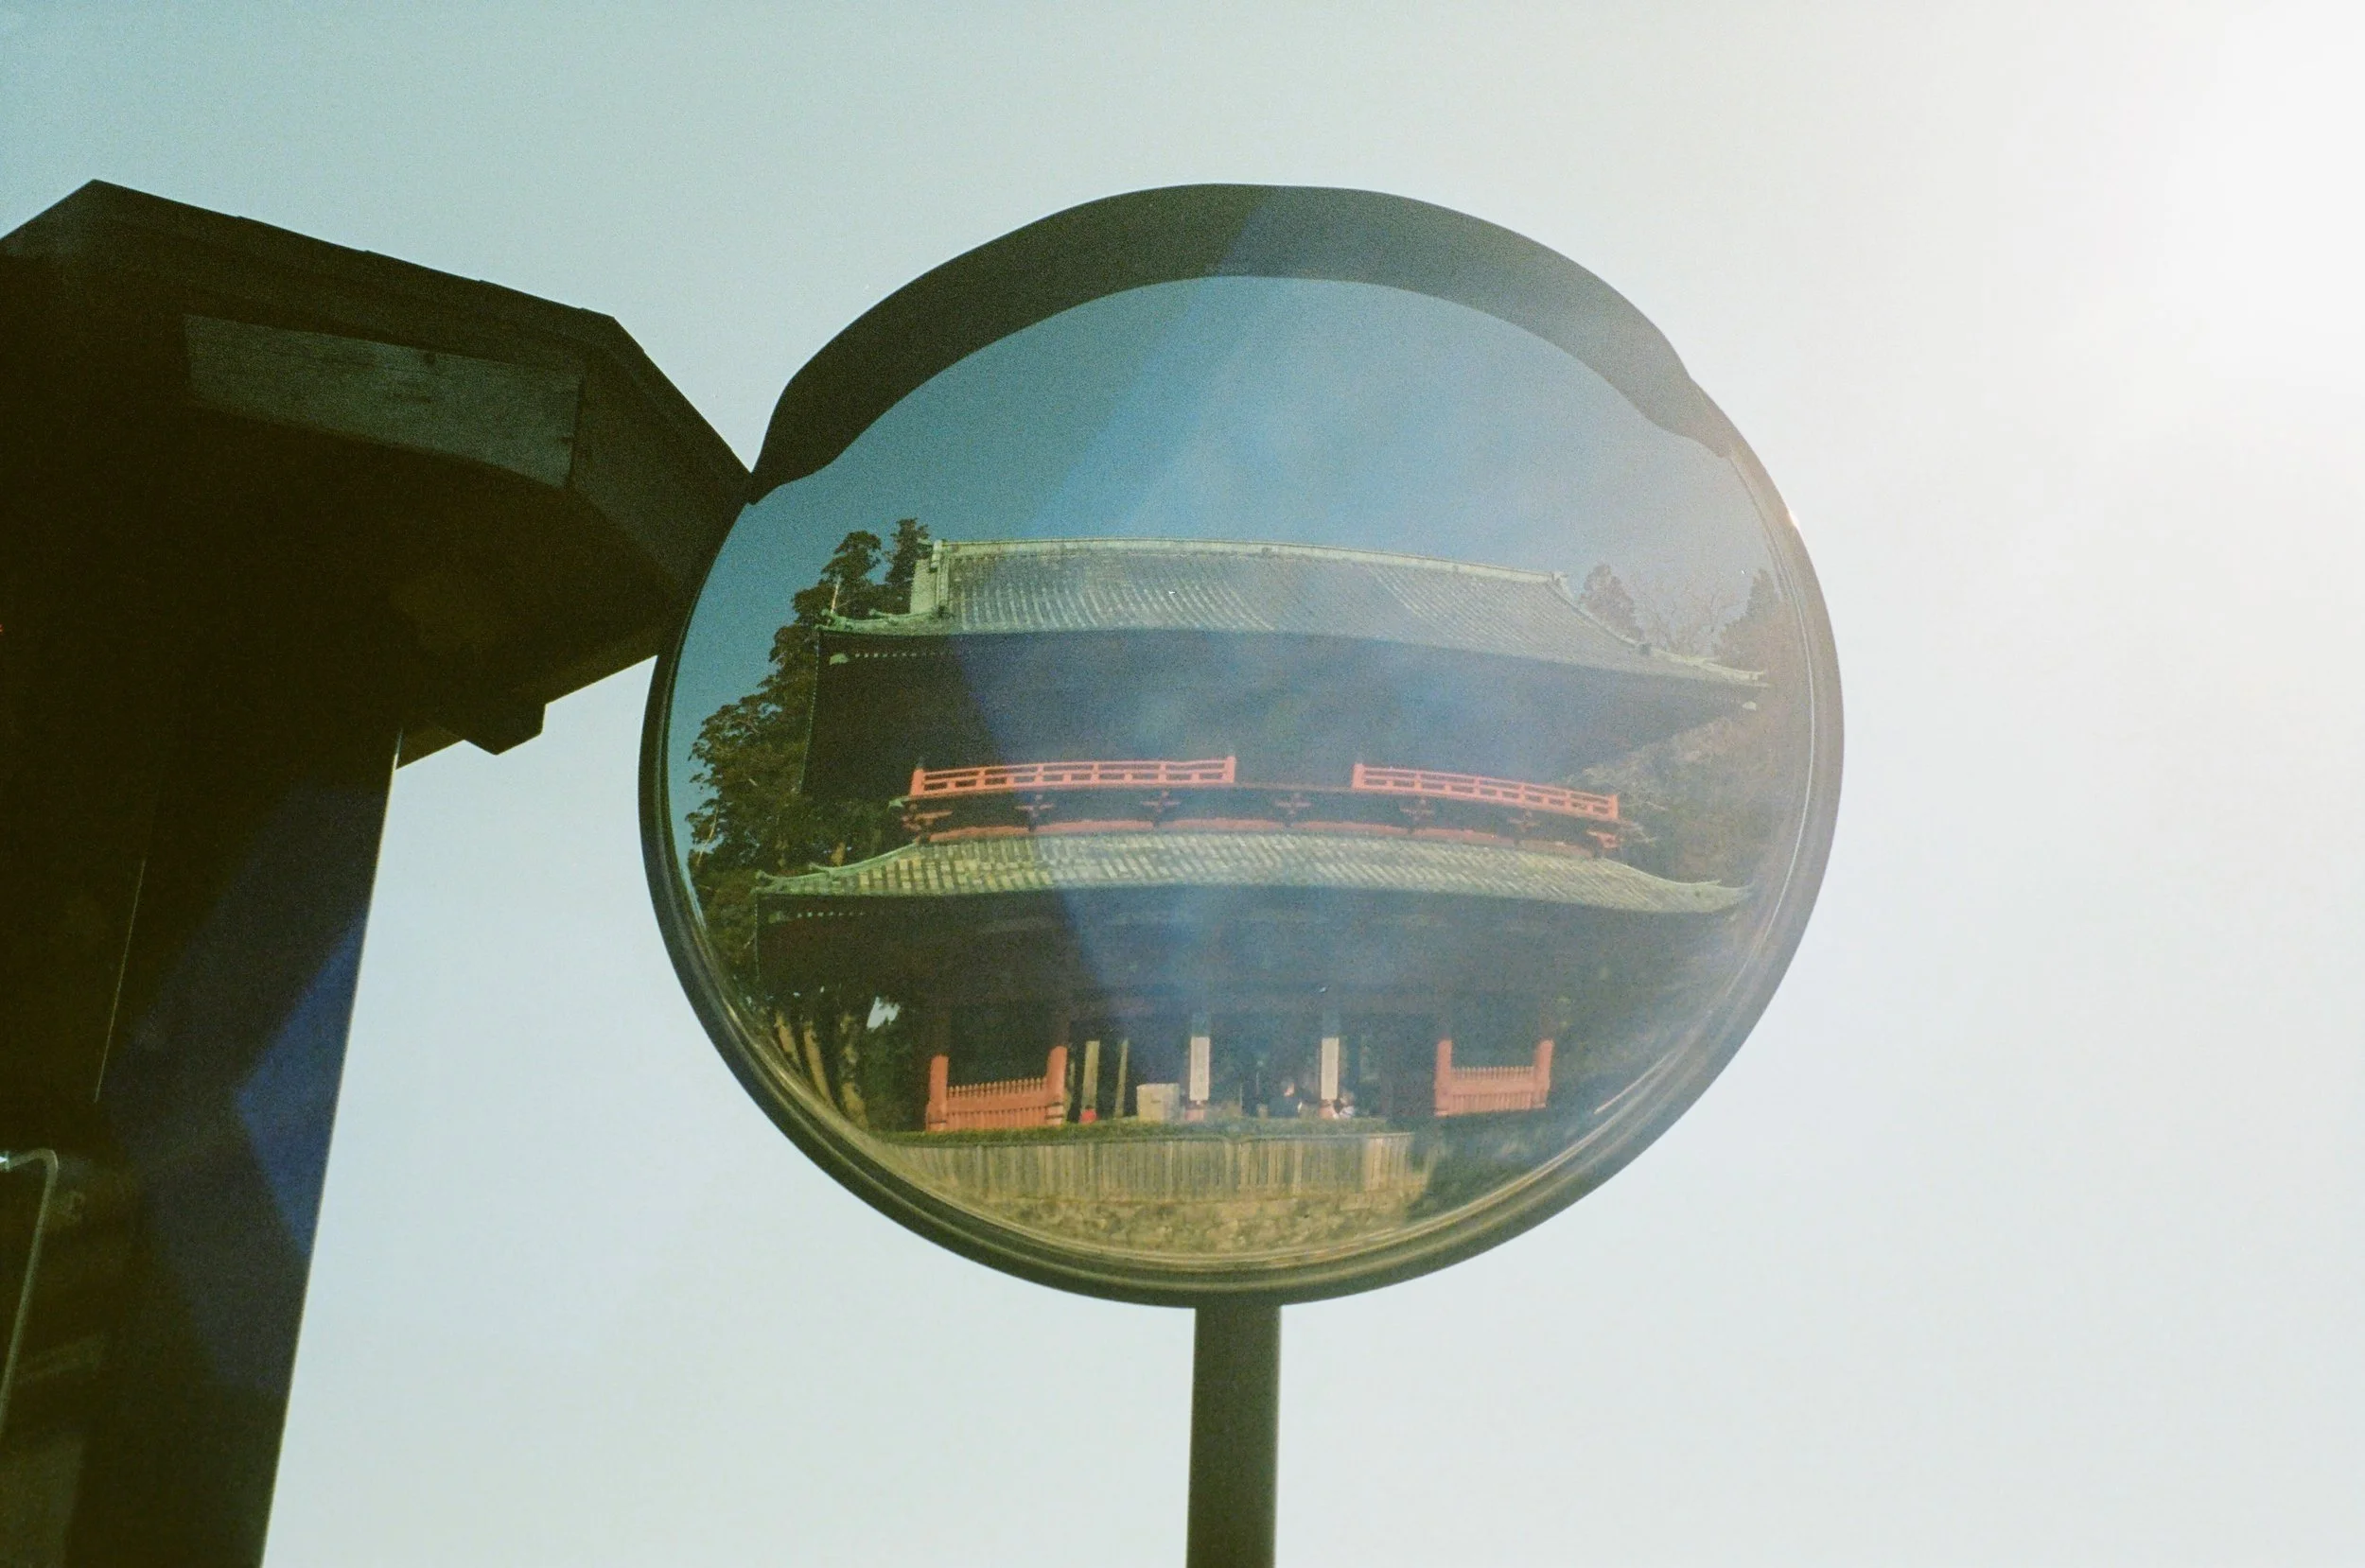
Daimon Gate reflected in a traffic mirror, Koyasan, 50mm Meyer-Optik Domiplan Lens, Kodak Portra 400
I’ll be Back
I hope you’ve enjoyed this short series on Japan, as well as my experience on this first trip abroad with film photography. As always, I welcome your comments and ideas, and most of all hope I’ve provided some inspiration to visit these places and share the images you capture there. At the time of writing I’m planning another trip back to explore more of this beautiful country. What camera will I take on my next travels there? Film and/or digital? Well, I may not be able to help myself this time as I’ll certainly be taking more than one, but a hint would be that Daido Moriyama had some influence on my decision, and it’s going to be fun.
Hiroshima - Japan
I was at times perhaps too stingy with my shooting, and other times I felt compelled to snap a photo of some okonomiyaki. In time I’d develop a rhythm (and tendency to overpack) to my shooting that freed me to shoot unencumbered by worry of running out out of film.

Orb in Hiroshima. Praktica LTL. 50mm Meyer-Optik Domiplan Lens, Kodak Portra 400
Humidity & Hope
Read Previous Part III: Koyasan, Japan →
After our serene visit to Koyasan, our group spent a night in Wakayama taking in the palm trees, ramen and huge public onsen, before boarding another train for our final destination, Hiroshima. It’s a name we’re all familiar with from history class, but what’s it like to visit today? Could a city with such a sad history enjoy a bright future?

Cycle commuter in Hiroshima, Praktica LTL. 50mm Meyer-Optik Domiplan Lens, Kodak Portra 400
Of course having done my research I knew that I’d find a vibrant city with a bustling economy, arts scene, food scene and everything else you’d expect of a major urban center. What amazed me was that being there, if you didn’t know when you arrived about the city’s terrible demise in the second world war, there’s not much to give away it ever happened.
Unlike the rest of the stops on our Japan trip, Hiroshima was already hot and humid in early spring. We were sweating within minutes of leaving our door in the morning. That, coupled with this being the tail end of our trip, made for a fairly relaxed pace and wandering more centered on “Where do we eat next?” than “What do we see next?”. Hiroshima is a treat for foodies (most of Japan is, really) so whether it was pastries at patisseries or katsu at a corner shop, this was the stop that was going to pack on the most weight for our crew. It’s a large city, but well served by a bus and trolley system that is easy to navigate. We rented an apartment just outside the city core, which was conveniently located on a trolley line that took us right where we’d want to go within minutes.
With the humidity came a thick layer of cloud and since I was committed to ISO400 I found myself having to shoot at fairly open apertures to allow for a quick-enough shutter speed to minimize blur. My film stock running low, I decided to focus more with my eyes and less with my lens but still grabbed the occasional snap as something caught my eye. Although I knew at this stage that film is readily available in Japan, limiting the number of shots I could take to the rolls I brought with me made for an interesting project and challenge. I was at times perhaps too stingy with my shooting, and other times I felt compelled to snap a photo of some okonomiyaki. In time I’d develop a rhythm (and tendency to overpack) to my shooting that freed me to shoot unencumbered by worry of running out out of film.

Outside our window. Praktica LTL. 50mm Meyer-Optik Domiplan Lens, Kodak Portra 400
““I was at times perhaps too stingy with my shooting, and other times I felt compelled to snap a photo of some okonomiyaki.””

Hiroshima’s Famous Okonomyaki on the way. Praktica LTL. 50mm Meyer-Optik Domiplan Lens, Kodak Portra 400

Playing with bokeh, Praktica LTL. 50mm Meyer-Optik Domiplan Lens, Kodak Portra 400
Trying to keep the camera steady while shooting at relatively low ISO and manually focusing. Praktica LTL. 50mm Meyer-Optik Domiplan Lens, Kodak Portra 400
The Bomb
I suppose one can’t really visit Hiroshima without speaking about it’s history with “the bomb”, and perhaps it would be rude not to. The recovery of this city from utter devastation at the end of the second world war is remarkable. It gives me hope that even after the darkest of times humanity can still flourish. One of my main objectives in visiting Hiroshima was to tour the Hiroshima Memorial Peace Museum. Walking through its maze of halls and galleries with detailed dioramas, relics, audio clips and video interviews of survivors, your mind is assaulted by a single thought; why does our species keep doing this? The answers aren’t here, but the opportunity for observation and reflection this atmosphere fosters is more than worth the price of admission. It’s things you’ve learned in books brought closer to life, to reality. Things you are cognizant of but likely haven’t felt (if you are lucky, as I am, to live in a place far from war) until you’ve experienced it in this thoughtfully curated immersion. If you can make it out of the building without shedding tears, you’re made of sterner stuff than I.
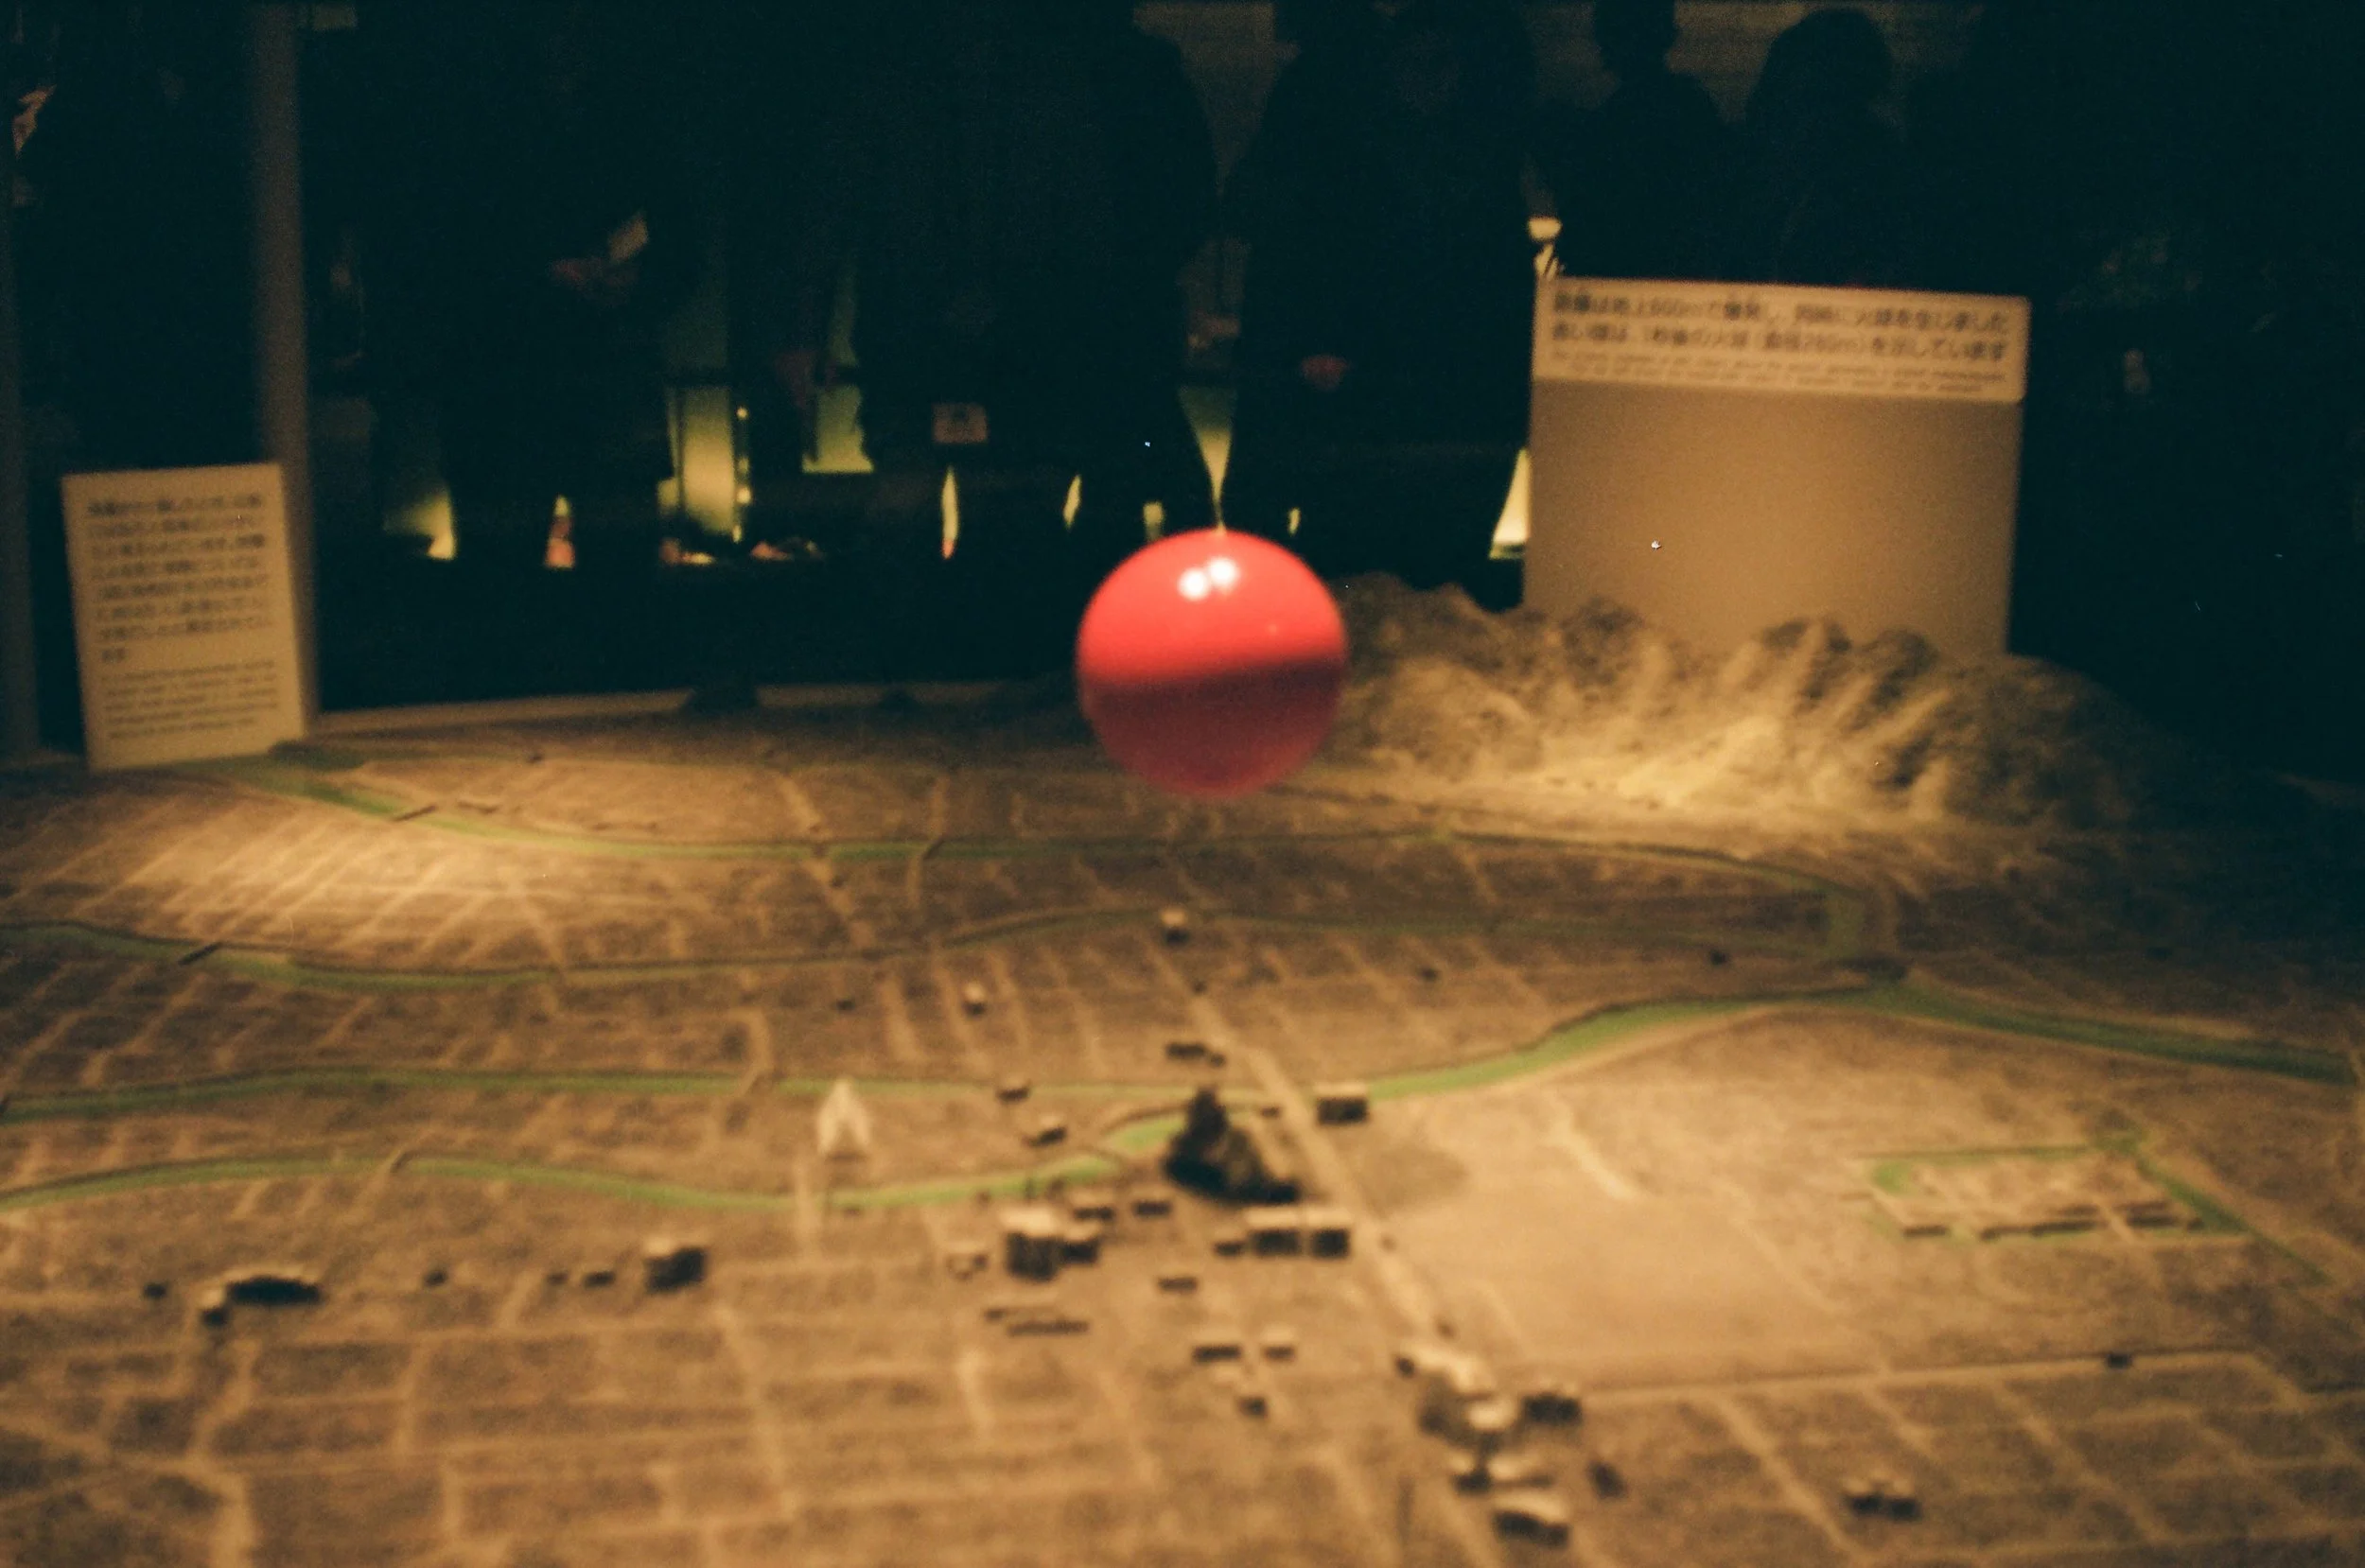
The Bomb, one of many dioramas at the museum. Praktica LTL. 50mm Meyer-Optik Domiplan Lens, Kodak Portra 400

Hiroshima Memorial Peace Museum, Praktica LTL. 50mm Meyer-Optik Domiplan Lens, Kodak Portra 400

Looking towards the epicenter from the grounds of the Hiroshima Memorial Peace Museum, Praktica LTL. 50mm Meyer-Optik Domiplan Lens, Kodak Portra 400
It Followed Me Home
The visit to Hiroshima went by in a blur. Before we knew it, it was back to Tokyo by high speed rail for a short overnight stay before flying home to Vancouver. At this stage of the trip I’d realized I’d done almost no shopping and thought to grab a few mementos of this visit other than the photos I was hoping would turn out. A quick stop at Lemonsha in Ginza and I found myself a like-new condition Yashica Electro GSN. Ok, I thought it was quick stop, but nearly missed my train as a result of a high degree of indecisiveness. This led to my first opportunity to sprint down a train platform, just like in the movies. The Yashica? A joy to look at, if not a powerhouse of photographic potential. That, along with a new-old-stock Seiko SKX007 that I found in a tiny clock shop in Koyasan, and my printed photobooks, are all tangible reminders that immediately elicit memories of this wonderful country that I will undoubtedly visit again.
It was a couple of years later that I decided to actually write up a story on this trip. Looking through my photographs while doing so, I was amazed by how quickly my memories of the experience sharpened. I guess that’s the beauty of travel photography. Its ability to transport you back in time and across the world to relive moments that otherwise might just be lost in the back-catalog of our minds. Even more special in this instance perhaps, is the memories of taking the shots themselves; composing, adjusting, fretting, forgetting, and as is the case when shooting film, hoping. Hoping the shots turn out, trusting your equipment, your film and your skill adds a bit of uncertainty to the experience that -for me- augments the adventure you’re on.

Yashica Electro GSN from Lemonsha, using a Huawei Smartphone with integrated Leica Summilux-H 27mm f1.8 ASPH

Seiko SKX007, arguably one of Seiko’s most loved pieces, found in a tiny clock repair shop in Koyasan. Shot on a Samsung S20 FE.
Stay tuned for my Japan series follow-up post where I’ll share some lessons learned on this first film-photography-only experience abroad. I learned a lot, and while I’ve shared some tips and thoughts throughout these articles, I look forward to preparing a summary of some of these key learnings for those of you contemplating a similar project.
Continue to the Epilogue: Japan - Travelling with Film Photography →
Koyasan - Japan
After a long day of travel getting here, we lay on our comfortable mattresses preparing to sleep when the deep hum of a gong reverberated from the forest and filled the room. It was a low tone that you feel more so than hear and one that had the hairs standing on the backs of our necks.
Kongobuji Kompon Daito Pagoda. Praktica LTL. 50mm Meyer-Optik Domiplan Lens, Kodak Portra 400
Serenity and the Ghost
Read Previous Part II - Kanazawa, Japan →
It’s tempting to focus on dazzling urban centers when visiting Japan, especially for a photography enthusiast. If you’re up for taking-in a breathtakingly ancient and quiet place for a few days, however; I’ve got just the spot for you. Koyasan, the home of Shingon Buddhism in Japan, is a tiny mountaintop village known for it’s clean air, dense forests, beautiful monasteries with their ryokan accommodations, and the ancient Okunoin cemetery. If that sounds interesting, read on! Let’s start with how to get here.
Rail is the way to go in Japan, Praktica LTL. 50mm Meyer-Optik Domiplan Lens, Kodak Portra 400
Chasing trains on the way to Koyasan. Praktica LTL. 50mm Meyer-Optik Domiplan Lens, Kodak Portra 400
This way up to Koyasan! Praktica LTL. 50mm Meyer-Optik Domiplan Lens, Kodak Portra 400
The interior of the funicular forms a bit of an optical illusion. Praktica LTL. 50mm Meyer-Optik Domiplan Lens, Kodak Portra 400
Nankai Koyasan Cable Line, the funicular that takes you up the steep slope to Koyasan Station. Praktica LTL. 50mm Meyer-Optik Domiplan Lens, Kodak Portra 400
As is the case with most travel in Japan, the train is the mode of choice for getting to Koyasan. We left from Kyoto and spent a lovely morning winding through Osaka and into the more quiet villages in the southern foothills. You change trains twice, once in the village of Hashimoto and again when you arrive at the funicular station. This was my first time on a funicular and it was definitely a fascinating experience. Our minds are programmed for trains to be level, so walking up a staircase within the train to get from the back to front can be a bit vertigo inducing! The short ride up the hill and through the trees gives the sense of gradually entering a different world, which proved a fitting feeling given where we ended up.
Awe-inspiring 11th century Daimon Gate, Praktica LTL. 50mm Meyer-Optik Domiplan Lens, Kodak Portra 400
Most of the lodging in Koyasan is in the form of “ryokan” or pilgrim’s lodgings, which are effectively private rooms within a monastery. We stayed at the Fukuchi-in Temple Ryokan and I’d highly recommend it. (Since our visit they updated their website which now provides some great guidance to visiting Koyasan). The accommodation is spartan but impeccably clean and comfortable, and in keeping with the lifestyle of the monks who live there. Food is served to you in a dedicated room and with multiple servers who bring delicate traditional vegetarian dishes unique to the area that are as delicious as they are simple. There is an onsen on site which again is basic but utterly relaxing with its hot-spring fed waters bubbling in silent surroundings.
If you’re willing to get up early (and you really should), the monks invite you to join them for their morning prayer ceremony. I’ve never attended a Buddhist ceremony before, let alone one in the village at the heart of Shingon Buddhist lore, and I found myself utterly engrossed in the chants and rituals. A tip for would-be worshipers; the room the ceremony is conducted in is open to the outdoors and at that time of year, the air was just above freezing at sunrise. I was underdressed and pretty cold having chosen to wear the traditional garments offered to guests upon arrival but it somehow didn’t detract from (perhaps enhanced?) my enjoyment of the experience.
Fukuchi-in Temple, Koyasan, Praktica LTL. 50mm Meyer-Optik Domiplan Lens, Kodak Portra 400
In classical Japanese fashion, the sleeping room is an open and largely empty space with tatami mats on the floor and a large window facing into the deep coniferous forest. After the lengthy day of travel getting here, we lay to rest early on our comfortable mattresses when the deep hum of a gong reverberated from the forest and filled the room. It was a low tone that you feel more so than hear and one that had the hairs standing on the backs of our necks. It was at that moment that one of our friends felt a deliberate but gentle tap right on the center of her forehead. She yelped, startling all of us from our wispy near-sleep states. Was a playful travel companion pranking a friend? Or, a playful spirit passing through? To this day no-one has claimed responsibility for the tap, so…
Manihouto Buddhist Temple. Praktica LTL, 50mm Meyer-Optik Domiplan Lens, Kodak Portra 400
Koyasan is essentially a one-road-town and easily walkable. While there are a few tiny shops and restaurants along the road, the village is largely dominated by temples, shrines and monasteries. Most visitors eat at their ryokan, but a tiny izakaya just a couple of blocks east of our lodging proved a delightful spot for dinner one night. Even at the izakaya, the restauranteur bade us trust him with the menu (or so we surmised) and served up terrific plates of sushi, pickles and tofu. Very few people we encountered here speak English, but that never seemed to be a barrier.
Okunoin, Praktica LTL, 50mm Meyer-Optik Domiplan Lens, Kodak Portra 400
At the far western end of the town lies the Okunoin Cemetery and this is a sight you simply cannot miss if you are in the area. The Okunoin is a deeply spiritual place, the kind you read about in fantasy novels where hero’s and heroines have epiphanies and meet mystical beings. My skin tingles thinking back on it now even as I write this. Its grounds are essentially a 2km long meandering path through dense, tall and lush forest with tombs and graves dating back to at least 816AD lining the path and even scattered hidden behind trees and bushes. It is not as orderly as one might expect in Japan, a product of it’s ancient and seemingly haphazard expansion through the forest over hundreds of years. In Japan it is said that you are born Shintoist but die Buddhist and you certainly feel that here. There are even massive corporate tombs here for firms such as Toshiba, Mazda and other Japanese industrial giants and it is apparently a great honor for an employee to be buried here.
At the end of the walk is the tomb of Kobo Dashi, the founder of Shingon Buddhism. While photos of the tomb are not allowed, you are invited to observe the ceremonies that take place there every day, with monks feeding the spirit of Shingon’s ancient founder. While we experienced the Okunoin with daylight sun filtering through the thick green of the trees, nightime walks are available where the forest is lit entirely by lanterns. I wasn’t aware of this at the time, but might just make the trip back next time I’m in Japan just to experience that -with a different camera of course! The peril of committing to a single ISO with a choice of film stock is missing out on certain opportunities.
Incredible wood patterns under the roof of a pagoda, Praktica LTL, 50mm Meyer-Optik Domiplan Lens, Kodak Portra 400
On the eastern end of town lies the Danjo-garan Buddhist Temple complex filled with a variety of ancient buildings and structures including the Kongobuji Kompon Daito Pagoda pictured at the header of this article. There was a nominal fee to enter this area and it’s well worth the spend to see and learn more of Koyasan’s history. The structures themselves are impressive, stunningly large in some cases, and beautifully painted in bright colors with intricate hanging lanterns.
One of the many buildings in the temple complex, Praktica LTL, 50mm Meyer-Optik Domiplan Lens, Kodak Portra 400
Walking through history, Praktica LTL, 50mm Meyer-Optik Domiplan Lens, Kodak Portra 400
A trip to Koyasan provides an opportunity to see a part of Japan’s history unfettered by modernity. A rare place, that caters to pilgrims and tourists without loosing it’s authenticity and charm. I hope this short piece entices you to visit someday! Next on our journey, we were back into the hustle of urban Japan with a stop in Hiroshima. A place I’d never thought I’d see, but I’m glad I did.
Kanazawa - Japan
A guide to Kanazawa, Japan—Kenroku-en gardens, historic districts, incredible seafood, and a slower, more local side of Japan.
The Moat surrounding Kanazawa Castle, Praktica LTL, 50mm Meyer-Optik Domiplan Lens, Kodak Portra 400
Gardens and Sake
Read Previous Part 1: First Frames, Tokyo, Japan →
We left the urban expanse of Tokyo by train, headed for the west-coast city of Kanazawa. The train is by far the easiest and most reliable way to travel Japan and in our case, the two-week JR Rail Pass was worth every Yen. I recommend ordering your tickets in advance of your trip and picking them up when you arrive. My Canadian friends can click here to find and book the package that suits your plans best.
So, why Kanazawa? Our friend Kaeko would be in town and was excited to host us in her home city, so we jumped at the chance of a guided visit to a place a little off the typical tourist path. Compared to Tokyo, we would throttle back the pace for these next few days. Our aim, to see where our friend grew-up, enjoy it’s renowned gardens, preserved historical districts and of course, enjoy a local’s tips for where to eat & drink.
The Tea House, Praktica LTL, 50mm Meyer-Optik Domiplan Lens, Kodak Portra 400
Kenroku-en
Considered one of the top three most beautiful landscape gardens in Japan, Kenroku-en was as lovely and peaceful as one might expect. The spring was late in Japan that year, so the sakura which would normally be blossoming were only just budding at the time. This also meant the garden was relatively free of tourists, and thus allowed for largely unfettered exploration. It also meant we were easily able to arrange to take part in a traditional tea ceremony at the tea house which sits perched over Kasumiga-ike pond. I can still smell the tea brewing if I think back to it, a memory that calms my mind as if I were still kneeling at that table.
View from the Tea House, Praktica LTL, 50mm Meyer-Optik Domiplan Lens, Kodak Portra 400
Budding Sakura, Praktica LTL, 50mm Meyer-Optik Domiplan Lens, Kodak Portra 400
Beauty Around the Castle
Surrounding the grounds of the castle and Kenroku’en are a variety of parks, gardens and temples to enjoy. Gyokusen’inmaru is another award winning garden built in the shape of an amphitheater around it’s meandering central pond. There’s a delightful coffee shop on the west side of the garden where one can sit and sip while taking in the view.
Across the street you find the Oyama shrine and the beautiful pond adjacent to it. I particularly enjoyed the bridge across the pond with it’s seemingly eccentric jagged pattern of sudden stops and turns. Evidently the design is strategic, it’s unexpected turns and surprise drops tricking unfriendly spirits into “walking the plank” to their doom. Near the shrine, Kaeko pulled a few strings to get us an up close look inside a one-time samurai-sword making factory that now houses artisans hand crafting some of Kanazawa’s renowned pottery.
Gyokusen’inmaru Park, Praktica LTL, 50mm Meyer-Optik Domiplan Lens, Kodak Portra 400
Bridge at Gyokusen’imaru Park, Praktica LTL, 50mm Meyer-Optik Domiplan Lens, Kodak Portra 400
Pond at Oyama Shrine, Praktica LTL, 50mm Meyer-Optik Domiplan Lens, Kodak Portra 400
One time sword factory, now making pottery. Praktica LTL, 50mm Meyer-Optik Domiplan Lens, Kodak Portra 400
Plenty of museums also surround the area, one of the more stunning of which is the D.T. Suzuki Museum, dedicated to the prominent Buddhist philosopher of the same name. Unfortunately it was closed when we were there, but the grounds alone are worth the visit and some quiet contemplation.
D.T. Suzuki Museum, Praktica LTL, 50mm Meyer-Optik Domiplan Lens, Kodak Portra 400
And Plenty of Normal Life
Of course Kanazawa isn’t all castles and gardens, and while I left the camera at home most nights for fear of sake-induced damage, there’s plenty of enjoyment to be found in the city’s everyday life. Highlights included an all you can drink sake bar (yes, really), the Nagamachi historic samurai neighborhood (visited by moonlight, after the sake) and what must be the tiniest, most delicious and characterful yakitori restaurant I could imagine (I’ve sadly heard it’s no longer open). The Higashi Chaya district blends history and real life and is perhaps your best chance of spotting a real geisha on the way to/from work (or tourists attempting to dress like one). The area is known for it’s ultra-fine gold-leaf based crafting, so we jumped at the chance to make our own real-gold coated chopsticks!
Speaking of chopsticks, the seafood in town is remarkable, we tried a kaiten-zushi style restaurant with a mini-shinkansen delivery system ordered off a tablet menu. Aside from the novel delivery system, I’ve never experienced melt-in-your-mouth sashimi like that before and it’s reason enough for me to day-dream of returning soon.
Light Leaks at the market, Praktica LTL, 50mm Meyer-Optik Domiplan Lens, Kodak Portra 400
Kazuemachi Stroll, Praktica LTL, 50mm Meyer-Optik Domiplan Lens, Kodak Portra 400
Craft Beer, Kanazawa style, Praktica LTL, 50mm Meyer-Optik Domiplan Lens, Kodak Portra 400
Your Own Path
Kanazawa may not be a destination that springs to mind when planning a trip to Japan. But with the Shinkansen ride through beautiful countryside taking only 2.5 hours from Tokyo, and an abundance of culture, atmosphere and food to enjoy, it’s a place worth considering for your itinerary. We covered a lot of ground in a short time during our visit, but never felt rushed or busy about it; a great little reprieve before diving into the rest of our journey.
Kanazawa Alleys, Praktica LTL, 50mm Meyer-Optik Domiplan Lens, Kodak Portra 400
First Frames, Tokyo - Japan
Admittedly the first few days of this trip were spent shooting sparingly, driven by the neophyte’s underlying fear of depleting a limited film stockpile.
Streets of Shibuya, Praktica LTL, 50mm Meyer-Optik Domiplan Lens, Kodak Portra 400,
“I am in Japan”
Read Previous: Japan - Prologue →
I remember thinking this as we rode the train from Narita Airport towards Tokyo. I’ve been fortunate to visit many countries over the years, but with Japan I felt an immediate wonder and giddiness I hadn’t felt before. Would it live up to the expectations of my eager imagination? Would this old film camera do it justice?
Urban Shibuya, Praktica LTL, 50mm Neyer-Optik Domiplan Lens, Kodak Portra 400.
Shibuya Streets, Praktica LTL, 50mm Meyer-Optik Domiplan Lens, Kodak Portra 400.
Live Small to Live Large
Our first stay in Japan was a tiny apartment in the quiet yet dense western part of Shibuya. There were seven of us friends travelling together and yet we fit quite cozily into the small but well laid-out space. We opted for apartments rather than hotels for the vast majority of our trip, in hopes of getting a more local feel and perspective for each destination. Mostly, our accommodations only acted as storage and a place to sleep. We’d set out on foot each day from dawn until well into the night to immerse ourselves in the city. Where to eat, drink and explore was decided largely on the fly, with some tips and recommendations safely archived in the backs of our minds, guiding the general flow of our wandering.
I clutched my camera eagerly as we stepped out of the door into the cool air of the morning. I hadn’t traveled with photography specifically in mind in quite some time, so I felt a mixture or trepidation and excitement about capturing what I saw, free from chimping, but fraught with other silly concerns instead. Should I shoot that? Did I remember to use the meter in that last shot? Wait, what aperture am I using? Focus!
Lovely place for a break; Little Nap Coffee Stand, Shibuya, Praktica LTL, 50mm Meyer-Optik Domiplan Lens, Kodak Portra 400.
Texture & Color, Praktica LTL, 50mm Meyer-Optik Domiplan Lens, Kodak Portra 400.
What catches my eye?
I used to seek to capture the grandiose, the iconic and the archetypal sites of the places I visit. After-all, when you get back home from a trip, are you not asked; “did you see “X” and, what did you think of the “Y”!!?” by your family and friends? On this trip to Japan, I’d try to un-tether myself from that. Sure, I’d be hunting down sakura, castles, kei cars and all the rest, but could I open my mind to notice more and capture more of my experience?
Admittedly the first few days of this trip were spent shooting sparingly, driven by the neophyte’s underlying fear of depleting a limited film stockpile. I later discovered that Tokyo, and most of Japan in general, is stocked to the gills with film at camera stores, drug stores and corner shops. Running out wouldn’t be a problem and in fact, next time I go, I’ll load up with rolls on arrival as Japan’s readily available selection of film is remarkable. To this day, I always seem to bring more rolls than I need, but have also become comfortable experimenting and taking more chances with what I try to photograph. If I were sponsored to shoot my travels I’d no doubt shoot with a higher frequency, but “spot, stop, snap, move-on” suited the flow of this trip just fine.
Tofu Delivery, Praktica LTL, 50mm Meyer-Optik Domiplan Lens, Kodak Portra 400.
Moment of Serenity in Yoyogi Park, Praktica LTL, 50mm Meyer-Optik Domiplan Lens, Kodak Portra 400.
““Should I shoot that? Did I remember to use the meter in that last shot? Wait, what aperture am I using? Focus! “”
On the hunt for Ramen, Vicky in foreground, pals in the back. Praktica LTL, 50mm Meyer-Optik Domiplan Lens, Kodak Portra 400.
The ubiquitous masks, Praktica LTL, 50mm Meyer-Optik Domiplan Lens, Kodak Portra 400.
The Buns, choosing their ramen. Praktica LTL, 50mm Meyer-Optik Domiplan Lens, Kodak Portra 400.
How’s “The Brick” Holding Up?
From a beginners perspective, the Practika LTL’s simplicity was a boon. Not too much to mess with; just line up the exposure needle using aperture/shutter speed (ensuring you’re holding down the metering lever), focus and click. Aside from forgetting one of the latter, the biggest challenge became apparent as night fell. There’s no illumination of the exposure needle, so if you’re shooting a dark scene it’s difficult to confirm your exposure. A trick I discovered was to quickly point the viewfinder towards the lightest point of the frame in hopes of seeing the needle contrast it for a moment. The needle moves reasonably slowly and that would give me a brief glimpse of how close I was within my composition. The rest is up to me to hold still, keeping in mind an ISO of 400 might necessitate using a lamppost or mailbox as an impromptu stabilizer. If I were flying back tomorrow, there’d definitely be some Cinestill 800T in my bag and perhaps my little Olympus XA loaded with Black & White to push.
Heading back to the apartment, Praktica LTL, 50mm Meyer-Optik Domiplan Lens, Kodak Portra 400.
Tokyo Nights, Praktica LTL, 50mm Meyer-Optik Domiplan Lens, Kodak Portra 400.
Look Up
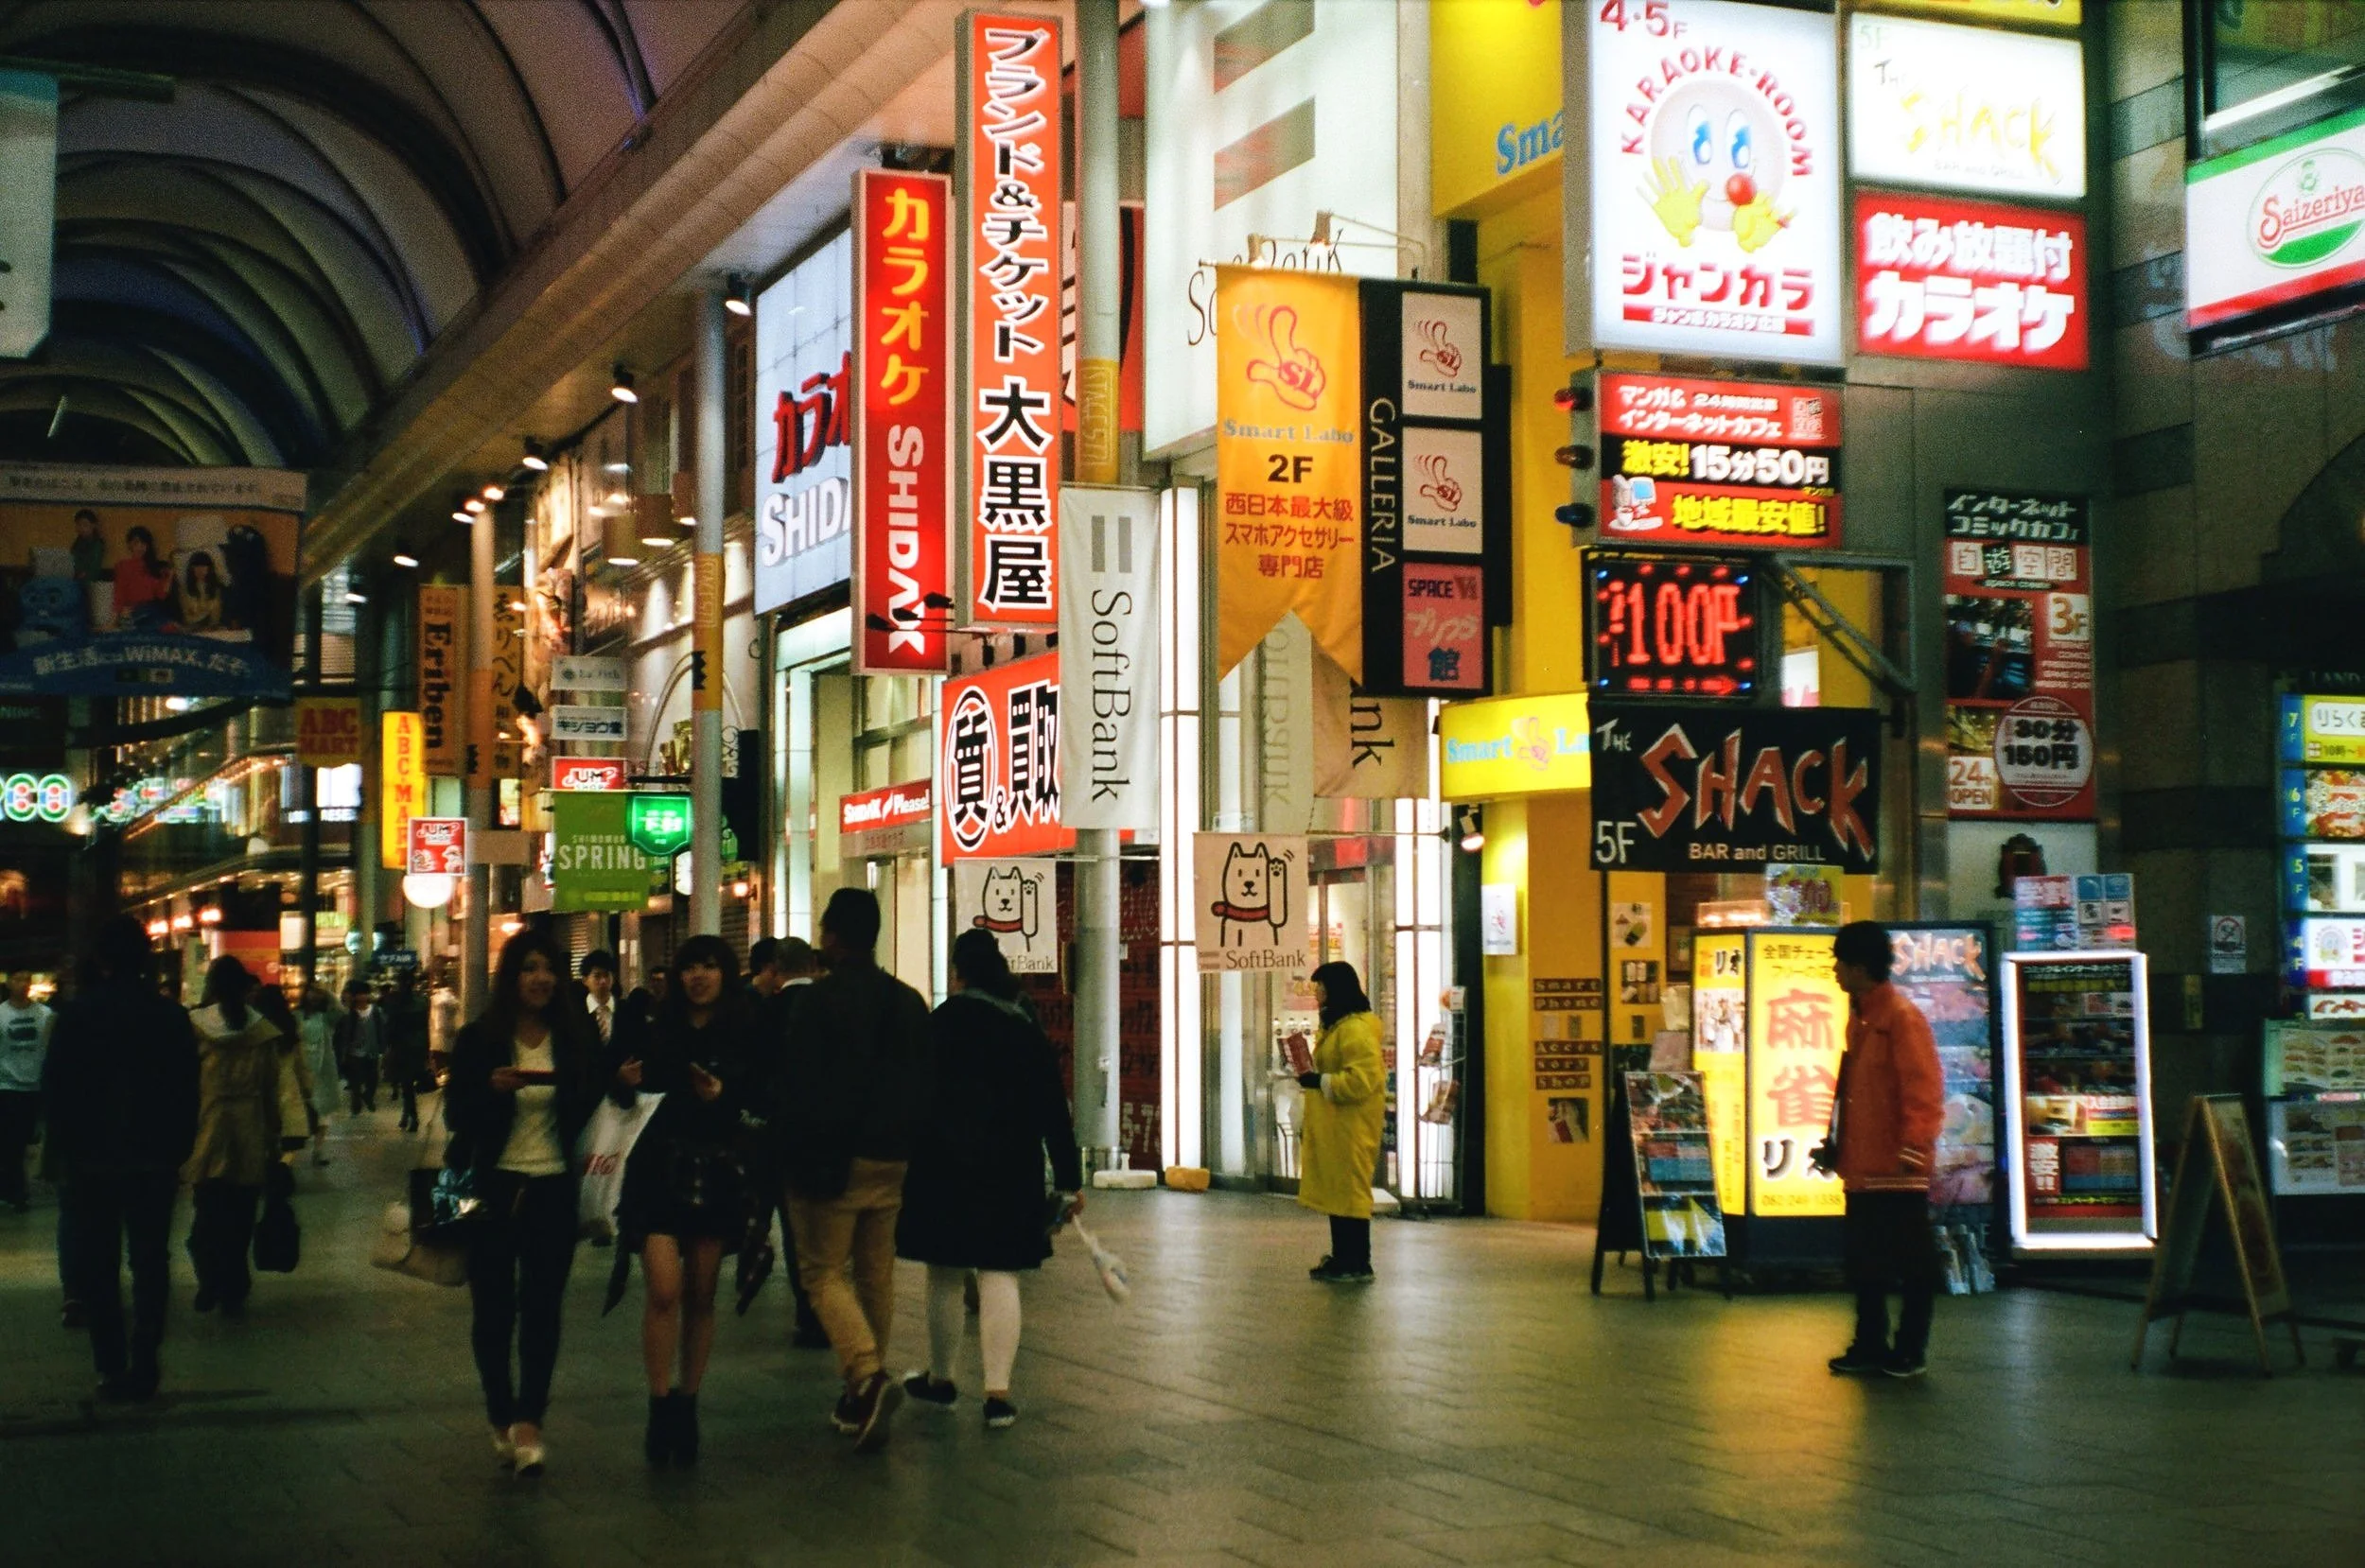
So, what catches the eye in Tokyo? EVERYTHING. Especially if it’s your first visit. To me the architecture seems rooted in the 70’s and 80’s, with intense density, and I loved it. Buildings and people tightly packed without ever feeling cluttered. Trying to find a particular shop? Make sure you look up! In stark contrast to North American retail with its shops rooted to the ground level (malls aside), you might have different retailers on floors 1 through 10 of any building you walk past in the busier parts of town. In one case, I had to ride a nondescript elevator to the 8th floor of a church in Ginza, to get to one of Tokyo’s famous used camera stores, Lemonsha. I could have spent an entire day -and entire bank account- in that one shop easily.
Kappabashi, Praktica LTL, 50mm Meyer-Optik Domiplan Lens, Kodak Portra 400.
Kappabashi Tourists, Praktica LTL, 50mm Meyer-Optik Domiplan Lens, Kodak Portra 400.
Each sign on the stack may represent a different store, above and bellow street level. Praktica LTL, 50mm Meyer-Optik Domiplan Lens, Kodak Portra 400.
So much to say
I didn’t originally photograph Tokyo with the intent to write about it. Heck, I wasn’t even sure if a single picture I took would turn out in my first film photography forray abroad. In retrospect, I could write essays about the place (many have), documenting the city neighborhood by neighborhood. I will return, shoot more, and tell more detailed stories one day. I spent most of this visit exploring and chatting with friends, delighting at new experiences, flavors and sights, and snapping the odd pic along the way. That approach, I think, made for the best “first date” with Tokyo of all. Not over analyzed, stylized nor dramatized. Just a few days to get to know each other. Besides, there was much more of Japan to see ahead. Follow me and I’ll show you!
Feels like a dream, Praktica LTL, 50mm Meyer-Optik Domiplan Lens, Kodak Portra 400.
Japan - Prologue
“Does it work"?” I asked, pulling the metal brick out of a dusty cupboard. “Find a battery for it and find out!” My Dad replied. And like that, sometime in early 2017, my curiosity for film/photography was reborn.

Temples. Praktica LTL, 50mm Meyer-Optik Domiplan Lens, Kodak Portra 400,
“Does it work"?” I asked, pulling the metal brick out of a dusty cupboard. “Find a battery for it and find out!” My Dad replied. And like that, sometime in early 2017, my curiosity for film/photography was reborn. A personal challenge formed in my mind as I inspected the chunky form of my Dad’s Pentacon Pracktica LTL; could I commit to taking this camera on my upcoming trip to Japan, and shoot the entire experience using film alone, in this day and age?

“The Brick”, Dad’s Praktica LTL. Huawei P10 PLus.
Gear
The Praktica is typical of accessible East German consumer workhorse cameras: it feels solid, weighs a ton and skips frills for simplicity and functionality. In a way it was the perfect camera for my sojourn back into photography. Everything is manual, tactile, visceral, simple. A small lever next to the shutter release activates the TTL meter (easy to forget in a pinch until you’re used to it) and a black needle hovers near a tiny circle on the right within the viewfinder indicating exposure. Shutter speeds as fast as 1/1000th are available and the ASA/DIN dial allows you to select as high as 1600.
I had figured a 50mm lens would do the trick (my desire to bring a bag of lens options came later in my photographic renaissance, though I’ve since toned that back down). I found a clean and clear Meyer-Optik Domiplan 50mm f2.8 and -sold on the sellers description of super-cool bokeh- chose that to screw onto the front of this chunky little camera for the duration of the trip.
The question of what film to bring was not so simple. I knew I wanted color rather than black & white and decent versatility to shoot in various light conditions. Online advice proved a mishmash of mixed opinions (is it ever anything else?), so I visited my two favorite camera stores in Vancouver (Beauphoto and Leo’s) to get the opinions of the folks behind the counter. With their advice, I settled on Kodak Portra 400, and bought a box of 5 rolls, 180 shots to cover my two week trip. I’d heard that film was still quite easy to find for sale in Japan, so didn’t stress that I wasn’t bringing enough and besides, I didn’t intend to blast away as I once did with my digital. With 400 -I figured- I could capture anything in daylight, and with a steady hand take a chance at Japan’s spectacular night scenery as well.

Kodak Portra 400, Huawei P10 Plus
““Could I end up shooting a whole trip only to find irreparably damaged negatives when I got home?””
Doomed from the Start?
With bags packed and the promise of sake and sakura ahead, we headed to YVR airport in Vancouver to fly to Tokyo by way of Shanghai. Film canisters softly clattering together in my backpack, I’m eager to experience Japan and capture it in a way that feels novel (what’s old is new again) and somehow more deliberate compared to the “I’d better snap this” feel of cellphone photography. I figured I’d load the camera in the darkness of the airplane, ready to step out and capture a new world. My friends seemed a little puzzled at my choice, but they’re used to me by now and reflect my optimism back at me with their own excitement at our groups’ first trip abroad together.
“Sir pass the bag through the X-Ray please,” the stern-faced security person gestures towards the Ziploc bag full of film, grasped tightly in my hand as the rest of my carry-on makes it’s way though the machine. The 5 minute interaction that followed involved a fair bit of eye-rolling and threats until a level headed and more senior supervisor came to the rescue and gave the bag a quick hand-check. Sure, lower ISO film should be fine passing through once…but how many scans through a machine can it take before it’s impacted*? I’d be passing by at least 4 scanners on this trip and was hoping to minimize potential damage. Could I end up shooting a whole trip only to find irreparably damaged negatives when I got home? For that matter will this 40 year old piece of hardware stand up to so much sudden use? As I buckled in for the flight, excitement and anticipation overshadowed that brief flood of doubts. Headphones-in, I close my eyes and daydream what’s to come.
Continue to: First Frames, Tokyo - Japan →

China Eastern to Tokyo. Praktica LTL, 50mm Meyer-Optik Domiplan Lens, Kodak Portra 400.
*Later on I’d read about “burner rolls”, a high ISO film roll that you include in your bag that serves as a valid excuse to avoid passing the whole film-bag through a machine. This has proved an effective tactic!

Expert Shield Screen Protector
A brief review of the excellent Expert Shield Screen Protectors.

Give Your Gear Some Love
If you’ve followed my blog for a bit, you’re likely wondering what I’m doing writing about a digital camera accessory. While it’s true I love the experience of shooting with film, great design is always near and dear to my heart and there are some wonderfully designed digital cameras out there, with the Fujifilm X-Pro2, Ricoh GRii and Olympus TG3 occasionally finding themselves in my hand or somewhere in my Peak Design Everyday Backpack. A common feature of all three of these cameras is an exposed screen and -as one who obsesses about keeping his toys tidy- preventing those screens from becoming damaged is important to me.
You’re Writing About A Clear Piece of Plastic?
Yes, yes I am! As I mentioned, I love great design, and even something as simple as a screen protector will catch my attention if it’s executed well. The Expert Shield Screen Protector is a simple lesson in excellent product design and user experience, enough so that I’ve actually been thinking about writing about ever since i installed my first one. So here we go, the short and sweet on why this is the only screen protector brand I would consider for my cameras.


Fit & Finish
I’ve now purchased and installed two Expert Shield screen protectors, one on my Ricoh GRii (above) and the other on my Fujifilm X-Pro2 (bellow) and the fitment is absolutely spot on. My X-Pro2 protector even came with a spare in the sleeve (perhaps inadvertently?) and when I lined it up it matched the screen as perfectly as the original piece I affixed. For the Ricoh I chose the “Anti Glare” variant, whereas I used the “Crystal Clear” version on the X-Pro2. This was somewhat strategic, given the Ricoh lacks a viewfinder and thus good screen visibility in all lighting conditions is paramount. With the Fuji, I primarily use the viewfinder to shoot, and so the screen is really used just to review my shots.
The screen on both cameras is slightly recessed and for this reason I believe the protector is about 1mm shy of perfectly flush with either side, which actually helps with ease of installation. The screen comes cleverly sandwiched between two protective layers which helps you not mess up in handling and when practicing test fittings. Finally, there’s nothing flimsy about it; both versions have a quality feel with a thickness and rigidity that might surprise you but definitely will inspire confidence in their ability to help protect your gear.


Easy as ABC
About a year ago I witnessed first hand as a camera-store employee ham-fistedly affixed another brand of screen protector to my Xpro-2 (and assured me all the bubbles left behind would sort themselves out). The experience left me a bit gun-shy about trying it myself, but eventually the old protector was so dilapidated that I simply had to peel it off and find a replacement. Expert Shield clearly have put a lot of thought into ensuring their customers’ experience affixing the protector is stress-free. They even provide a handy screen wipe to ensure your screen is crystal clear before adding the protector. The package has clear, concise and fairly comical instructions printed on the back, and of course there’s even more detail and installation videos on their site. The installation tip recommending doing the final installation in a slightly foggy bathroom (to reduce dust in the air and thus landing on your screen) seemed especially clever; though my wife was curious what I was up to bringing the camera into the bathroom and running a steamy shower…

It Works
After several months of rattling around in backpacks, purses and the back of our cars; the screens (and shields) look as immaculate as the day I installed them. No bubbles, all edges firmly affixed and not even a scratch on either. Both versions work well in various lighting conditions without distorting or obscuring what you’re aiming to see. The crystal clear version which I have on the XPro-2 feels a touch softer than the anti-glare variant, so I expected it to start to show some scratching but it’s been remarkably resilient. In fact, when I started writing this piece I had to check the XPro-2 closely just to make sure it was indeed still installed -it’s that clear and precise a fit. The anti-glare shield on the Ricoh quite frankly feels like it will outlive the rest of the camera. It’s a touch more difficult to clean fingerprints from than the crystal clear version, but I find a mild screen cleaning solution such as Zeiss Lens Cleaner does the trick to keep it clean. I highly recommend these affordable, well-made shields for your camera. They’re a cheap investment to help protect a not-so cheap tool and certainly give you a ton more piece of mind when working with cameras with exposed screens.
Disclaimer
I purchased these screens from Amazon on my own and was neither sponsored nor subsidized to do so nor to write this article. I’m a consumer and enthusiast sharing a great experience for like-minded individuals! If you’d like to purchase these screen protectors for your own cameras, please consider using the links in my article, through which I might earn a small commission on qualifying purchases as an Amazon Associate. This will help to offset my hosting costs and allow me to keep generating content you enjoy! Thanks! RicohGRii and Fujifilm XPro-2

Get Disconnected - Murtle Lake
Once at the end of the road you’ll find yourself in a small dirt parking area and that’s where the adventure begins. From there, the lake entry-point is accessed via a winding 2.5km forest trail.
Peter & Peter, Olympus XA, Portra 160
Want to see the quintessential lakes and mountains of British Columbia, without the crowds that accompany the easily accessed sites near Vancouver? I may have a spot for you -if you’re willing to put in some effort to get there. Murtle Lake BC is the world-famous lake you've likely never heard of, until now.
White sand beaches, Murtle Lake BC, Olympus XA, Portra 160
Planning a trip? Here’s what you need to know before you go:
Murtle Lake — Quick Facts
Location: Wells Gray Provincial Park, British Columbia
Distance from Vancouver: ~600 km (≈7–8 hour drive)
Nearest Town: Blue River, BC
Access: 18 km forest service road + 2.5 km portage trail
Lake Size: ~30 km long
Boating: Canoe / kayak only (no motorized boats)
Campsites: Distributed along shoreline (many with bear caches & outhouses)
Best Time to Visit: June – September
Key Tip: Paddle early—afternoon winds can be intense
Cell Service: None
How to Get to Murtle Lake
“World Famous” you say? Yes indeed, though I’d first heard of it only a couple of weeks before we ventured out. Murtle Lake is the largest canoe/kayak only lake in North America. That means no power-boats, no sea-do’s, not even those little electric powered dinghy’s to help you explore this body of water that stretches for over 30km. This is going to be a paddle powered adventure, once you reach the water that is.
The lake is located in Wells Gray Provincial Park in British Columbia’s interior, nearly 600km from Vancouver, and an 18km off-road drive from the nearest village, Blue River BC. A 4x4 is not required, but good ground clearance and rugged tires will get you to the trail head with less stress. Once at the end of the road you’ll find yourself in a small dirt parking area and that’s where the adventure begins. From there, the lake entry-point is accessed via a winding 2.5km forest trail. This means you are hiking/portaging to the lake with your camping gear, supplies and vessel of choice, unless you’ve arranged to rent a canoe from the nice folks at Blue River Campground, who’s canoes are stored at the small dock at the end of the trail. The above characteristics tend to keep the day-trippers away and when considering the sheer size of the lake, almost guarantees the solitude one hopes for in a wilderness getaway such as this.
Cozy campsite, Murtle Lake BC, Olympus XA, Portra 160.
Canoe Camping on Murtle Lake
Once you’ve left the dock and the small lagoon at the southern tip of the lake, the rest is up to you. There are campsites all over the shores of Murtle Lake, most equipped with bear-safe storage boxes and even outhouses. If you’re staying for a few days, you should relocate a number of times and experience different sites, shores and islands that can vary wildly from dense thickets to long white sandy beaches. A key piece of advice I’ll share is to start your paddling early in the morning and plan to end by mid-day. Fierce winds can descend upon the waters in the afternoon and easily overpower even the strongest paddlers, sending you wherever they’re blowing (which can be 20km+ from where you want to be, or worse). If you’re caught out later than you expected, hug the shore in case you need to make a hasty landing.
Murtle Lake BC, Olympus XA, Portra 160
The Sound of Silence
As power-craft aren’t allowed on the lake, there’s nothing but nature to assault your senses. The breeze whistling through trees, a trout jumping, the frogs croaking, all combine to create a nice backing track to whatever you’re up to. Oh, and the mosquitoes buzzing, but they’re not too bad. I tend to have my best sleeps while camping, and this place didn't disappoint in that regard.
Wild Shore, Murtle Lake BC, Olympus XA, Portra XA
Hidden bonus lake! Murtle Lake BC, Olympus XA, Portra 160
Dinner prep, Murtle Lake BC, Olympus XA, Portra 160
White Sandy Beaches
Few lakes in the Pacific North West have white sandy beaches (that aren’t human-made), but Murtle, no doubt due to its glacial-volcanic heritage, has plenty. On a hot summer day you could be forgiven for thinking you’re somewhere much more tropical as you lay on the warm sands soaking up the sun.
Paddle past a beach, Murtle Lake BC, Olympus XA, Portra 160
Picnic Spot, Murtle Lake BC, Olympus XA, Portra 160
Let’s stop here, Murtle Lake BC, Olympus XA, Portra 160
To Do
I probably don’t need to tell you how to fill your time here, but definitely don’t forget your fishing rod! Even a natural fish-replant such as myself was able to catch some trout, and they were delicious cooked over the open fire. Organic eating with lake-to-table sustainable appeal!
There are also numerous hikes available from various campsites, including one to another hidden lake which didn’t show up on any map I had with me. I delight in experiences like that, and found most fellow paddlers on the lake eager to share their tips & tricks to finding hidden gems in the area.
Lighting the reeds and grasses, Murtle Lake BC, Olympus XA, Portra 160
Vicky catches the Sun, Murtle Lake BC, Olympus XA, Portra 160
Sunset at Murtle Lake BC, Olympus XA, Portra 160
Get Disconnected
A spot such as this is best shared with family and friends, in person and in the moment. One of my favorite aspects of this piece of wilderness was the complete disconnection from the digital. No signal here, folks. You can enjoy the company you brought along with you without distraction, and if you haven’t experienced that in a while, the experience alone is worth the trip.

Moody Symphony - Tofino
It’s not often you hear someone say, “I hope there’s a storm”, when planning a weekend to the coast, but then Tofino, British Columbia isn’t your typical beach destination.
Victoria watches the waves, Nikon FE, Nikkor 20mm lens, Rollei Superpan 200, Circular Polarizing Filter
It’s not often you hear someone say, “I hope there’s a storm”, when planning a weekend to the coast, but then Tofino, British Columbia isn’t your typical beach destination. Tucked into the edge of a temperate rain-forest on the far Western shore of Vancouver Island, its sprawling beaches meet tall evergreens as surfers delight in waves that approach unfettered from the Pacific Ocean. Sure, it’s lovely in the sunshine, but the Pacific Northwest is at it’s best when mother nature throws some energy at it, stirring up the sky and sea into a moody symphony. To capture that mood, I chose Rollei Superpan 200 (perhaps my favorite black & white film) and my trusty Nikon FE. Can you hear the wind and the waves?
Florencia Bay, Nikon FE, Nikkor 20mm lens, Rollei Superpan 200, Circular Polarizing Filter
Florencia Bay Driftwood, Nikon FE, Nikkor 20mm lens, Rollei Superpan 200, Circular Polarizing Filter
Tonquin Beach, Nikon FE, Nikkor 20mm lens, Rollei Superpan 200, Circular Polarizing Filter
Victoria on Tonquin Beach, Nikon FE, Nikkor 20mm lens, Rollei Superpan 200, Circular Polarizing Filter
Exhausted Surfer on Chesterman Beach, Nikon FE, Nikkor 20mm lens, Rollei Superpan 200, Circular Polarizing Filter
Victoria fixed on the sea, Chesterman Beach, Nikon FE, Nikkor 20mm lens, Rollei Superpan 200, Circular Polarizing Filter
Chesterman Beach Surfer, Nikon FE, Nikkor 20mm lens, Rollei Superpan 200, Circular Polarizing Filter
Tonquin Tree, Nikon FE, Nikkor 20mm lens, Rollei Superpan 200, Circular Polarizing Filter
Surfers on the Way Out, Chesterman Beach, Nikon FE, Nikkor 20mm lens, Rollei Superpan 200, Circular Polarizing Filter
Undersea Fiji - Viwa
The first adventure of every Viwa dive excursion is crossing its barrier reef. There’s a small gap forming a channel about a hundred meters off-shore that the boat has to blast through in order to get to the deeper waters beyond.

A Garden of Coral, Viwa Fiji, Olympus Tough TG3, Dive Housing
As I described in my last post, the Island of Viwa is an isolated place, situated on the extreme Western edge of the Yasawa group of the Fijian Islands. It’s a long boat ride from anywhere, so I recommend the short 25 minute float-plane/chopper flight from Nadi rather than the ferry-boat transfer option. Crossing the choppy seas in a small vessel can be daunting for some, and eats up most of a day you’d rather spend on the beach or beneath the waves.
So, let’s dive right in, shall we?

Eagle rays patrol the edge of the reef. Olympus Tough TG3, Dive Housing.
The first adventure of every Viwa dive excursion is crossing its barrier reef. There’s a small gap forming a channel about a hundred meters off-shore that the boat has to blast through in order to get to the deeper waters beyond. Because of the shape and location of the gap, it inevitably meant jumping some big waves whilst passing quite close to the rusting wreck of a vessel that didn’t quite get it right. Yikes. Once through the gap the sea is your oyster and a myriad of potential dive sites awaits you.

Clownfish and it’s Anemone, Olympus Tough TG3, Macro setting, Dive Housing

Clownfish guarding eggs, Olympus Tough TG3, Macro setting, Dive Housing
Unlike the Rainbow Reef where my focus was on the smaller denizens of the sea, in the waters surrounding Viwa it was some of the larger creatures and vistas that caught my gaze and lens. That’s not to say there weren’t plenty of the little guys around (as you see above), but there were certainly an abundance of larger fish one simply couldn’t ignore.
The Viwa dive sites we visited (The Zoo, Coral Garden and Fantasea) were all characterized by a fairly deep dive profile and rolling coral mounts that dropped off into the vanishing deep blue of the open ocean. We would slowly dive along the edge of these precipices, splitting our attention between the corals and rocks on one side, and the vast blue nothing on the other - waiting for something to appear.

Bilo leading the way, Olympus Tough TG3, Dive Housing
I was fortunate to be the only diver at Viwa that week and so was able to enjoy the solitude of the sea with just Bilo, the dive leader, to guide me to his favorite spots. He always seemed to know where to stop and wait for the magic to happen, and he clearly liked the pelagic fish most of all.

Giant Trevally swims in from the blue, Olympus Tough TG3, Dive Housing
Schools of Barracuda and Rainbow Runners crossing paths, Olympus Tough TG3, Dive Housing

Barred Mackerel gets close, Olympus Tough TG3, Dive Housing
One of the neat things about stopping to observe the fish is the opportunity to note behavior you might not have noticed before. Bilo and I hovered motionless in one spot for about 10 minutes just watching the world swim by and noting how the fish reacted (or didn’t) to our presence. A glint of sunlight in my peripheral vision attracted me to one interesting and unexpected display. A pair of Dogtooth Tuna were playing around in the open water, one swimming just above the other but tilted so that it was swimming on it’s side, and smacking the tuna bellow it with it’s tail as it went. I literally laughed into my regulator watching this playtime unfold before us, imagining one to be the older sibling mercilessly teasing the other. Not what I was expecting to see from a fish that can reach nearly 2.5m in length and 150kg.

Dogtooth Tuna Playing around. Olympus Tough TG3, Dive Housing.
At the dive site known as “The Zoo”, the sheer volume of fish on display can not be understated. At any moment any of the above would show up, plus a variety of Turtles, Rays and yes, Sharks, including a mismatched pair of Black Tip and White Tip Reef Sharks that together seemed to be patrolling the zone between reef and the deep.

Black Tip Reef Shark, Olympus Tough TG3, Dive Housing

Eagle Ray Pair, Olympus Tough TG3, Dive Housing

Looking for the EAC? Olympus Tough TG3, Dive Housing

Lone Barracuda follows me around for a bit. Olympus Tough TG3, Dive Housing

White Tip gets real close, Olympus Tough TG3, Dive Housing
For snorkelers, the area immediately off the beach is a bit barren, but venturing closer to the barrier reef quickly produces more interesting sites and varieties of fish to see. You probably want to do this with a buddy, as it requires getting a bit far from shore and the outbound current can be strong depending on the tides. I challenge you to find the garden of colorful giant clams, it’s hidden in plain sight straight off shore from the resort’s gear hut. I also highly recommend the guided snorkeling tour, which takes you by boat to a site not otherwise reachable from the resort. There we saw more sharks (including a leopard shark! - no photo I’m afraid) and more varieties of coral and fish.

Resting Grouper, Olympus Tough TG3, Dive Housing.
You could probably spend your entire Viwa dive trip at “The Zoo” and not get bored (we went twice), but there’s plenty to see at all the sites and plenty of sites I didn’t yet see! I’m often curious how dive operators in these places discover and plot-out the dive sites they’ll take visitors to. Is it by trial and error, general local knowledge, or perhaps leveraging past research? If you have some ideas I’d love to hear from you in the comments section down bellow.

School of Trevally, Olympus Tough TG3, Dive Housing
Regardless which site you dive, seeing Viwa from beneath the waves is a must. You can plunge right into the wild and be back at the resort in time for lunch. It's hidden treasure trove of natural beauty forming the perfect compliment to your relaxing beach-time topside.

Bilo leads back out of the cave, Olympus Tough TG3, Dive Housing
The Road to Hana and beyond — narrow roads, raw coastline, and the question every traveler faces: turn back, or keep going?